Difference between revisions of "Button Controller"
(→Installing the Button Controllers app) (Tag: Visual edit) |
|||
| Line 5: | Line 5: | ||
===<big>Installing the Button Controllers app</big>=== | ===<big>Installing the Button Controllers app</big>=== | ||
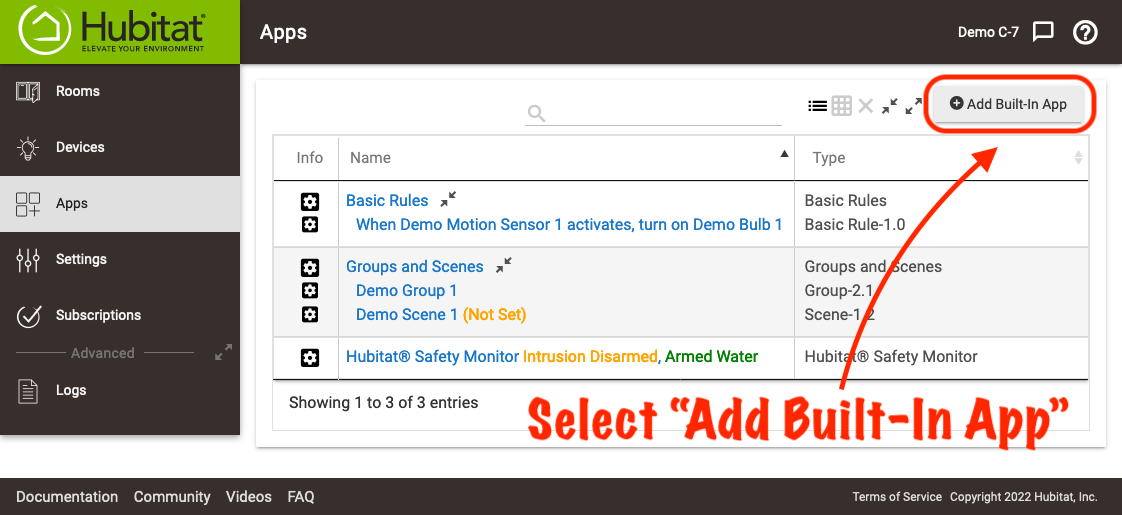
| − | #<big>From the sidebar of your hub, select '''Apps''' and press the '''Add Built-In App''' button.</big>[[File:Install Built-In App 2.0.png|none|thumb|600x600px]] | + | #<big>From the sidebar of your hub, select '''Apps''' and press the '''Add Built-In App''' button.</big>[[File:Install Built-In App 2.0.png|none|thumb|600x600px|link=https://docs.hubitat.com/images/7/77/Install_Built-In_App_2.0.png |
| − | #<big>Choose '''Button Controllers''' from the list of Hubitat Elevation built-In apps.</big>[[File:Install Button Controllers 2.0.png|none|thumb|600x600px]] | + | ]] |
| + | #<big>Choose '''Button Controllers''' from the list of Hubitat Elevation built-In apps.</big>[[File:Install Button Controllers 2.0.png|none|thumb|600x600px|link=https://docs.hubitat.com/images/b/b1/Install_Button_Controllers_2.0.png | ||
| + | ]] | ||
#<big>If you haven't already, add your button device using the process found in [[Discovering your Devices]]. In the case of Lutron Pico buttons, you will use the Lutron mobile app to add them to the Lutron Smart Bridge Pro or Lutron RA2 Select Main Repeater, in combination with the [[Lutron Integrator]] app to add them to your Hubitat Elevation hub.</big> | #<big>If you haven't already, add your button device using the process found in [[Discovering your Devices]]. In the case of Lutron Pico buttons, you will use the Lutron mobile app to add them to the Lutron Smart Bridge Pro or Lutron RA2 Select Main Repeater, in combination with the [[Lutron Integrator]] app to add them to your Hubitat Elevation hub.</big> | ||
| Line 12: | Line 14: | ||
#<big>Open the '''Button Controllers''' app on your hub.</big> | #<big>Open the '''Button Controllers''' app on your hub.</big> | ||
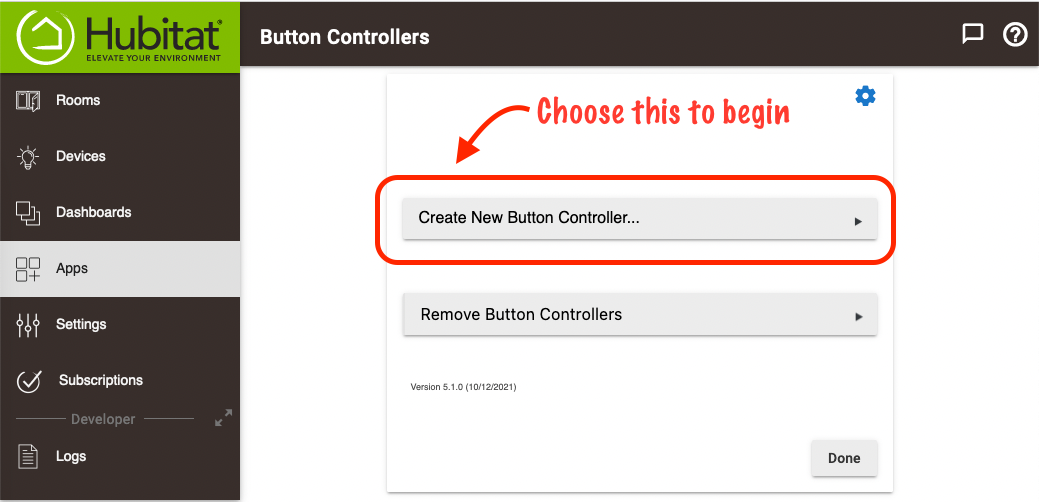
| − | #<big>Select '''Create New Button Controller 3.1'''</big>[[File:Create new Button Controller 3.1.png|none|thumb|600x600px]] | + | #<big>Select '''Create New Button Controller 3.1'''</big>[[File:Create new Button Controller 3.1.png|none|thumb|600x600px|link=https://docs.hubitat.com/images/0/00/Create_new_Button_Controller_3.1.png |
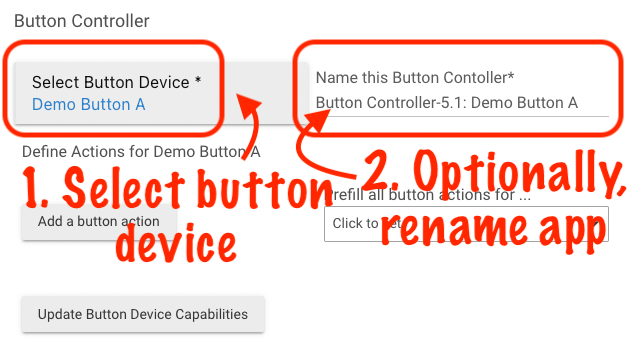
| − | #<big>Name the Button Controller 3.1 child app and select your button device.</big>[[File:Prefill Button Controller 3.1 actions.png|none|thumb|600x600px]] | + | ]] |
| − | #<big>You may now choose to allow Button Controller 3.1 to automatically pre-fill selected actions for all available device buttons, or you can choose to manually add button actions for specific buttons.</big>[[File:Prefill or manual add BC 3.1 actions.png|none|thumb|600x600px]] | + | #<big>Name the Button Controller 3.1 child app and select your button device.</big>[[File:Prefill Button Controller 3.1 actions.png|none|thumb|600x600px|link=https://docs.hubitat.com/images/2/29/Prefill_Button_Controller_3.1_actions.png |
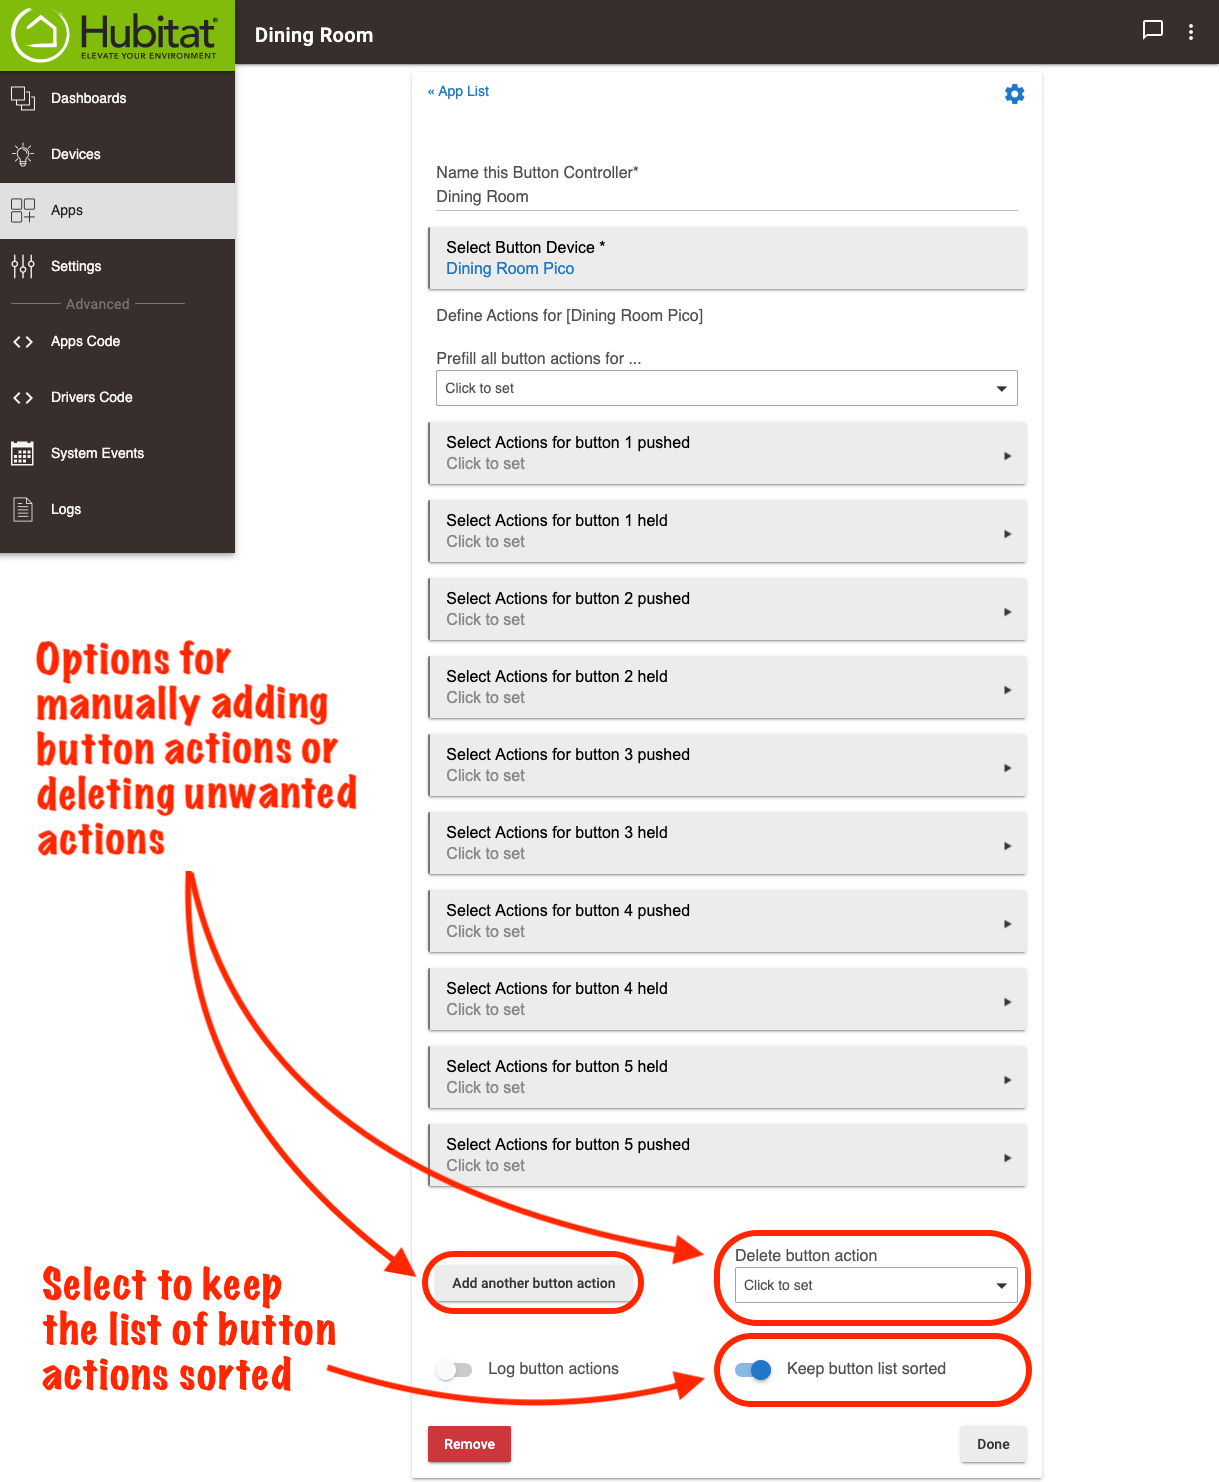
| − | #<big>Button Controller 3.1 allows maximum flexibility when adding and removing button actions. If you choose to pre-fill button actions, you will still be able to delete button actions you don't want afterward, or add additional button actions as needed. You may keep the list of button actions sorted numerically by selecting the option '''Keep button list sorted'''.</big>[[File:Add - delete and sort BC 3.1 actions.png|none|thumb|729x729px]] | + | ]] |
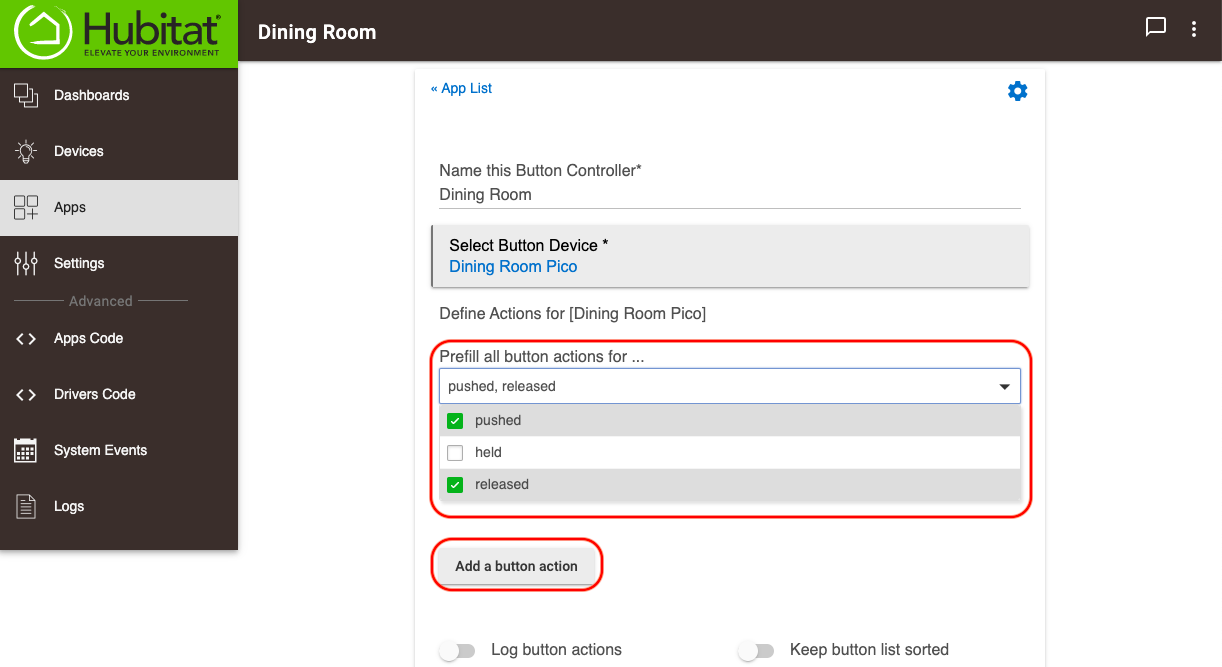
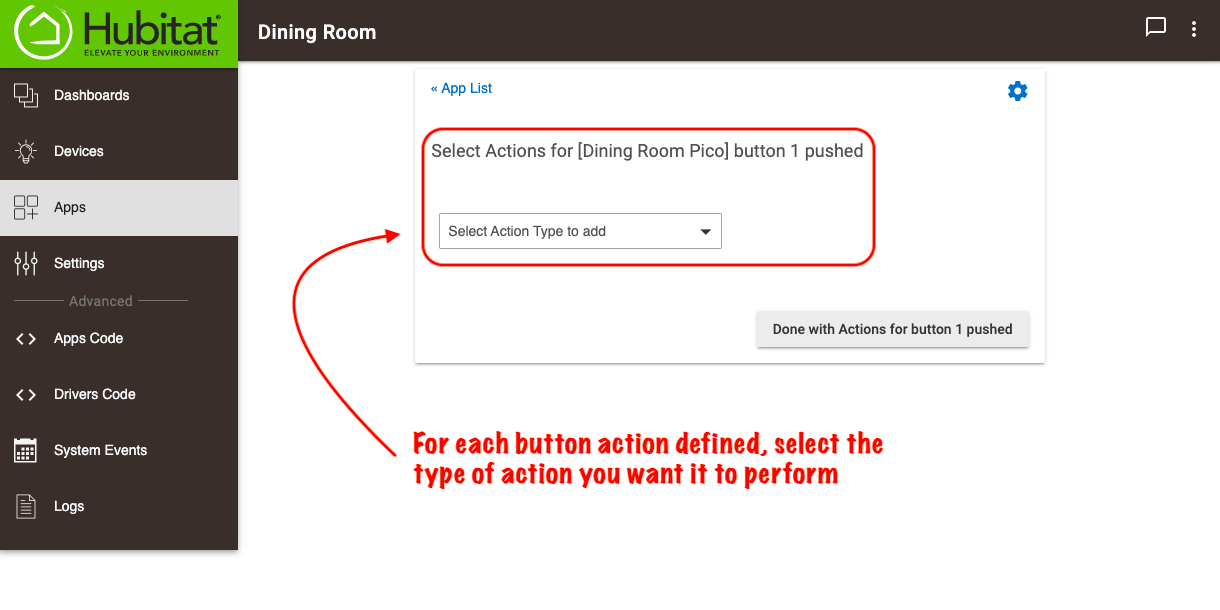
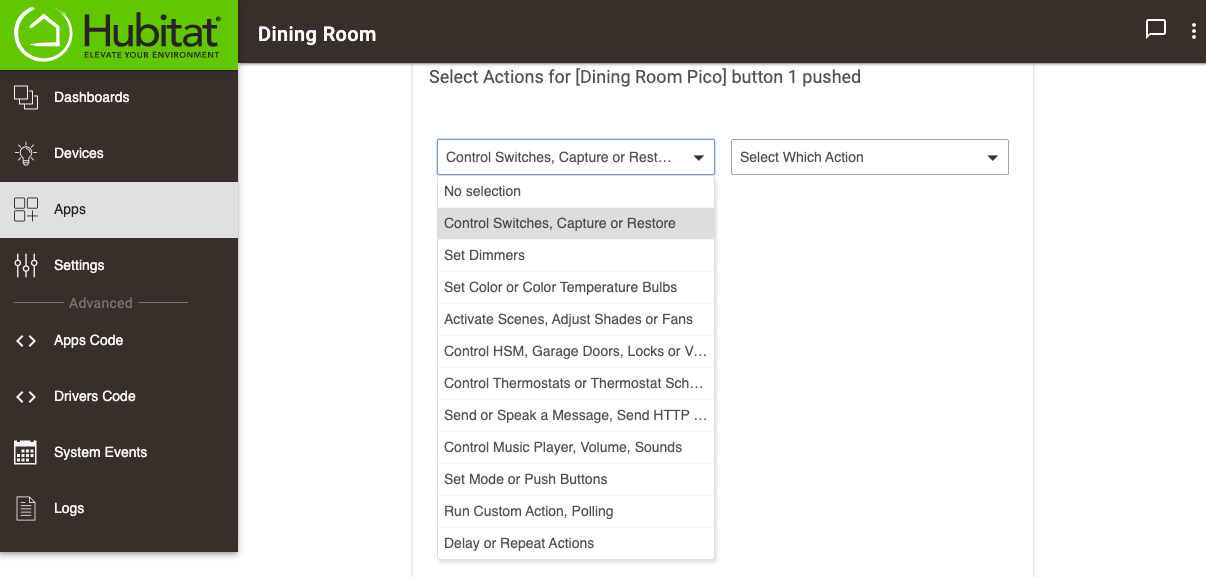
| − | #<big>For each button action defined, select the action type you want to perform. There are a wide range of action types that can be defined and each action type will have specific options available relating to the action type.</big>[[File:BC 3.1 select action type.png|none|thumb|600x600px]][[File:BC 3.1 define action type.png|none|thumb|600x600px]][[File:BC 3.1 define action type optons.png|none|thumb|600x600px]] | + | #<big>You may now choose to allow Button Controller 3.1 to automatically pre-fill selected actions for all available device buttons, or you can choose to manually add button actions for specific buttons.</big>[[File:Prefill or manual add BC 3.1 actions.png|none|thumb|600x600px|link=https://docs.hubitat.com/images/4/48/Prefill_or_manual_add_BC_3.1_actions.png |
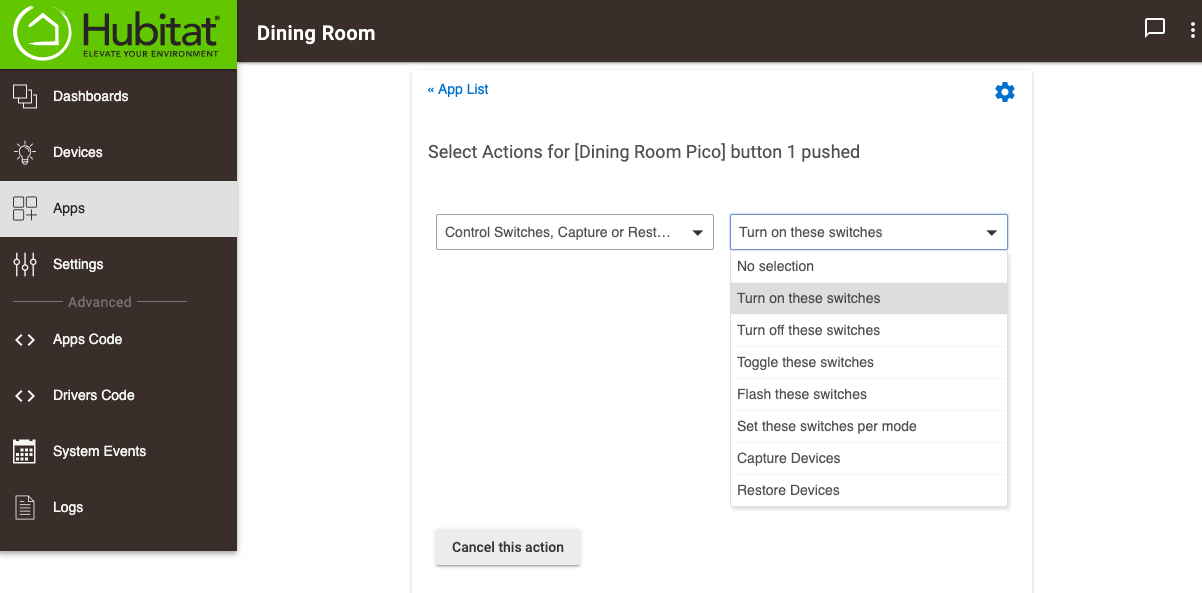
| − | #<big>Depending on the button action type and its options, you will have specific types of devices or attributes that can be controlled.</big>[[File:Define BC 3.1 action type device or attribute.png|none|thumb|600x600px]] | + | ]] |
| − | #<big>You may add additional action types for the same button actions. This can be helpful to control multiple device types with a single button press.</big>[[File:BC 3.1 define released action.png|none|thumb|600x600px]] | + | #<big>Button Controller 3.1 allows maximum flexibility when adding and removing button actions. If you choose to pre-fill button actions, you will still be able to delete button actions you don't want afterward, or add additional button actions as needed. You may keep the list of button actions sorted numerically by selecting the option '''Keep button list sorted'''.</big>[[File:Add - delete and sort BC 3.1 actions.png|none|thumb|729x729px|link=https://docs.hubitat.com/images/8/8d/Add_-_delete_and_sort_BC_3.1_actions.png |
| − | #<big>It's also possible to add actions so they occur in a specific order, even if there are already existing actions defined. To do this, use the '''Insert Action Before''' drop-down menu.</big>[[File:BC 3.1 insert action before.png|none|thumb|600x600px]] | + | ]] |
| + | #<big>For each button action defined, select the action type you want to perform. There are a wide range of action types that can be defined and each action type will have specific options available relating to the action type.</big>[[File:BC 3.1 select action type.png|none|thumb|600x600px|link=https://docs.hubitat.com/images/d/d6/BC_3.1_select_action_type.png | ||
| + | ]][[File:BC 3.1 define action type.png|none|thumb|600x600px|link=https://docs.hubitat.com/images/f/f7/BC_3.1_define_action_type.png | ||
| + | ]][[File:BC 3.1 define action type optons.png|none|thumb|600x600px|link=https://docs.hubitat.com/images/4/43/BC_3.1_define_action_type_optons.png | ||
| + | ]] | ||
| + | #<big>Depending on the button action type and its options, you will have specific types of devices or attributes that can be controlled.</big>[[File:Define BC 3.1 action type device or attribute.png|none|thumb|600x600px|link=https://docs.hubitat.com/images/9/90/Define_BC_3.1_action_type_device_or_attribute.png | ||
| + | ]] | ||
| + | #<big>You may add additional action types for the same button actions. This can be helpful to control multiple device types with a single button press.</big>[[File:BC 3.1 define released action.png|none|thumb|600x600px|link=https://docs.hubitat.com/images/3/3b/BC_3.1_define_released_action.png | ||
| + | ]] | ||
| + | #<big>It's also possible to add actions so they occur in a specific order, even if there are already existing actions defined. To do this, use the '''Insert Action Before''' drop-down menu.</big>[[File:BC 3.1 insert action before.png|none|thumb|600x600px|link=https://docs.hubitat.com/images/7/7e/BC_3.1_insert_action_before.png | ||
| + | ]] | ||
===<big>Configuring held and released actions</big>=== | ===<big>Configuring held and released actions</big>=== | ||
<big>While not supported by all button devices, some do support both held and released actions. These can be used with dimmers and bulbs that support smooth dimming. It's particularly helpful when you are able to hold a button to increase, or decrease light levels, and stop the change when the button is released. The Hubitat Hue Integration is one such application where this can be used if your button device also supports held and released actions.</big> | <big>While not supported by all button devices, some do support both held and released actions. These can be used with dimmers and bulbs that support smooth dimming. It's particularly helpful when you are able to hold a button to increase, or decrease light levels, and stop the change when the button is released. The Hubitat Hue Integration is one such application where this can be used if your button device also supports held and released actions.</big> | ||
| − | #<big>When connected to Hubitat Elevation via the Lutron Integration, the Lutron Pico remotes are one type of button device that supports both held and released button actions. Using a Lutron Pico as the example device, define the action that should occur when the increase button is '''held'''. For a Lutron Pico remote, this will be button 2, and the action type option will be '''Start raising dimmers'''.</big>[[File:BC 3.1 define held action.png|none|thumb|600x600px]] | + | #<big>When connected to Hubitat Elevation via the Lutron Integration, the Lutron Pico remotes are one type of button device that supports both held and released button actions. Using a Lutron Pico as the example device, define the action that should occur when the increase button is '''held'''. For a Lutron Pico remote, this will be button 2, and the action type option will be '''Start raising dimmers'''.</big>[[File:BC 3.1 define held action.png|none|thumb|600x600px|link=https://docs.hubitat.com/images/8/8f/BC_3.1_define_held_action.png |
| − | #<big>If you define that a dimmer should '''start raising when a button is held''', then you must also define what happens when the button is '''released'''. If you do not do this, the light will continue to increase until it reaches maximum brightness, even though you have released the button.</big>[[File:BC 3.1 define release actions.png|none|thumb|600x600px]] | + | ]] |
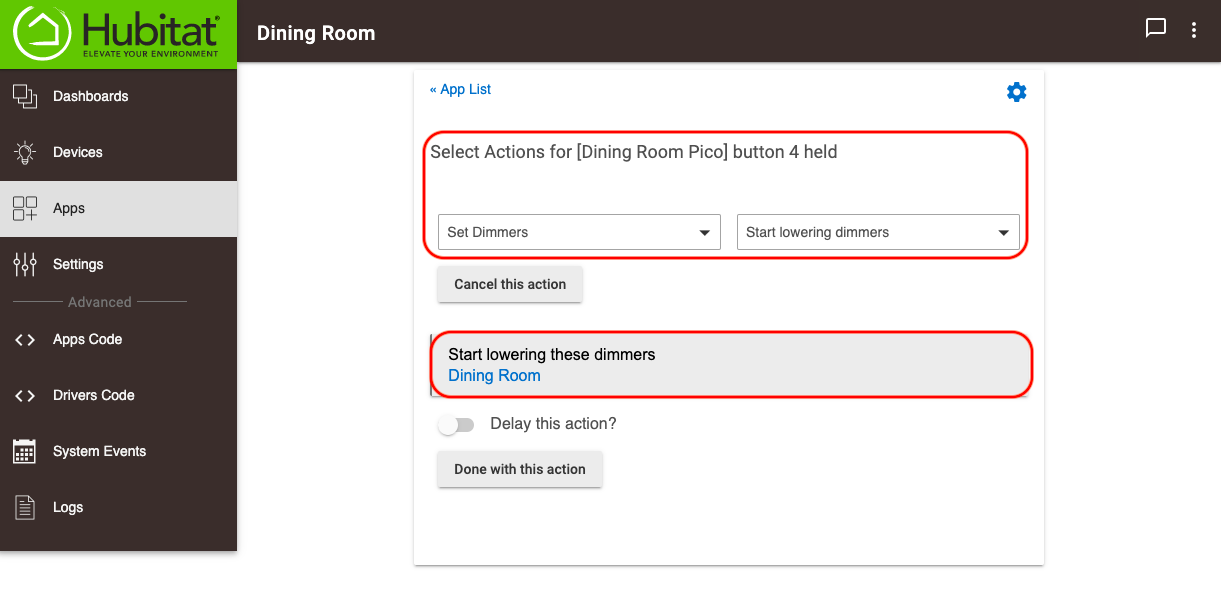
| − | #<big>Define the button action for '''decreasing''' the dimmer using the same method above, but instead use the button action type option, '''Start lowering dimmers.''' For the Lutron Pico remote used in our example, this will be button 4.</big>[[File:BC 3.1 define released action for lowering.png|none|thumb|600x600px]] | + | #<big>If you define that a dimmer should '''start raising when a button is held''', then you must also define what happens when the button is '''released'''. If you do not do this, the light will continue to increase until it reaches maximum brightness, even though you have released the button.</big>[[File:BC 3.1 define release actions.png|none|thumb|600x600px|link=https://docs.hubitat.com/images/7/72/BC_3.1_define_release_actions.png |
| − | #<big>If you define that a dimmer should '''start lowering when a button is held''', then you must also define what happens when that same button is '''released'''. If you do not do this, the light will continue to decrease until is reaches minimum brightness, even though you have released the button.</big>[[File:BC 3.1 define released lowering action.png|none|thumb|600x600px]] | + | ]] |
| + | #<big>Define the button action for '''decreasing''' the dimmer using the same method above, but instead use the button action type option, '''Start lowering dimmers.''' For the Lutron Pico remote used in our example, this will be button 4.</big>[[File:BC 3.1 define released action for lowering.png|none|thumb|600x600px|link=https://docs.hubitat.com/images/0/03/BC_3.1_define_released_action_for_lowering.png | ||
| + | ]] | ||
| + | #<big>If you define that a dimmer should '''start lowering when a button is held''', then you must also define what happens when that same button is '''released'''. If you do not do this, the light will continue to decrease until is reaches minimum brightness, even though you have released the button.</big>[[File:BC 3.1 define released lowering action.png|none|thumb|600x600px|link=https://docs.hubitat.com/images/5/5f/BC_3.1_define_released_lowering_action.png]] | ||
__FORCETOC__ | __FORCETOC__ | ||
Revision as of 21:44, 26 March 2021

Wireless buttons are a great way to quickly change modes, control lighting, override automations and even protect loved ones when you are not able. With Button Controller 3.1, an unlimited number of buttons can be configured to control devices, or attributes of other apps and drivers, providing the quickest and easiest way to program your buttons.
Contents
Installing the Button Controllers app
- From the sidebar of your hub, select Apps and press the Add Built-In App button.
- Choose Button Controllers from the list of Hubitat Elevation built-In apps.
- If you haven't already, add your button device using the process found in Discovering your Devices. In the case of Lutron Pico buttons, you will use the Lutron mobile app to add them to the Lutron Smart Bridge Pro or Lutron RA2 Select Main Repeater, in combination with the Lutron Integrator app to add them to your Hubitat Elevation hub.

Configuring your buttons
- Open the Button Controllers app on your hub.
- Select Create New Button Controller 3.1
- Name the Button Controller 3.1 child app and select your button device.
- You may now choose to allow Button Controller 3.1 to automatically pre-fill selected actions for all available device buttons, or you can choose to manually add button actions for specific buttons.
- Button Controller 3.1 allows maximum flexibility when adding and removing button actions. If you choose to pre-fill button actions, you will still be able to delete button actions you don't want afterward, or add additional button actions as needed. You may keep the list of button actions sorted numerically by selecting the option Keep button list sorted.
- For each button action defined, select the action type you want to perform. There are a wide range of action types that can be defined and each action type will have specific options available relating to the action type.
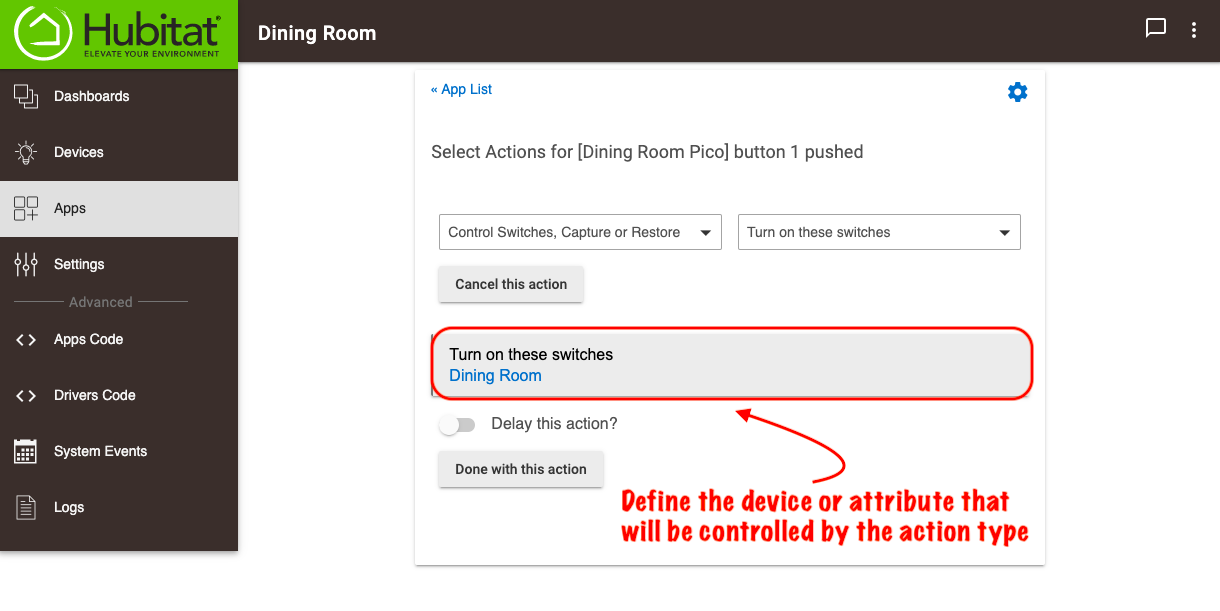
- Depending on the button action type and its options, you will have specific types of devices or attributes that can be controlled.
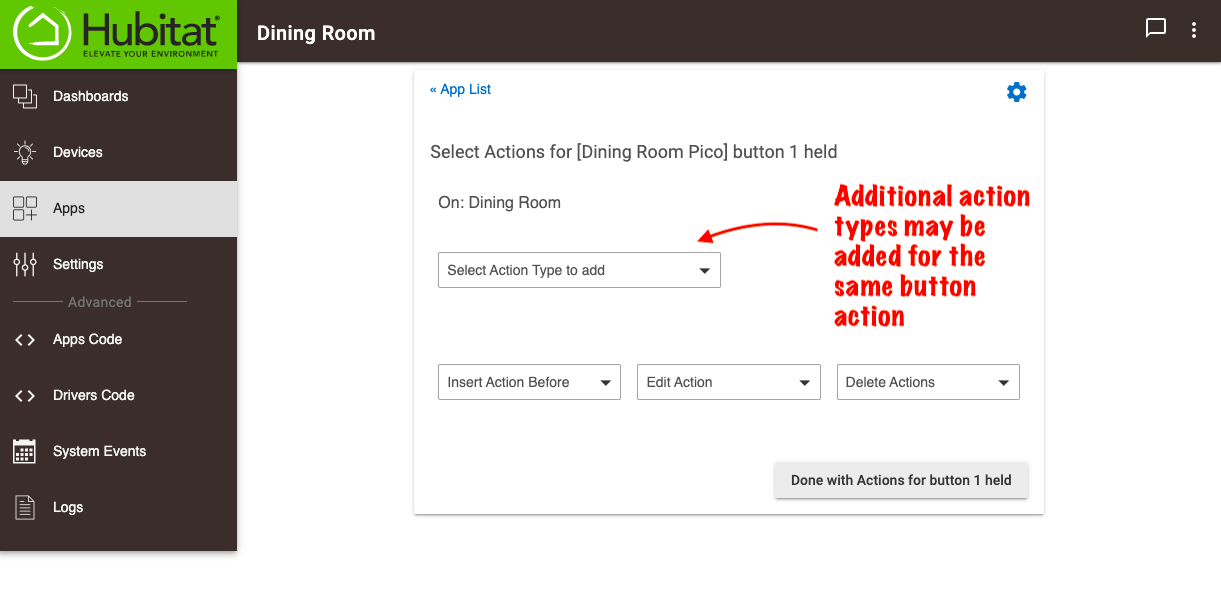
- You may add additional action types for the same button actions. This can be helpful to control multiple device types with a single button press.
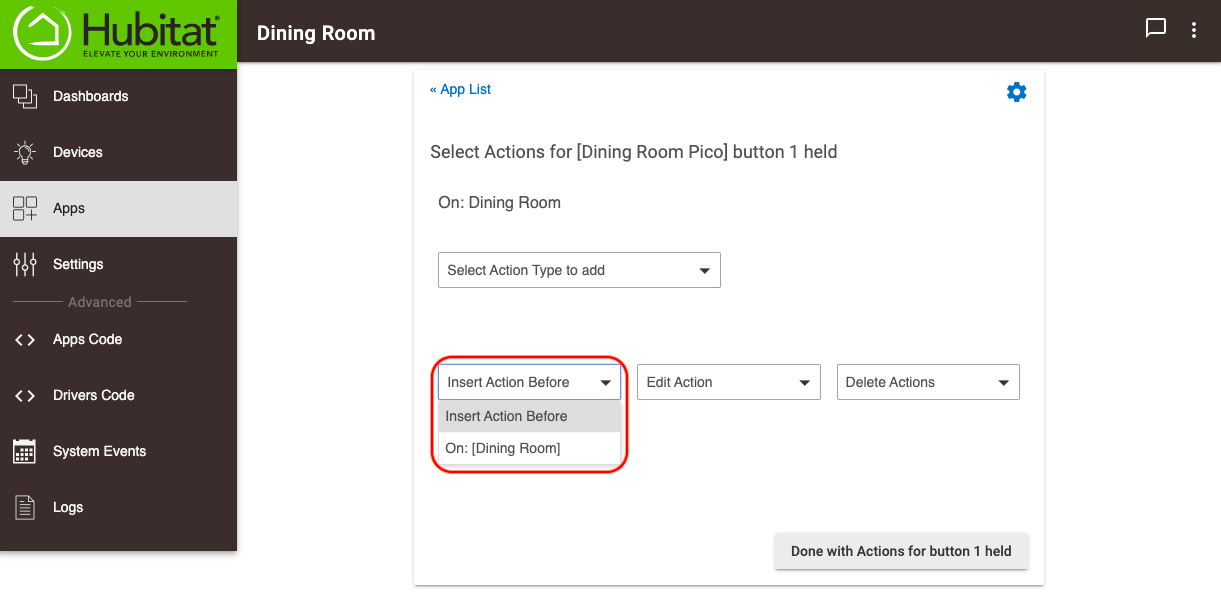
- It's also possible to add actions so they occur in a specific order, even if there are already existing actions defined. To do this, use the Insert Action Before drop-down menu.
Configuring held and released actions
While not supported by all button devices, some do support both held and released actions. These can be used with dimmers and bulbs that support smooth dimming. It's particularly helpful when you are able to hold a button to increase, or decrease light levels, and stop the change when the button is released. The Hubitat Hue Integration is one such application where this can be used if your button device also supports held and released actions.
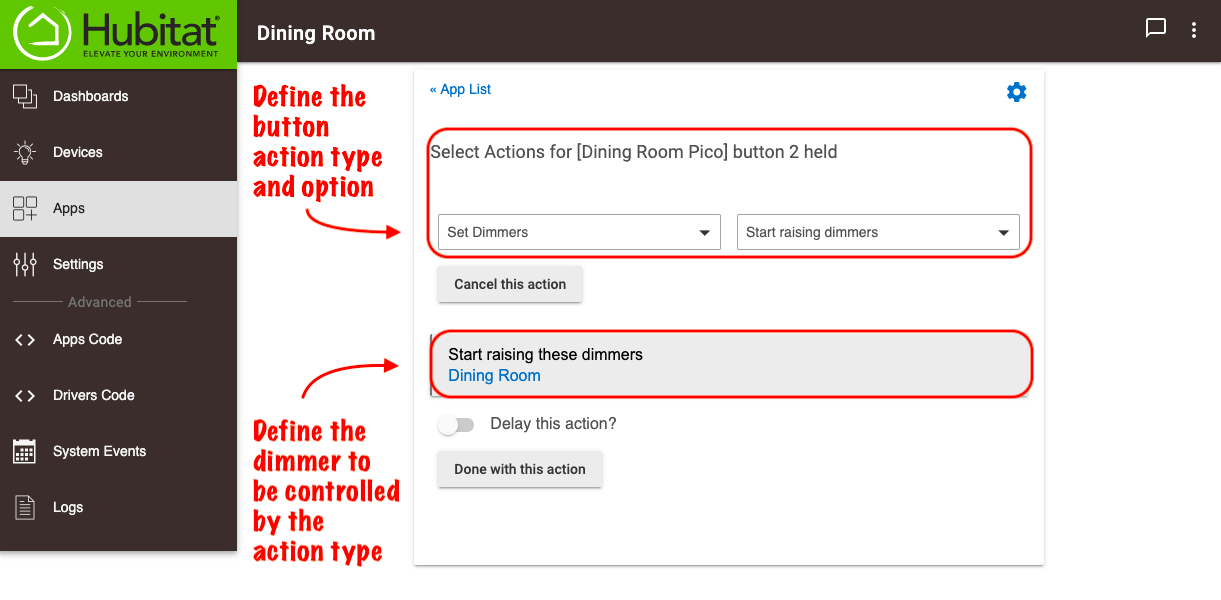
- When connected to Hubitat Elevation via the Lutron Integration, the Lutron Pico remotes are one type of button device that supports both held and released button actions. Using a Lutron Pico as the example device, define the action that should occur when the increase button is held. For a Lutron Pico remote, this will be button 2, and the action type option will be Start raising dimmers.
- If you define that a dimmer should start raising when a button is held, then you must also define what happens when the button is released. If you do not do this, the light will continue to increase until it reaches maximum brightness, even though you have released the button.
- Define the button action for decreasing the dimmer using the same method above, but instead use the button action type option, Start lowering dimmers. For the Lutron Pico remote used in our example, this will be button 4.
- If you define that a dimmer should start lowering when a button is held, then you must also define what happens when that same button is released. If you do not do this, the light will continue to decrease until is reaches minimum brightness, even though you have released the button.

