Groups and Scenes

Groups and Scenes are two distinct ways combine devices for simplified automation.
Groups let you select a collection bulbs, dimmers and switches that you would like to control together as if they were a single device. This means they will all turn on and off, adjust levels, and change color together using a single "group device" for use with any app that supports switches, dimmers, or bulbs. In addition to making lighting easier to use, the Zigbee Group Messaging option allows you to group supported Zigbee lights together to eliminate the "popcorn effect" when you turn them on or adjust levels.
Scenes are used to capture devices in their unique states and later "recall" those exact states as often as you want. Once that scene is captured, Hubitat Elevation can activate devices to the same captured state. The scene is linked to a virtual Scene Activator device that can be used with Simple Automation Rules, Motion Lighting, Button Controller, Rule Machine, Hubitat Dashboard, with Alexa and Google Assistant, or in any app that supports switch or button devices.
Contents
Installing Hubitat Groups and Scenes
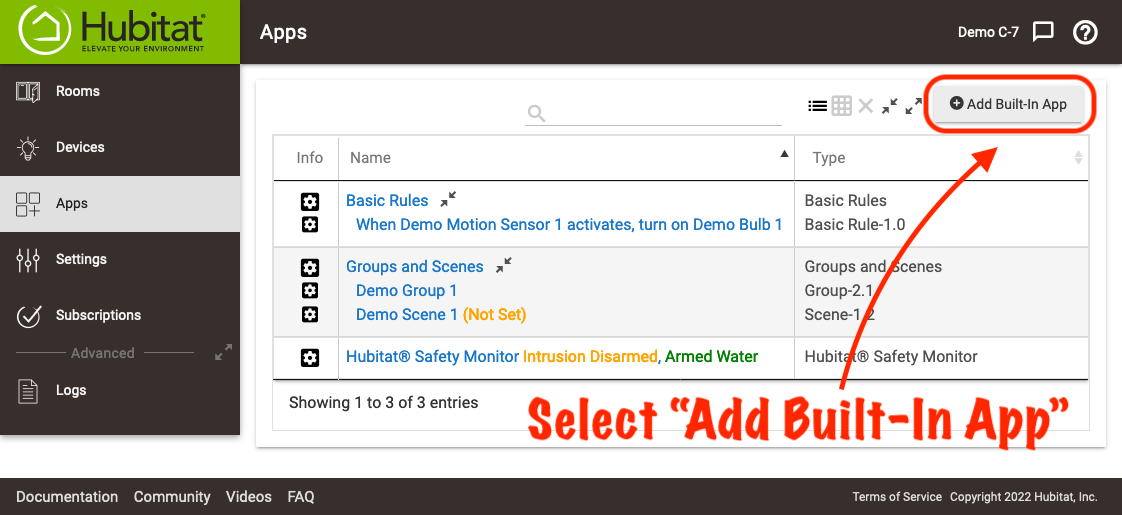
- From the sidebar of your hub, select Apps and press the Add Built-In App button.
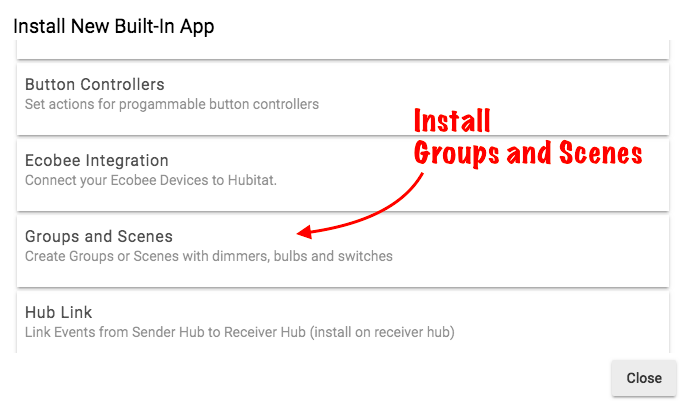
- Choose Groups and Scenes from the list of Hubitat Elevation Built-In Apps
Building a Hubitat Group
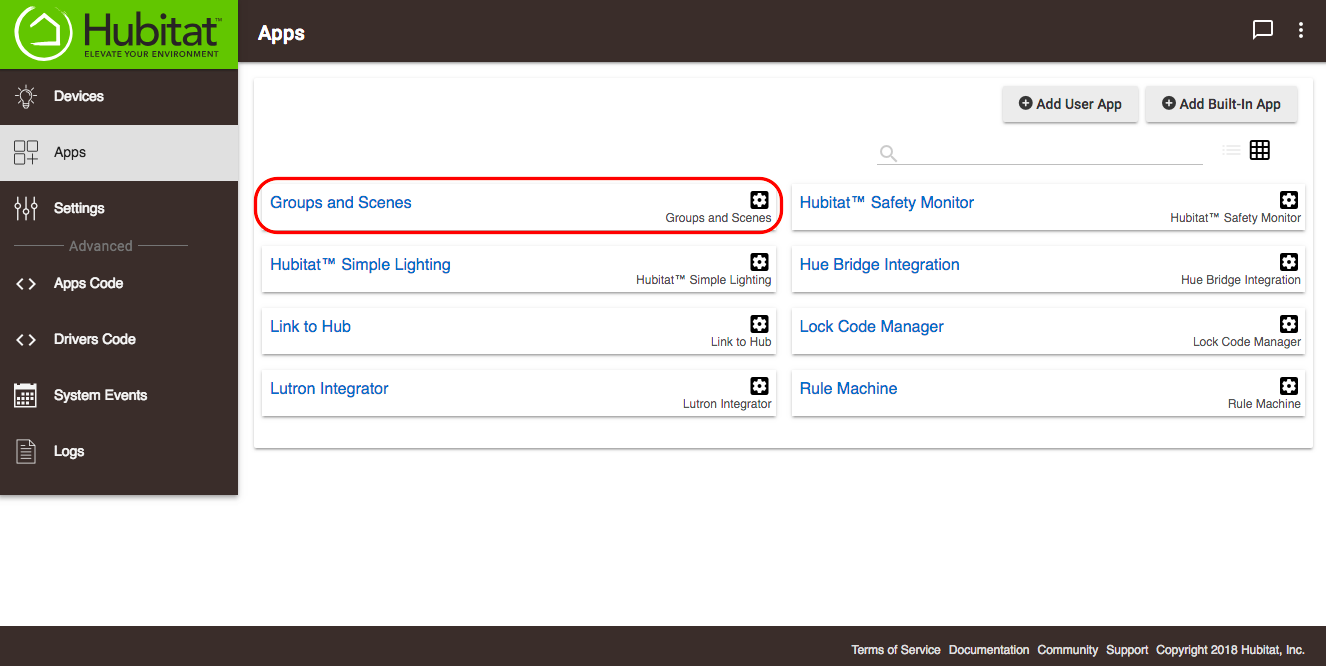
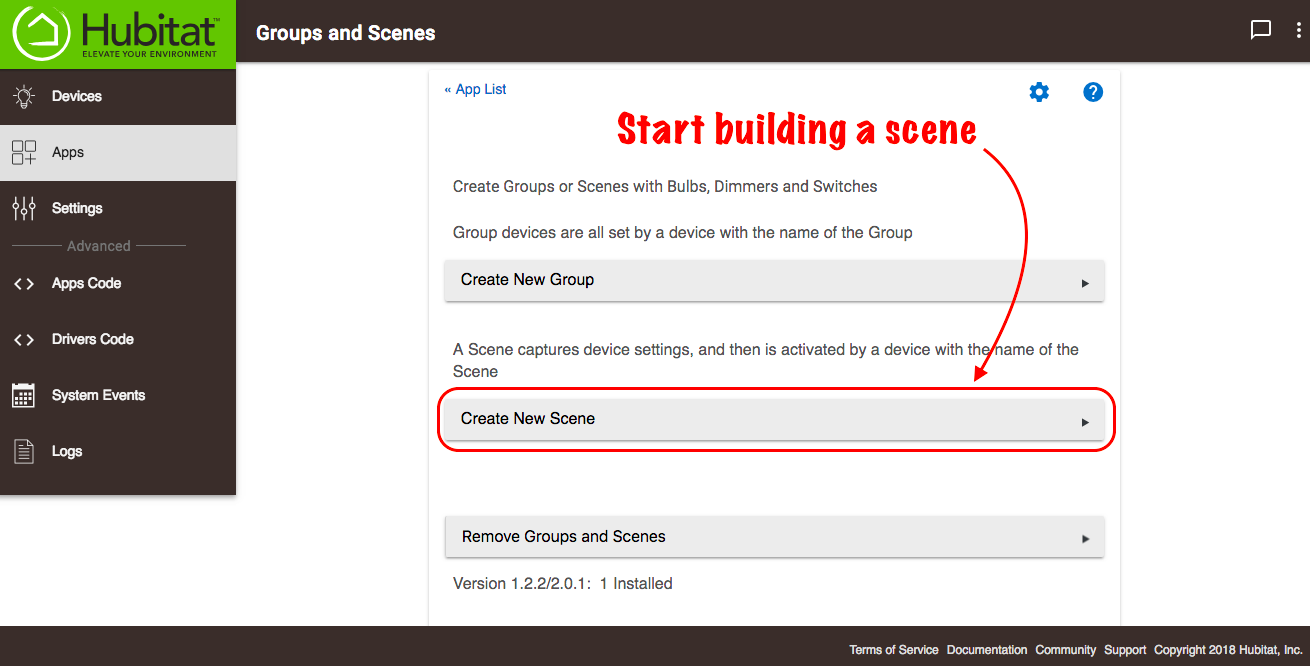
- Select Apps in the hub sidebar and then open the Groups and Scenes app.
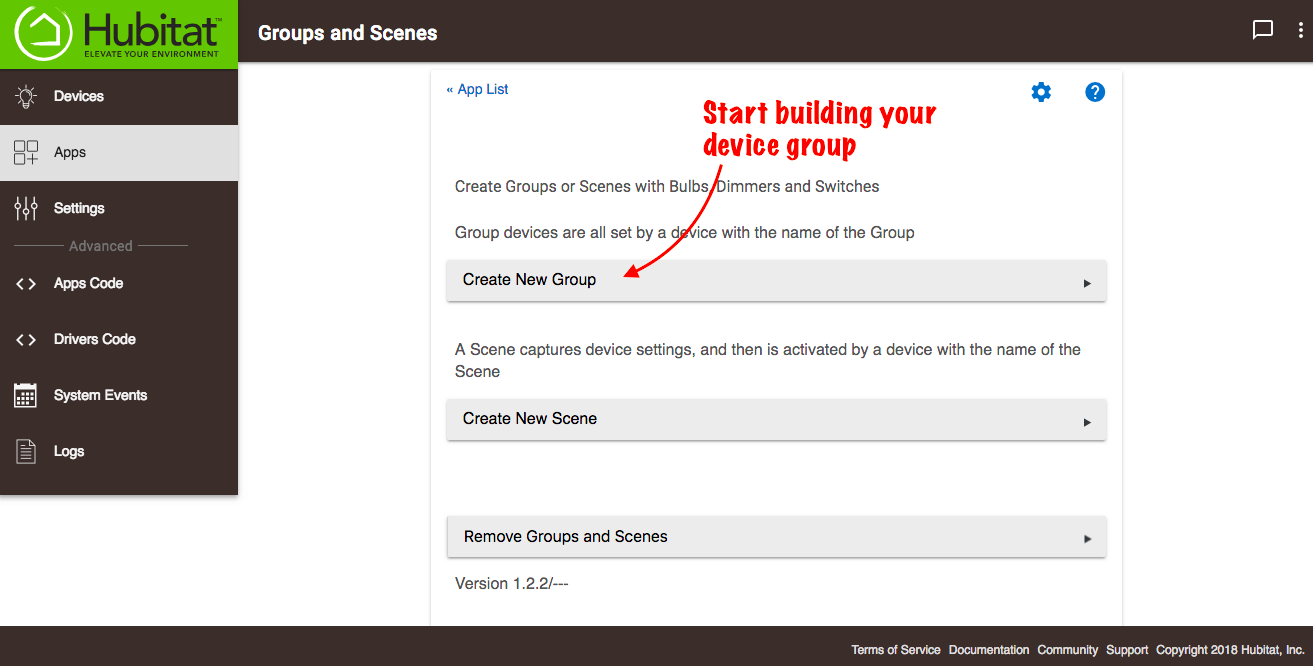
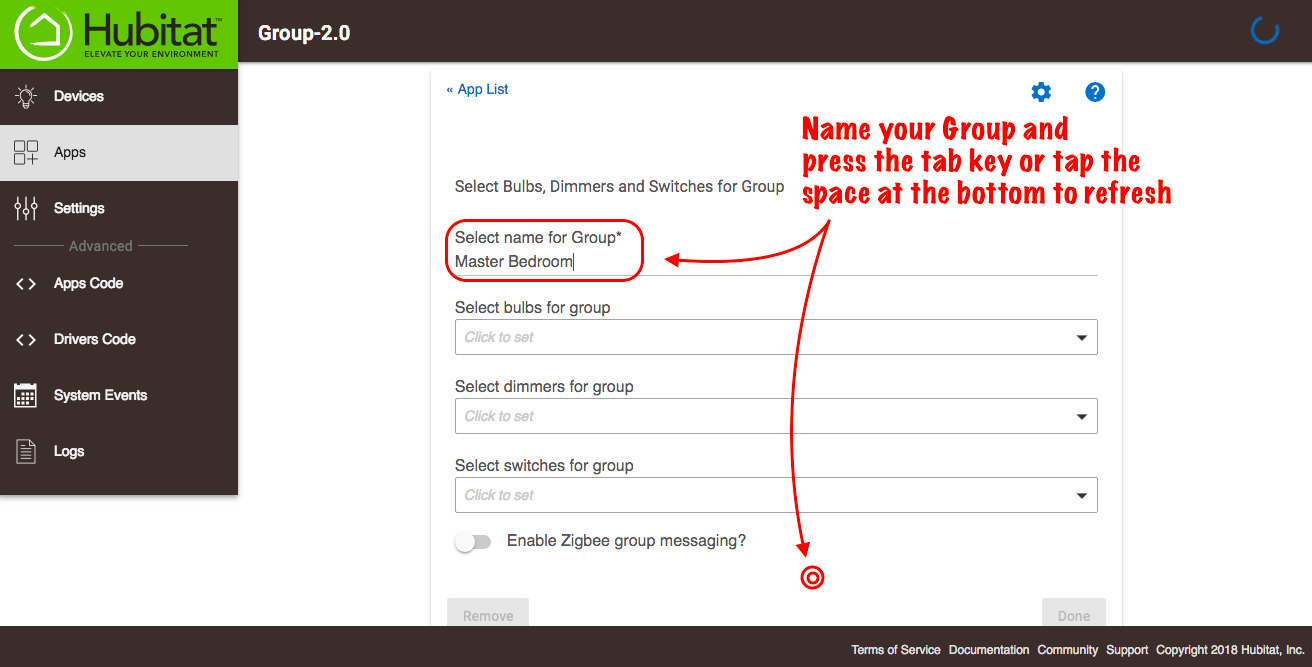
- Select Create New Group.
- Give your new group a name, then press the Tab key or click/tap in the space at the bottom of the setup page to refresh. Your Hubitat Group name is the same name you will use to control the group with Alexa and Google Assistant, so be sure to make it easily understandable.
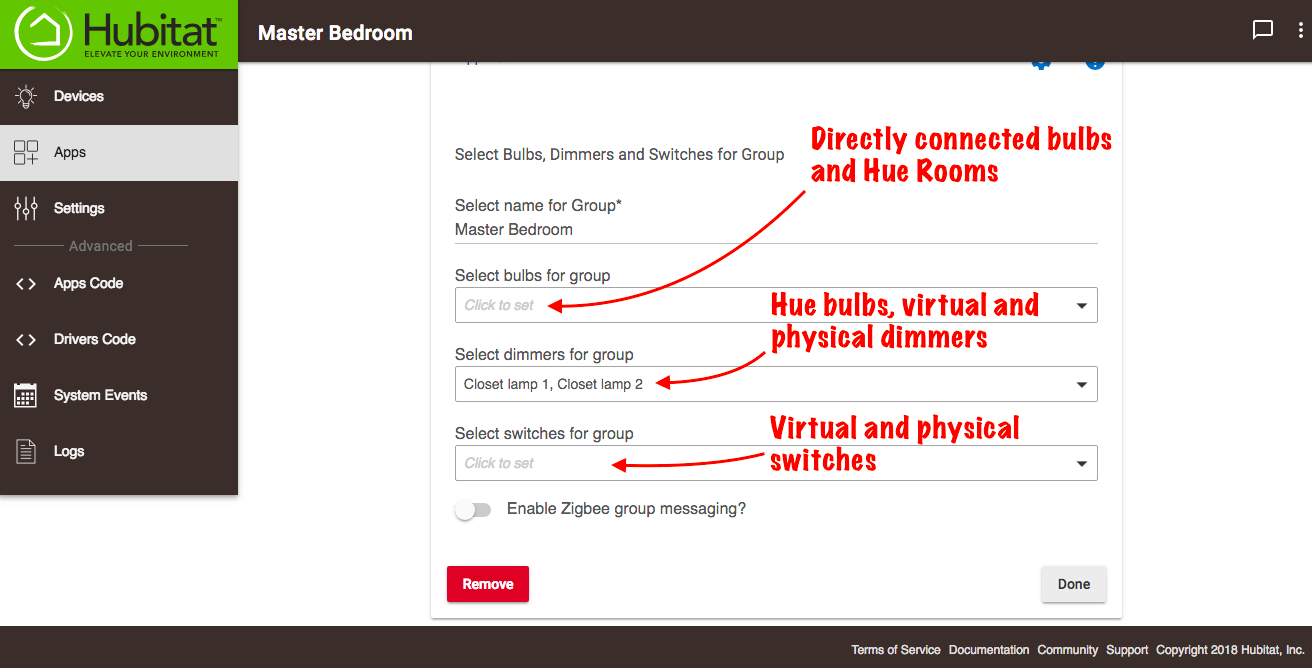
- Use the drop-down menus to select the devices you'd like to include in your group. You can include bulbs, dimmers and switches. You will find your devices in one of the drop-downs, Bulbs for group, Dimmers for group, or Switches for group, depending on what capabilities the device supports.
- Select any desired options:
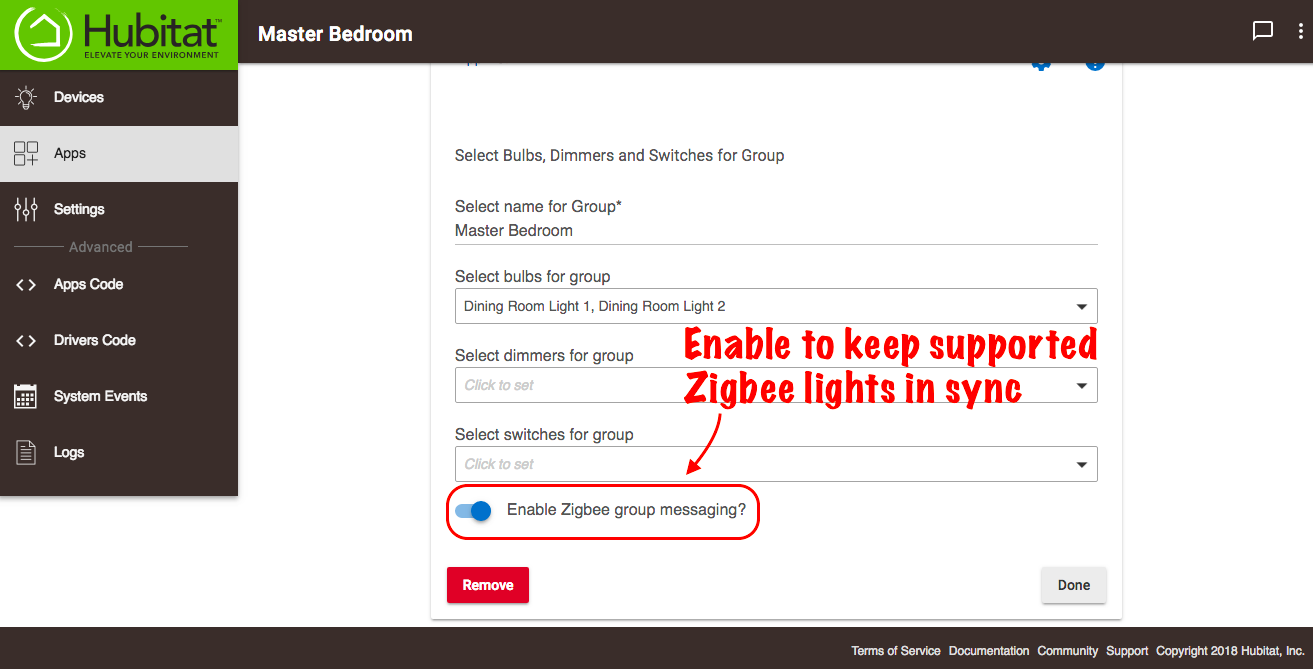
- Enable Zigbee group messaging: This option uses the Zigbee multicast capability for supported devices in order to more efficiently deliver Zigbee data. This can potentially reduce or eliminate the so-called "popcorn effect," where lights turn on or adjust one by one instead of simultaneously. (This option can still be enabled even if the group contains non-Zigbee devices; Hubitat will still use Zigbee group messaging on the devices that support it.)
- Select group device type: determines the capabilities exposed by the group device the app creates. For example, choosing "bulb" will cause the group device to have commands like "Set Color" and "Set Level," whereas "switch" will only have "On" and "Off."
- Use group device to indicate if any members are on: if enabled, the group device will show its switch status as on if any members of the group are on (and off if all are off).
- Use group device to indicate if any members are off: if enabled, the group device will show its switch status as off if any members of the group are off (and on if all are on). This cannot be used simultaneously with the previous option.
- Show group state in group device: adds a "groupState" attribute to the device (see "Current States" on the group device page), which will show a value as one of the following, depending on the state of member devices: allOff, someOn, allOn.
- Command mixed devices: this can help if your group devices contain a mix of capabilities. Dimmer devices do not implement "Set Color" or "Set Color Temperature" and switch devices do not implement those commands or "Set Level," but conventionally any of these commands will also turn on a device if it is currently off. Enabling this option will cause sending any of these commands (e.g., "Set Level") to the group to still turn on a member device that is only a switch (which does not implement this command), for example.
- Enable on/off optimization: if enabled, will not send "on" commands to member devices that already report as on and will not send "off" commands to member devices that already report as "off." (May reduce network traffic, but may cause unexpected results if devices do not accurately report state to hub.)
- Enable metering: allows you to specify a delay, in milliseconds, between commands (may help avoid problems if devices respond poorly due to too many successive commands on network, but may increase "popcorn effect")
- Once your group options are selected, select Done. Your new group will now be available as a Group Bulb Dimmer 2.1, Group Dimmer, or Group Switch device (depending on the options you selected), and it can be used with apps including Simple Automation Rules, Basic Rule, Motion Lighting, Button Controller, Rule Machine, Hubitat Dashboard, or with Alexa and Google Assistant.
Create and capture a Scene
Creating a scene allow you to capture devices in their unique states and repeat the exact condition. Once the scene is captured, Hubitat Elevation can activate devices to the same captured state. The scene is linked to a virtual Scene Activator device that can be used with Simple Lighting, Motion Lighting, Button Controller, Rule Machine, Hubitat Dashboard, or with Alexa and Google Assistant.
- Select Apps in the hub sidebar and then open the Groups and Scenes app.
- Select Create New Scene.
- Give your new scene a name, then press the Tab key or tap in the space at the bottom of the setup page to refresh. Your Hubitat Scene name is the same name you will use to control the group with Alexa and Google Assistant, so be sure to make it easily understandable.
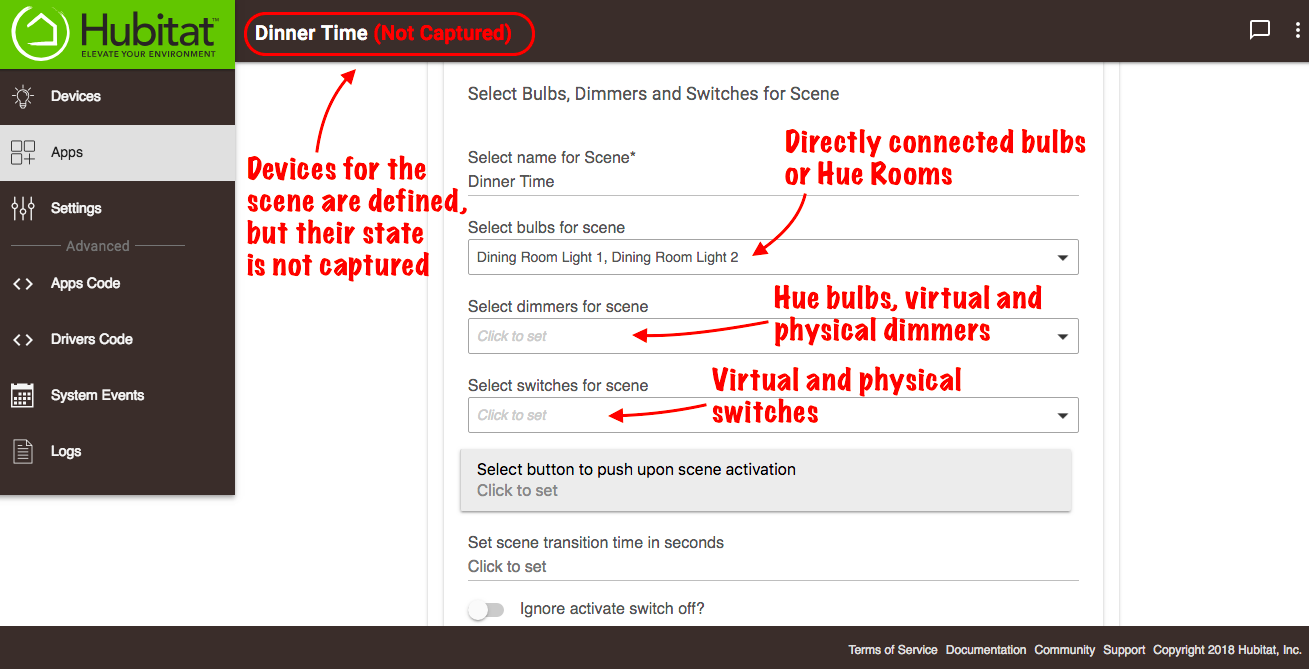
- Use the drop down menus to select the devices you'd like to include in your scene. You can include bulbs, dimmers and switches (supported devices will appear in only one of these lists, depending on the capabilities of the device).
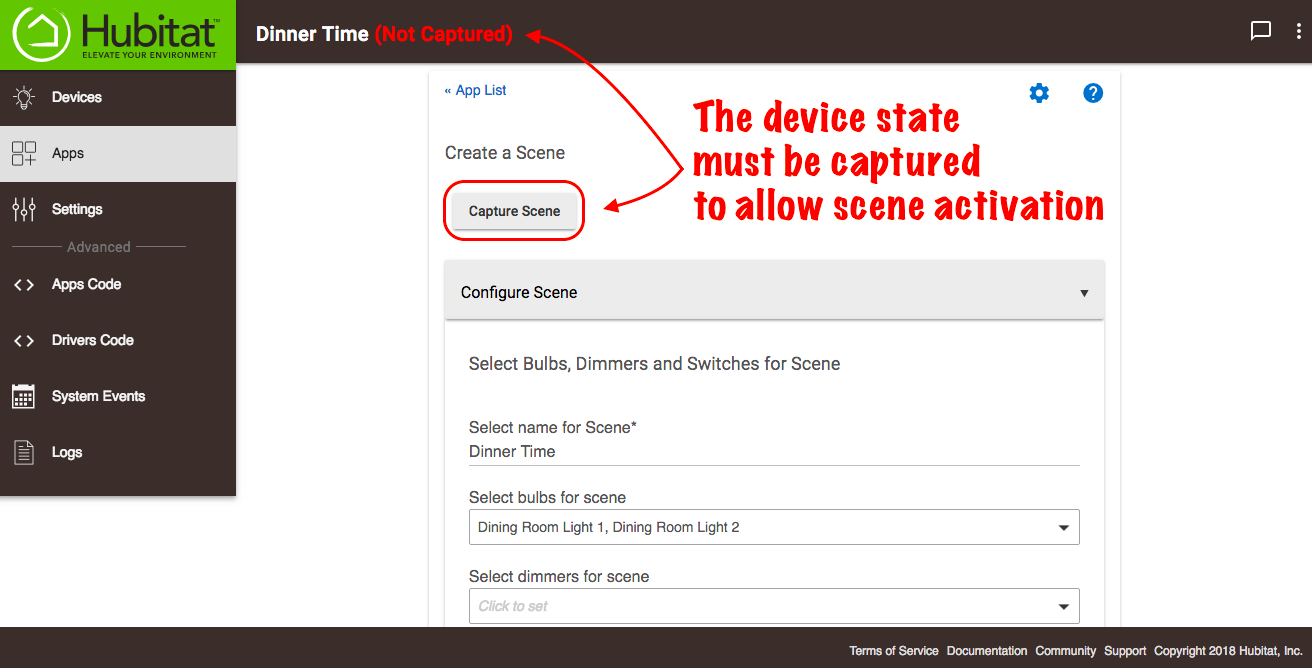
- NOTE: The Scene name at the top of the page will be appended with "(Not Captured)" to warn that the Scene is still incomplete. While you have defined the devices for the scene, you have not yet defined what their captured state should be..
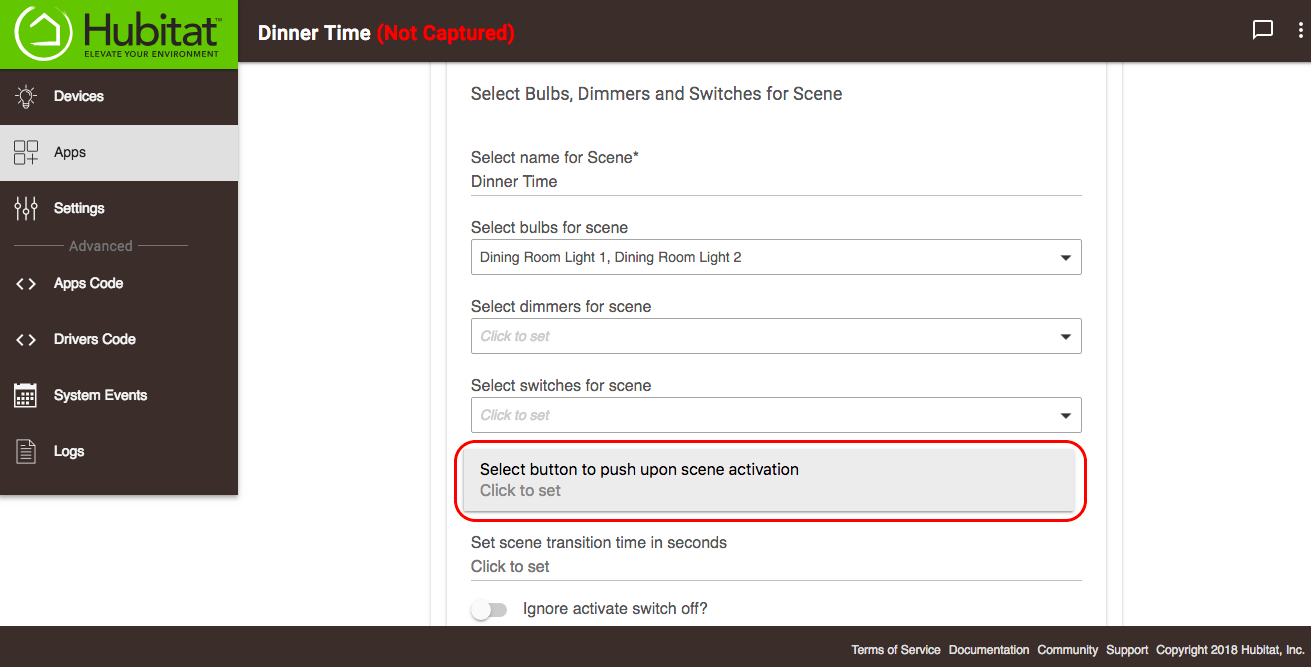
- Additionally, there is an option to push a button on a button device, such as a keypad. This is useful for activating scenes (phantom buttons) in a Lutron system.
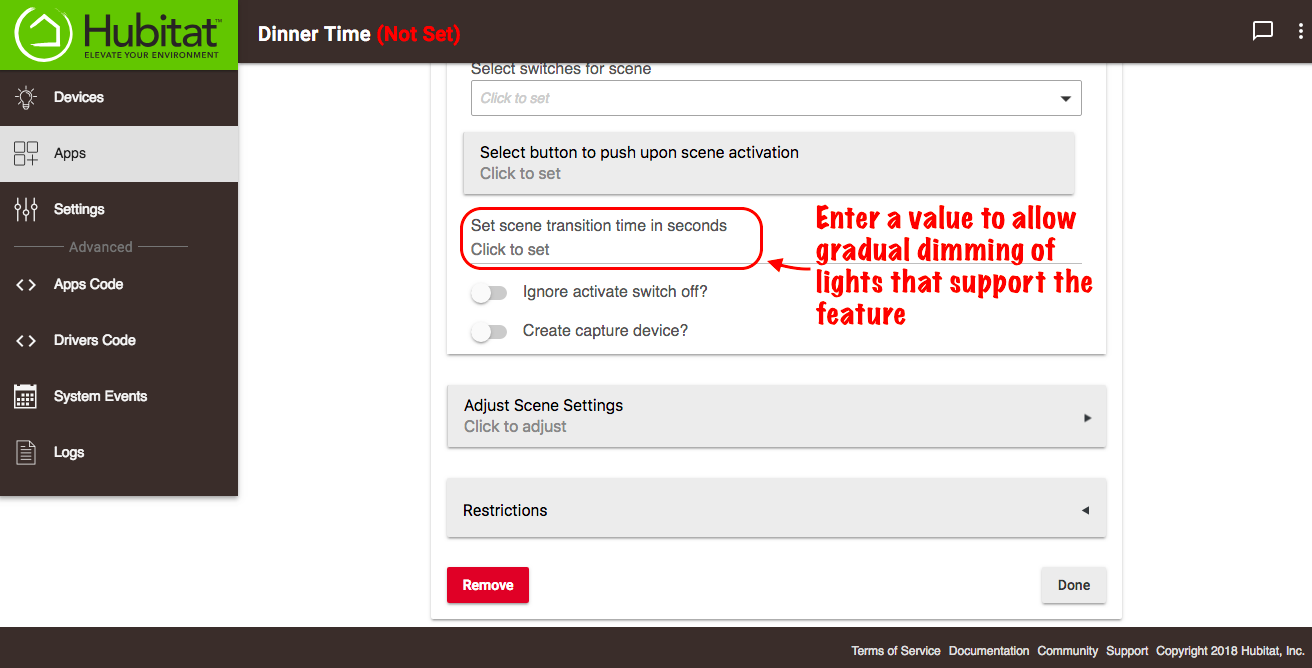
- For lights that support the feature, you may enter a transition time to allow gradual dimming
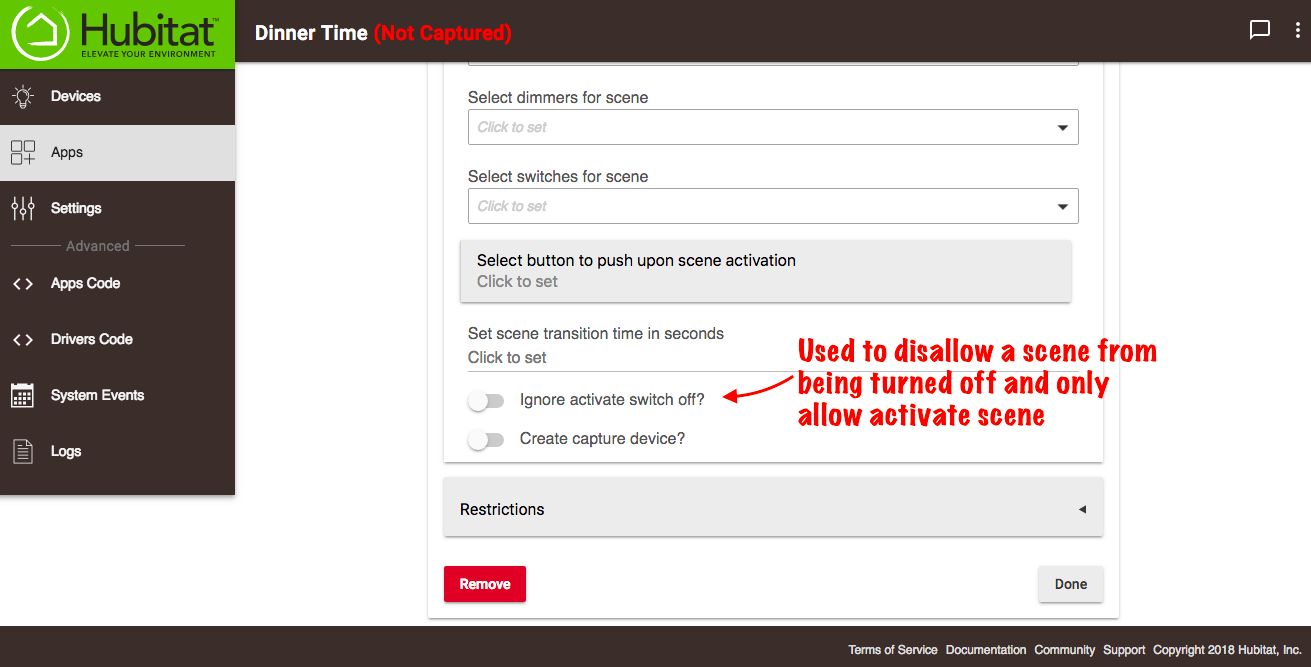
- Enabling the Ignore activate switch off feature will prevent scenes from being turned off. This is useful to prevent Amazon Echo and Google Home device turning off lights if a user tries to turn off a scene. Lutron users will find this similar to the Set Scene function.
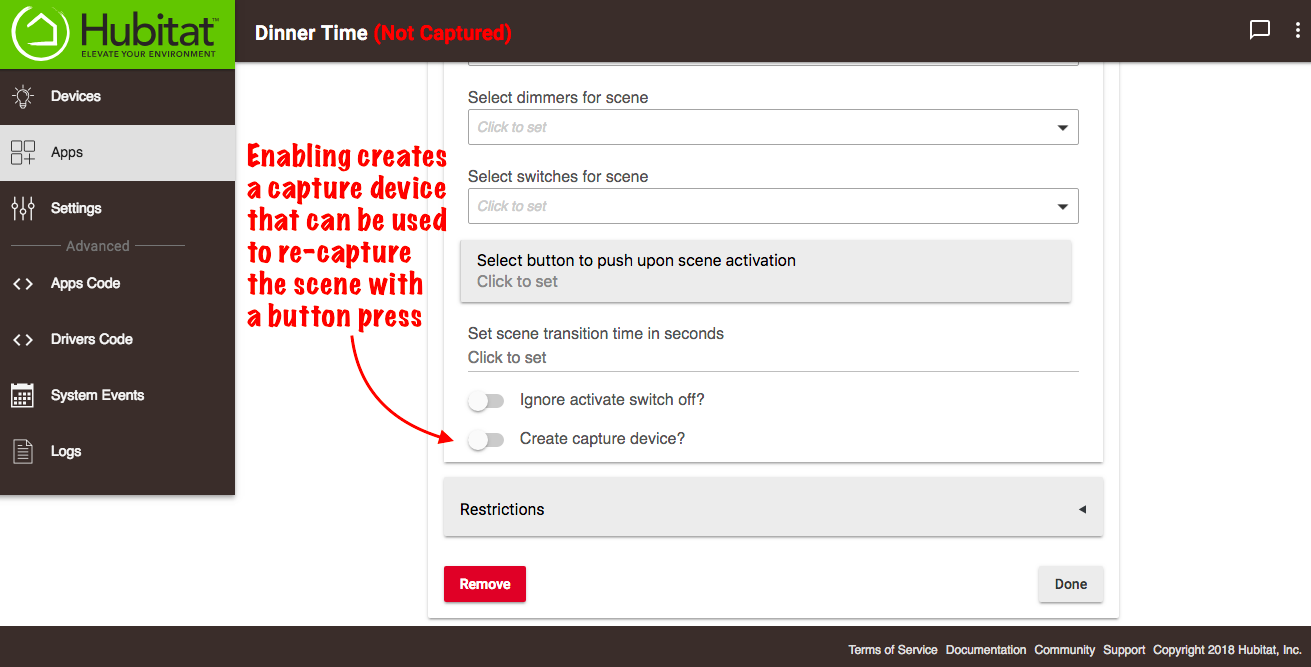
- Use the Create capture device option to create an additional virtual device for your scene. This can be assigned to a button to capture the current state of your scene devices. For example, you could program a button hold (on a real device) to capture the state of devices (using this virtual device) and a button press to activate that scene.
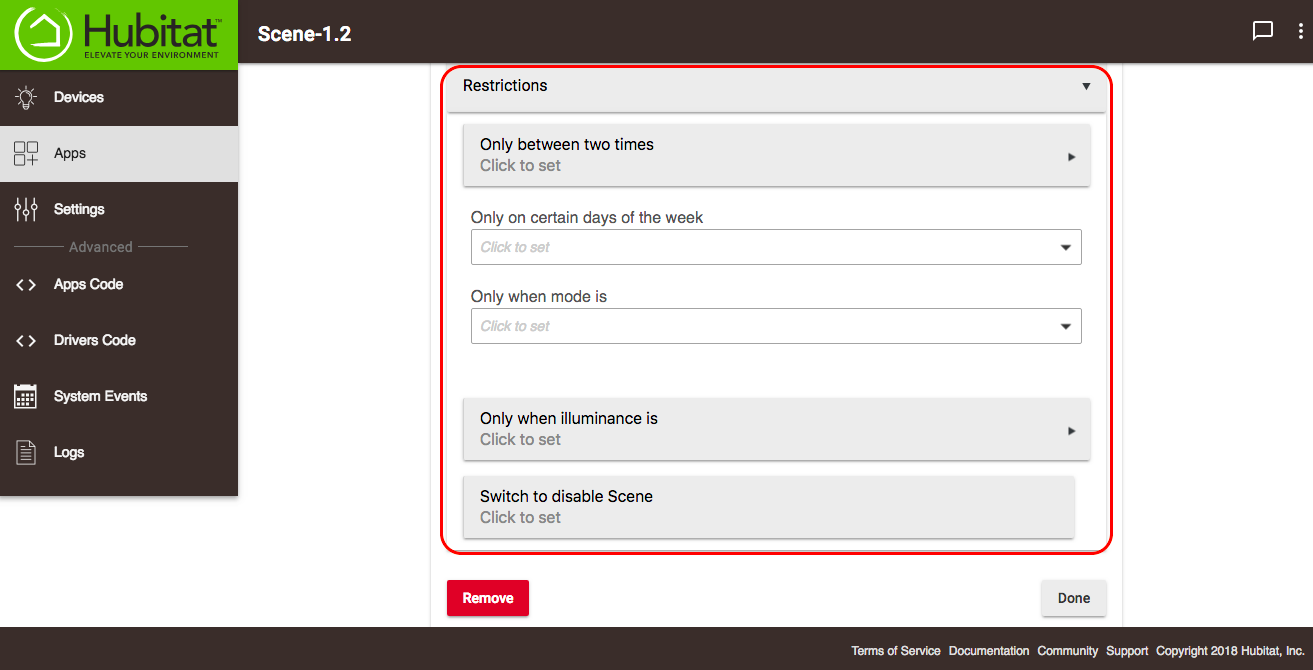
- You have the option to add restrictions to your Scene. This limits the scene to only being active during certain modes or conditions.
- Your restriction options include:
- Only between two times - Select specific times, Sunrise/Sunset, or a combination of Sunrise or Sunset and specific times.
- Only on certain days of the week - Restrict to specific days of the week for activation.
- Only when mode is - Restrict by mode. For example, Only when mode is Evening, means scene will not activate when the mode does not match.
- Only when illuminance is - Select an illuminance sensor and comparison light level to only allow scene activation when illuminance is equal or lower than a specified level or when it is equal or greater than a specified level.
- Switch to disable scene - Select an optional switch to disallow your scene from being activated.
- Your restriction options include:
- Optionally, configure additional options for the scene:
- Enable logging: if enabled, will write information to "Logs" when the scene is turned on (activated) or turned off, including what commands are sent to each device; can be useful for troubleshooting if scene is not working as expected.
- Enable activation optimization: if enabled, will skip sending certain commands to device if device is already in the expected state (e.g., if a dimmer device is captured at level 50 and that device already reports that it is on at level 50 when the scene is activated, no commands will be sent to that device).
- Enable discrete on for activation: if enabled, will send an "on" command to any devices in the scene that are captured as on. This is normally not necessary, as commands like "Set Level" or "Set Color" will normally also turn a device on if it is off, but some devices/drivers may require this option (e.g., because a prestaging option is enabled).
- Enable metering: allows you to specify a delay, in milliseconds, between commands (may help avoid problems if devices respond poorly due to a large amount of commands at the same time "flooding" the network, but may increase "popcorn effect")
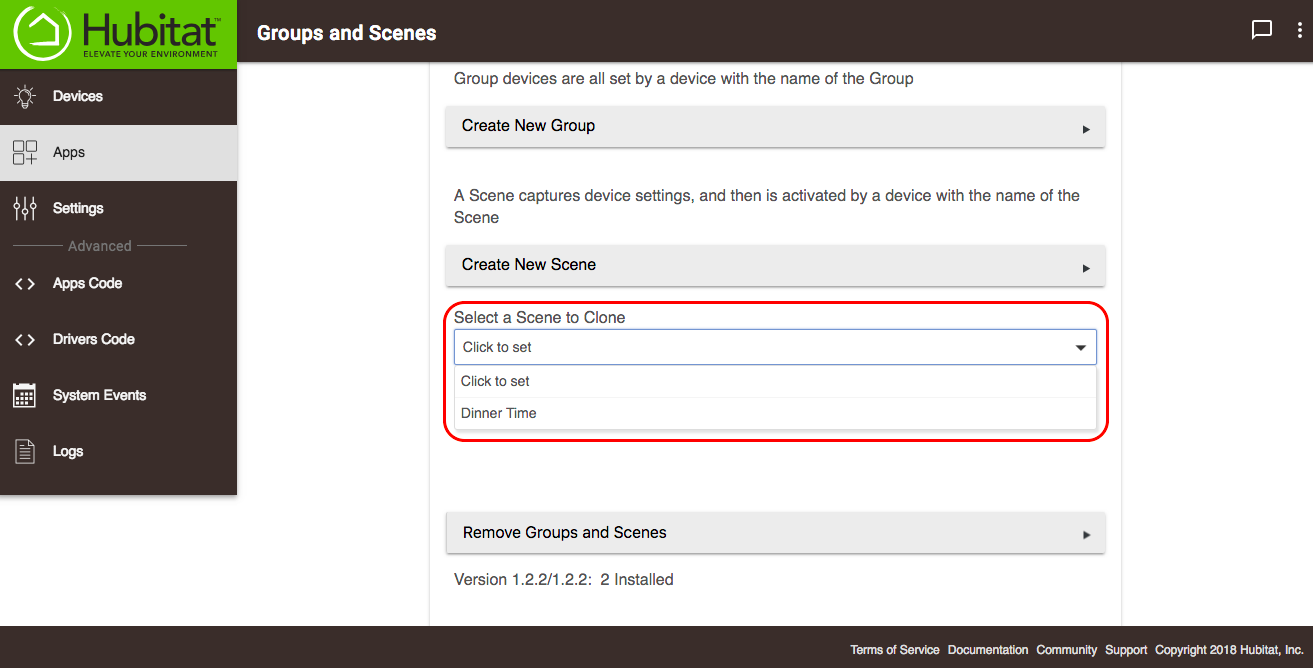
- Once your devices and restrictions are selected, select Done to create your scene, and then you may either select devices for additional scenes, or select Done again to complete the process and build your scene(s). You can also use the Clone feature to duplicate existing scenes. This simplifies setup when scene settings and devices are similar.
- Your scene is created, but you still need to capture the state of those devices as you want them in the scene.
- Start by adjusting all of the devices in your scene to the level you desire. Turn off the devices you want off, turn on the devices you want on, and set dimmers and colors to create the scene (states) you want to capture.
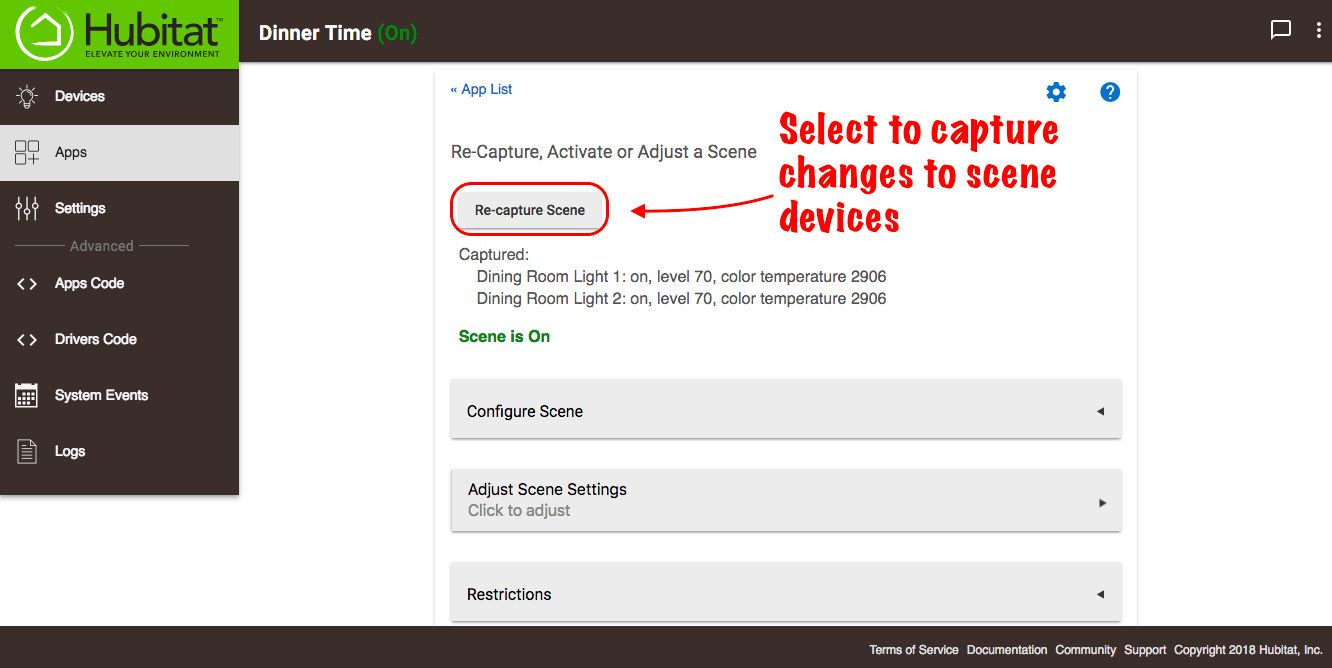
- With your devices set, open your scene settings and press the Capture Scene button to record the current device states.
- You can adjust your scene capture settings at any time simply by adjusting your devices, then pressing Re-Capture Scene button, or if you enabled the optional Create capture device in step 8, you can re-capture the scene this way too. Scene Capture devices will appear together in the Devices list with Scene Activator devices when this option is enabled.
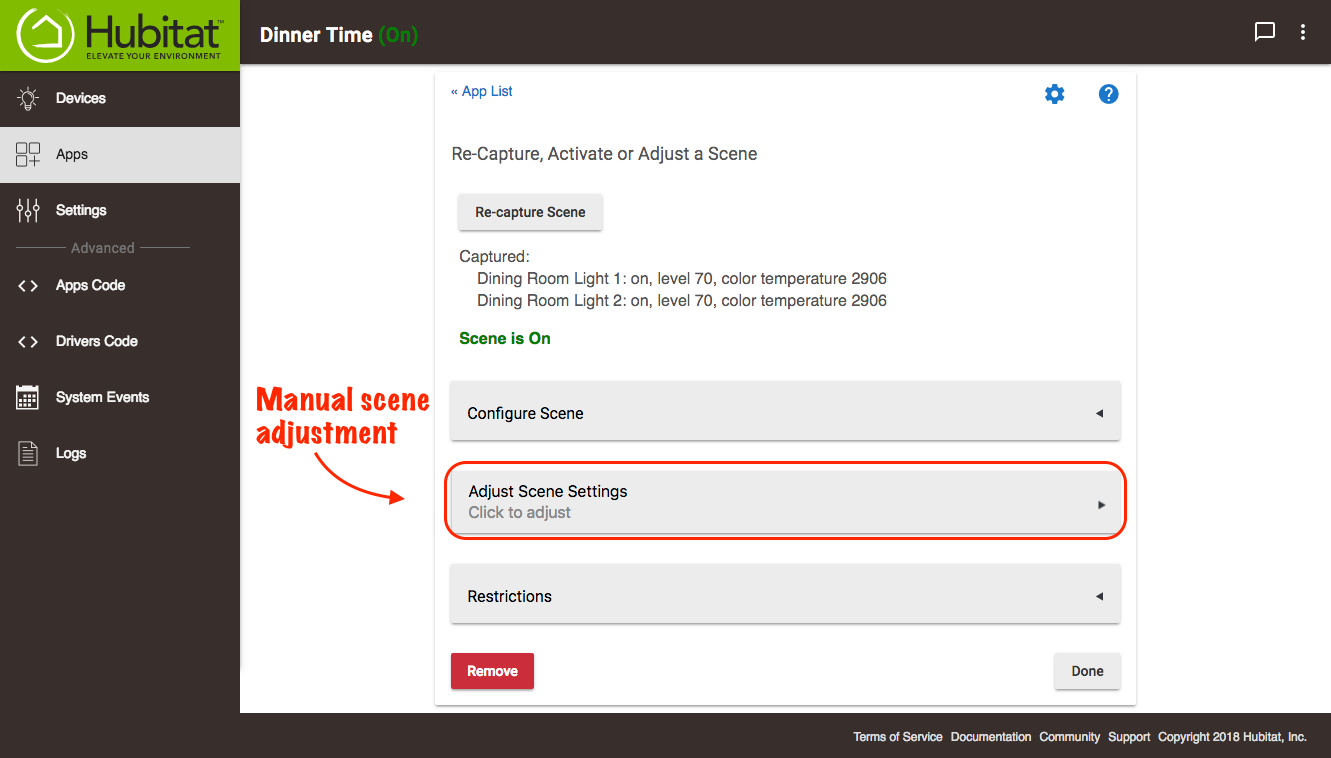
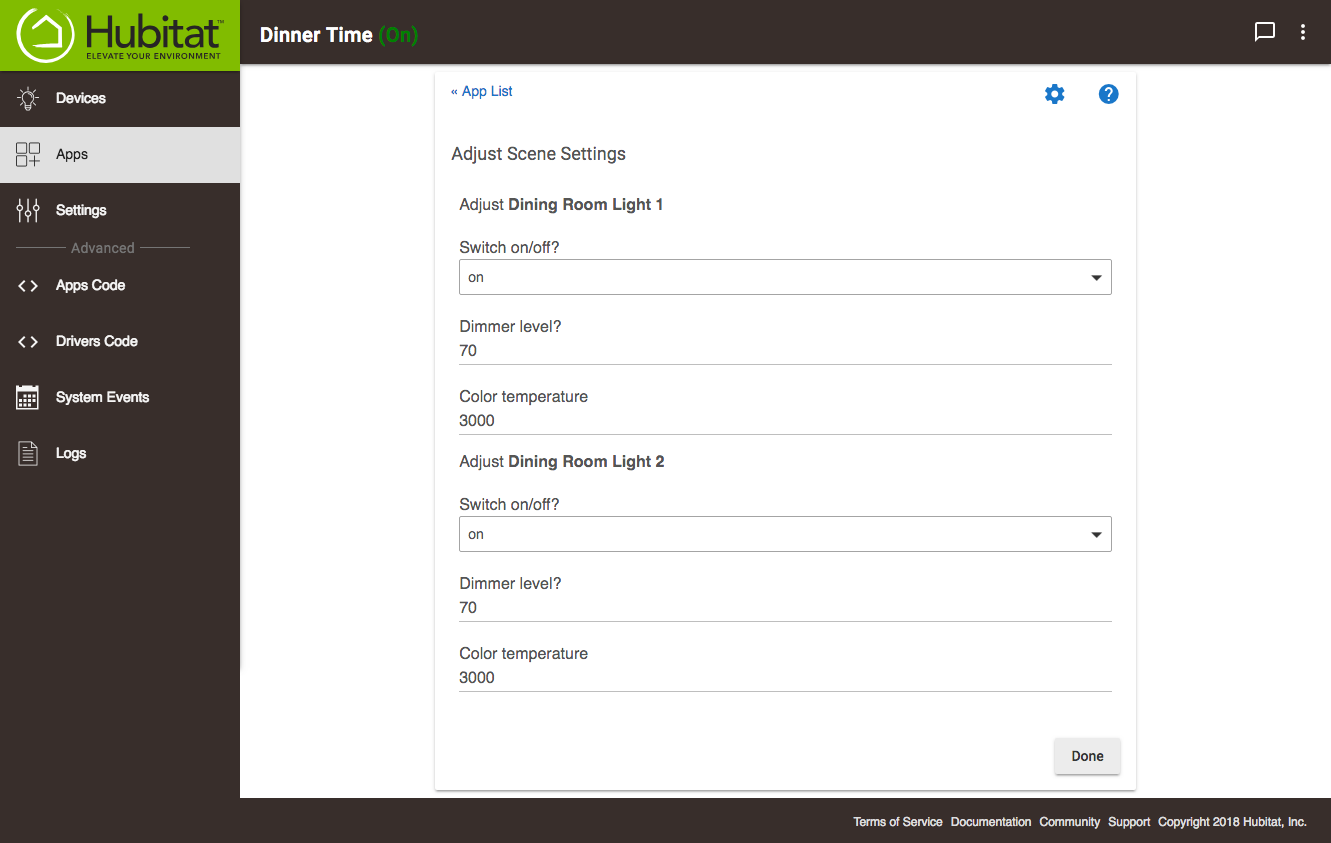
- You can also manually change scene settings by select Adjust Scene Settings and then manually changing the scene settings.
- NOTE: Do not use the Re-capture Scene button after manually adjusting scene settings. If you do, the current state of the devices in the scene will be captured again, instead of the manual settings you entered.

Activating a Scene
Once your scene has been captured, you activate using the Scene Activator device, which can be used used with Simple Automaton Rules, Motion Lighting, Button Controller 3.1, Rule Machine, Hubitat Dashboard, or with Alexa and Google Assistant. If the Scene Activator device is turned off, all of the member devices are turned off. If you don't want this to happen, use the Ignore activate switch off feature described in Step 7.