Difference between revisions of "How to Install Custom Apps"
(Add ALT text) (Tag: Visual edit) |
|||
| Line 5: | Line 5: | ||
#<big>The developer of the app will normally post a link to their app code. Follow their directions to get to the source code. Select and copy it.</big> | #<big>The developer of the app will normally post a link to their app code. Follow their directions to get to the source code. Select and copy it.</big> | ||
#<big>From the home page of your hub, select '''Apps Code''' in the side bar.</big> | #<big>From the home page of your hub, select '''Apps Code''' in the side bar.</big> | ||
| − | #<big>Select the '''+New App''' button in the upper right corner of the '''Apps Code''' page.</big>[[File:New User App dialogue 2.0.png|none|thumb|600x600px|link=https://docs.hubitat.com/images/6/61/New_User_App_dialogue_2.0.png | + | #<big>Select the '''+New App''' button in the upper right corner of the '''Apps Code''' page.</big>[[File:New User App dialogue 2.0.png|none|thumb|600x600px|link=https://docs.hubitat.com/images/6/61/New_User_App_dialogue_2.0.png |alt=Screenshot: "Apps Code" screen]] |
| − | ]] | + | #<big>In the blank text field, paste the code. Alternatively, you can select the '''Import''' button and past a URL to the developers code in raw text format.</big>[[File:Import user app code URL 2.0.png|none|thumb|600x600px|link=https://docs.hubitat.com/images/7/79/Import_user_app_code_URL_2.0.png |alt=Screenshot of "Import Code..." window]] |
| − | #<big>In the blank text field, paste the code. Alternatively, you can select the '''Import''' button and past a URL to the developers code in raw text format.</big>[[File:Import user app code URL 2.0.png|none|thumb|600x600px|link=https://docs.hubitat.com/images/7/79/Import_user_app_code_URL_2.0.png | + | #<big>Select the '''Save''' button in the top right. When the "modified" goes away, your app is saved.</big>[[File:User app code unsaved 2.0.png|none|thumb|600x600px|link=https://docs.hubitat.com/images/5/5c/User_app_code_unsaved_2.0.png |alt=Screenshot of "modified" text in page header (indicating changes) and "Save" button (to save them)]] |
| − | ]] | ||
| − | #<big>Select the '''Save''' button in the top right. When the "modified" goes away, your app is saved.</big>[[File:User app code unsaved 2.0.png|none|thumb|600x600px|link=https://docs.hubitat.com/images/5/5c/User_app_code_unsaved_2.0.png | ||
| − | ]] | ||
<big>You may experience an error in this step. If you do, your app will not save and it will not work. Please contact the developer of the app in the Hubitat Community forum. It is usually best if you take a screen shot of the error to help them diagnose the problem. Once the code is fixed, come back and try again.</big> | <big>You may experience an error in this step. If you do, your app will not save and it will not work. Please contact the developer of the app in the Hubitat Community forum. It is usually best if you take a screen shot of the error to help them diagnose the problem. Once the code is fixed, come back and try again.</big> | ||
| Line 18: | Line 15: | ||
<big>Not all user apps will require OAuth (Open Authorization). Consult the app developers documentation for instruction.</big> | <big>Not all user apps will require OAuth (Open Authorization). Consult the app developers documentation for instruction.</big> | ||
| − | #<big>After saving your user app code, select the '''Enable OAuth''' button and then '''Update''' to automatically generate the keys.</big>[[File:Enable OAuth 2.0.png|none|thumb|600x600px|link=https://docs.hubitat.com/images/d/d4/Enable_OAuth_2.0.png | + | #<big>After saving your user app code, select the '''Enable OAuth''' button and then '''Update''' to automatically generate the keys.</big>[[File:Enable OAuth 2.0.png|none|thumb|600x600px|link=https://docs.hubitat.com/images/d/d4/Enable_OAuth_2.0.png |alt=Screenshot of "Enable OAuth in App" button on OAuth page in app code]] |
| − | ]] | + | #*<big>If your client secret key becomes compromised, you may refresh it to protect the OAUTH2 endpoint security.</big>[[File:OAuth initial dialogue 2.0.png|none|thumb|600x600px|link=https://docs.hubitat.com/images/6/63/OAuth_initial_dialogue_2.0.png |alt=Screenshot of "Update" button in OAuth window]] |
| − | #*<big>If your client secret key becomes compromised, you may refresh it to protect the OAUTH2 endpoint security.</big>[[File:OAuth initial dialogue 2.0.png|none|thumb|600x600px|link=https://docs.hubitat.com/images/6/63/OAuth_initial_dialogue_2.0.png | + | #<big>To refresh the client secret, open your user app code, select OAuth and check to box for '''Refresh Client Secret''', the select '''Update'''</big>[[File:OAuth refresh client secret 2.0.png|none|thumb|600x600px|link=https://docs.hubitat.com/images/2/26/OAuth_refresh_client_secret_2.0.png |alt=Screenshot of "Refresh client secret" checkbox in OAuth page]] |
| − | ]] | ||
| − | #<big>To refresh the client secret, open your user app code, select OAuth and check to box for '''Refresh Client Secret''', the select '''Update'''</big>[[File:OAuth refresh client secret 2.0.png|none|thumb|600x600px|link=https://docs.hubitat.com/images/2/26/OAuth_refresh_client_secret_2.0.png | ||
| − | ]] | ||
'''<big>Loading Your User Developed App</big>''' | '''<big>Loading Your User Developed App</big>''' | ||
| Line 30: | Line 24: | ||
#<big>From the sidebar of your hub, select '''Apps.'''</big> | #<big>From the sidebar of your hub, select '''Apps.'''</big> | ||
| − | #<big>Select the '''+Add User App''' button.</big>[[File:Install Saved User App 2.0.png|none|thumb|600x600px|link=https://docs.hubitat.com/images/2/2a/Install_Saved_User_App_2.0.png | + | #<big>Select the '''+Add User App''' button.</big>[[File:Install Saved User App 2.0.png|none|thumb|600x600px|link=https://docs.hubitat.com/images/2/2a/Install_Saved_User_App_2.0.png |alt=Screenshot of "Add User App" button on Apps page]] |
| − | ]] | + | #<big>Find your User App in the list and select it to instantly add it.</big>[[File:Install user app list 2.0.png|none|thumb|600x600px|link=https://docs.hubitat.com/images/c/c7/Install_user_app_list_2.0.png|alt=Screenshot of user app listed in "Add User App" page]] |
| − | #<big>Find your User App in the list and select it to instantly add it.</big>[[File:Install user app list 2.0.png|none|thumb|600x600px|link=https://docs.hubitat.com/images/c/c7/Install_user_app_list_2.0.png]] | ||
<big>That's it! You're all set to create glorious home automations with your new app.</big> | <big>That's it! You're all set to create glorious home automations with your new app.</big> | ||
*<big>Don't forget to thank the developer in the community forum for their hard work.</big> | *<big>Don't forget to thank the developer in the community forum for their hard work.</big> | ||
Revision as of 00:07, 24 July 2022

The Hubitat community has developed some great apps to help you automate your devices in new, cool ways. Once you have the code, you can install them here:
- The developer of the app will normally post a link to their app code. Follow their directions to get to the source code. Select and copy it.
- From the home page of your hub, select Apps Code in the side bar.
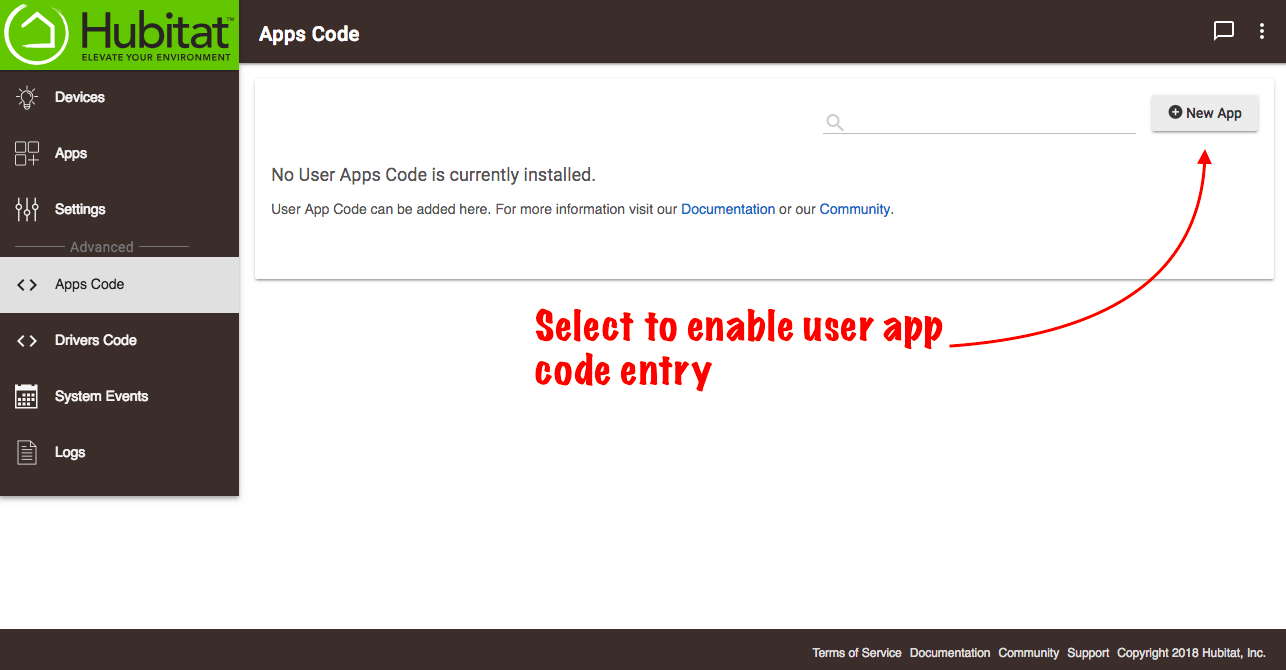
- Select the +New App button in the upper right corner of the Apps Code page.
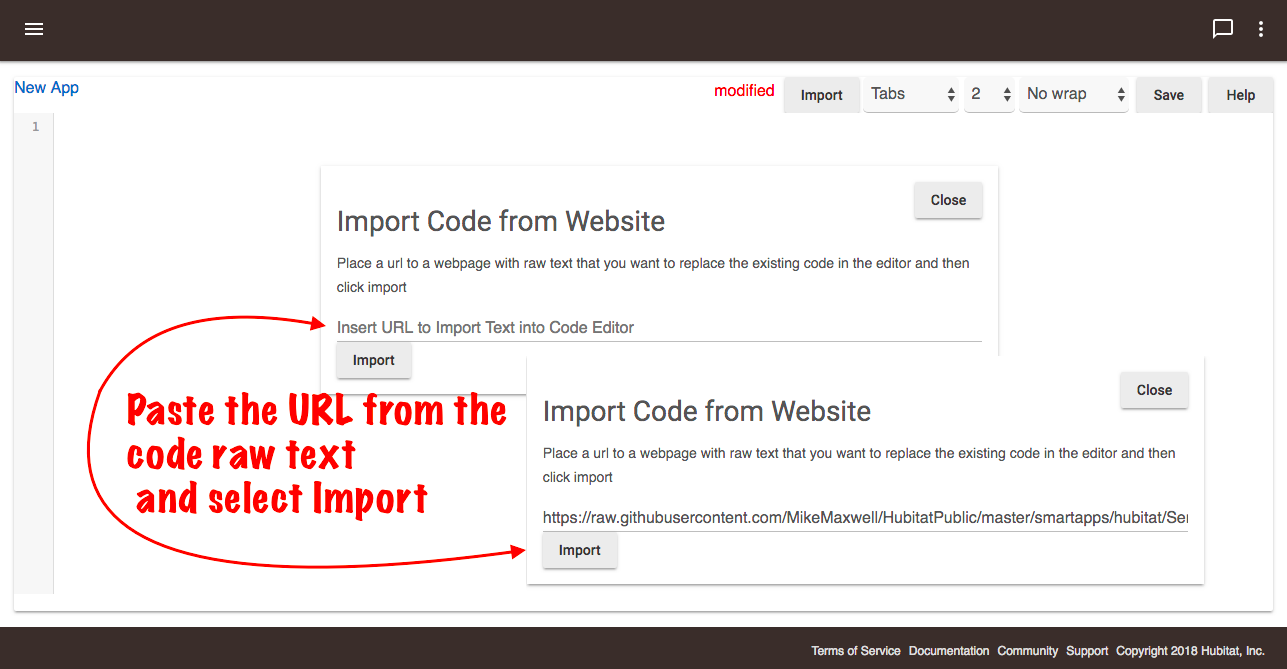
- In the blank text field, paste the code. Alternatively, you can select the Import button and past a URL to the developers code in raw text format.
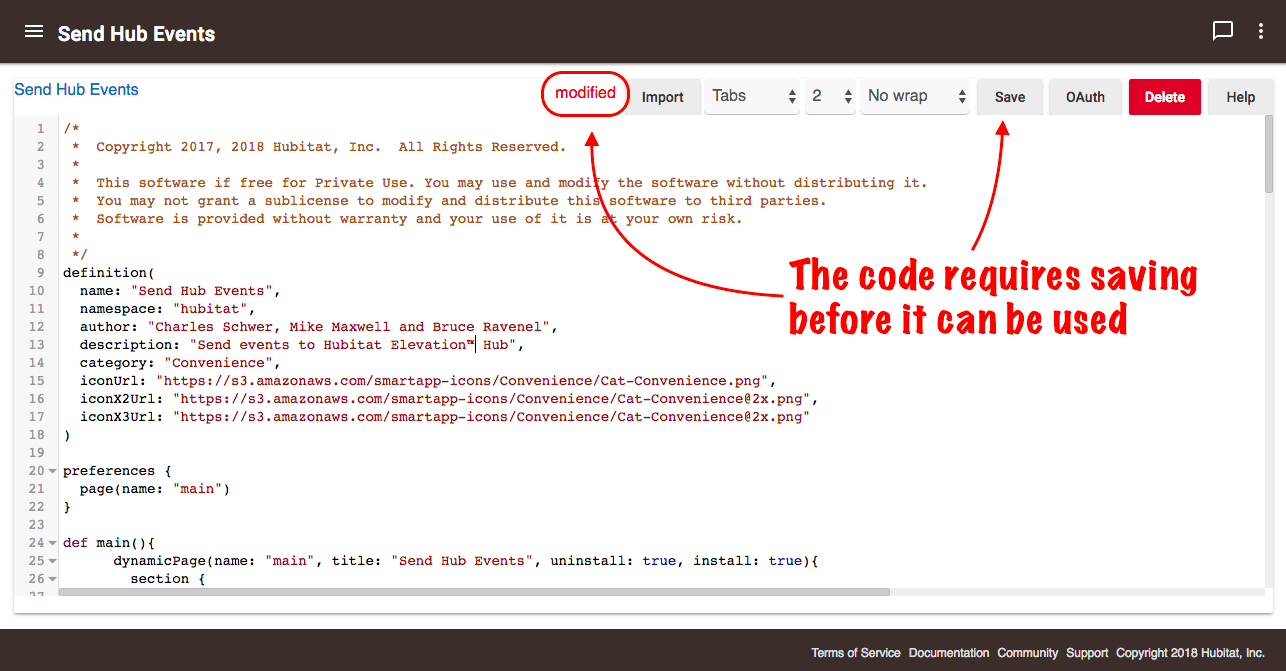
- Select the Save button in the top right. When the "modified" goes away, your app is saved.
You may experience an error in this step. If you do, your app will not save and it will not work. Please contact the developer of the app in the Hubitat Community forum. It is usually best if you take a screen shot of the error to help them diagnose the problem. Once the code is fixed, come back and try again.
Enabling OAuth
Not all user apps will require OAuth (Open Authorization). Consult the app developers documentation for instruction.
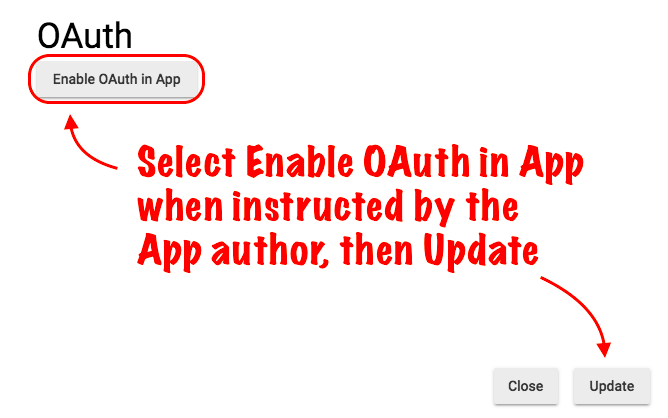
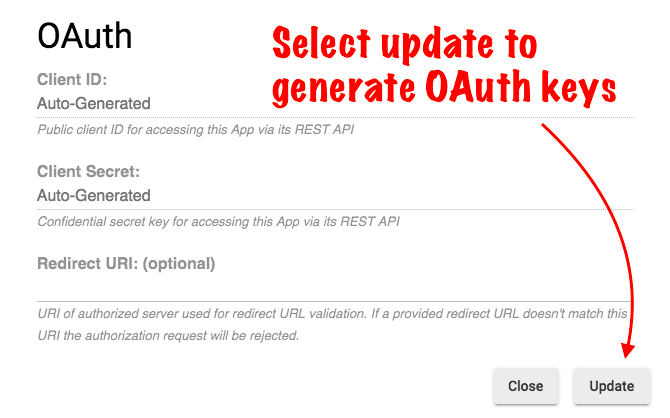
- After saving your user app code, select the Enable OAuth button and then Update to automatically generate the keys.
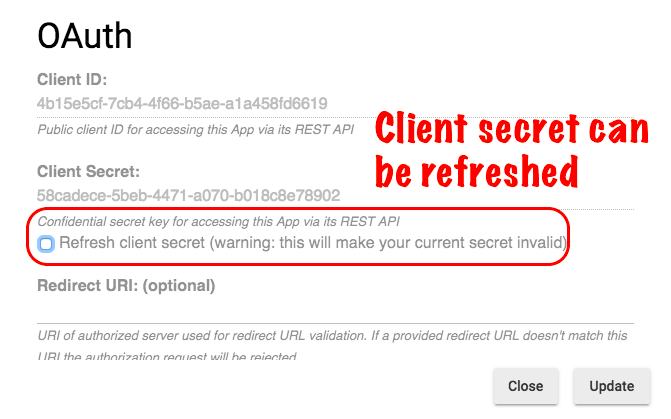
- If your client secret key becomes compromised, you may refresh it to protect the OAUTH2 endpoint security.
- To refresh the client secret, open your user app code, select OAuth and check to box for Refresh Client Secret, the select Update
Loading Your User Developed App
Once your app has successfully saved, you will need to load it to your Web Interface before you can use it:
- From the sidebar of your hub, select Apps.
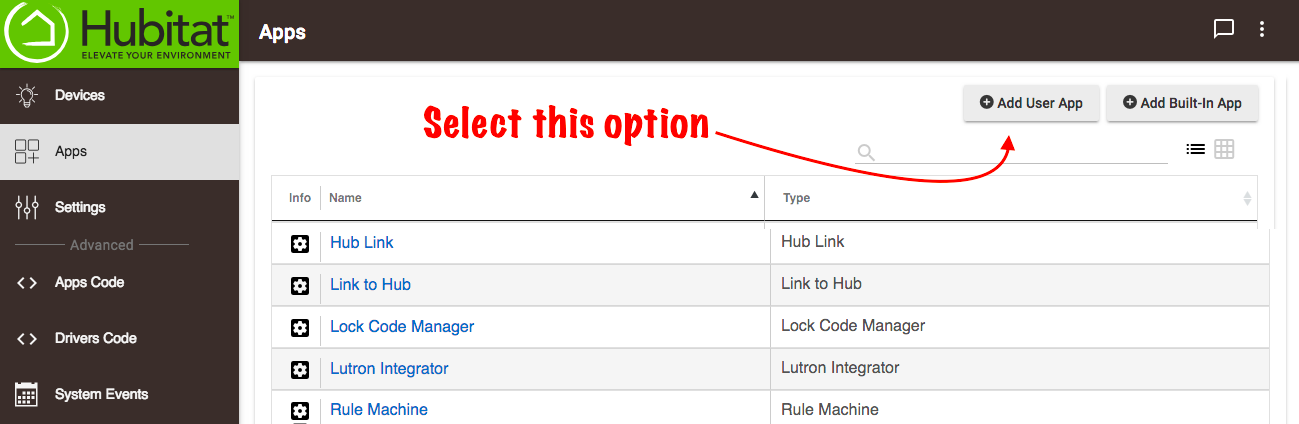
- Select the +Add User App button.
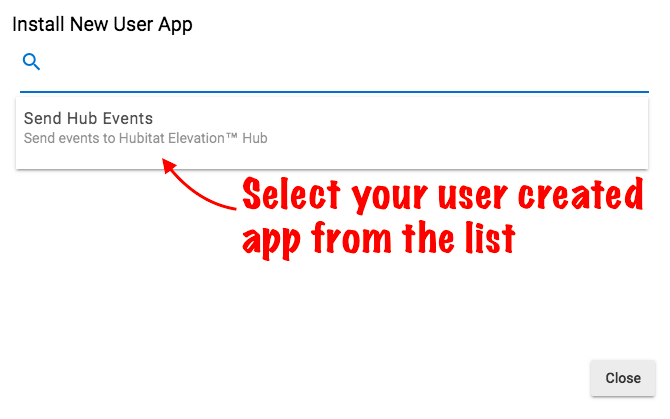
- Find your User App in the list and select it to instantly add it.
That's it! You're all set to create glorious home automations with your new app.
- Don't forget to thank the developer in the community forum for their hard work.