Difference between revisions of "Hubitat® Dashboard"
(→Installing Hubitat Dashboard) (Tag: Visual edit) |
|||
| Line 4: | Line 4: | ||
===<big>Installing Hubitat Dashboard</big>=== | ===<big>Installing Hubitat Dashboard</big>=== | ||
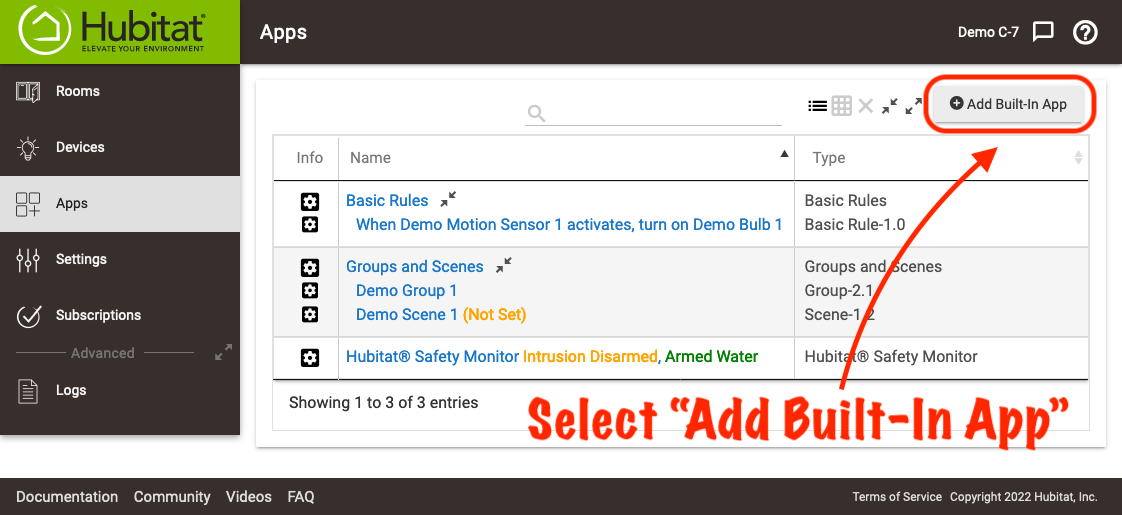
| − | #<big>From the sidebar of your hub, select '''Apps''' and press the '''Add Built-In App''' button.</big>[[File:Install Built-In App 2.0.png|none|thumb|600x600px]] | + | #<big>From the sidebar of your hub, select '''Apps''' and press the '''Add Built-In App''' button.</big>[[File:Install Built-In App 2.0.png|none|thumb|600x600px|link=https://docs.hubitat.com/images/7/77/Install_Built-In_App_2.0.png |
| − | #<big>Choose the '''Hubitat Dashboard''' from the list of Hubitat Elevation Built-In Apps</big>.[[File:Install Hubitat Dashboard v2.png|none|thumb|600x600px]] | + | ]] |
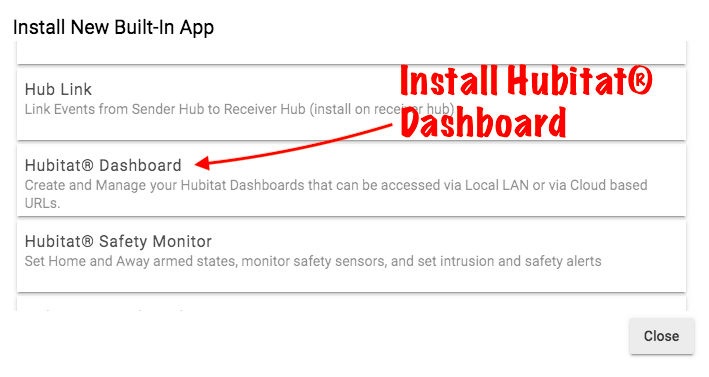
| + | #<big>Choose the '''Hubitat Dashboard''' from the list of Hubitat Elevation Built-In Apps</big>.[[File:Install Hubitat Dashboard v2.png|none|thumb|600x600px|link=https://docs.hubitat.com/images/e/ea/Install_Hubitat_Dashboard_v2.png | ||
| + | ]] | ||
===<big>Create A New Dashboard</big>=== | ===<big>Create A New Dashboard</big>=== | ||
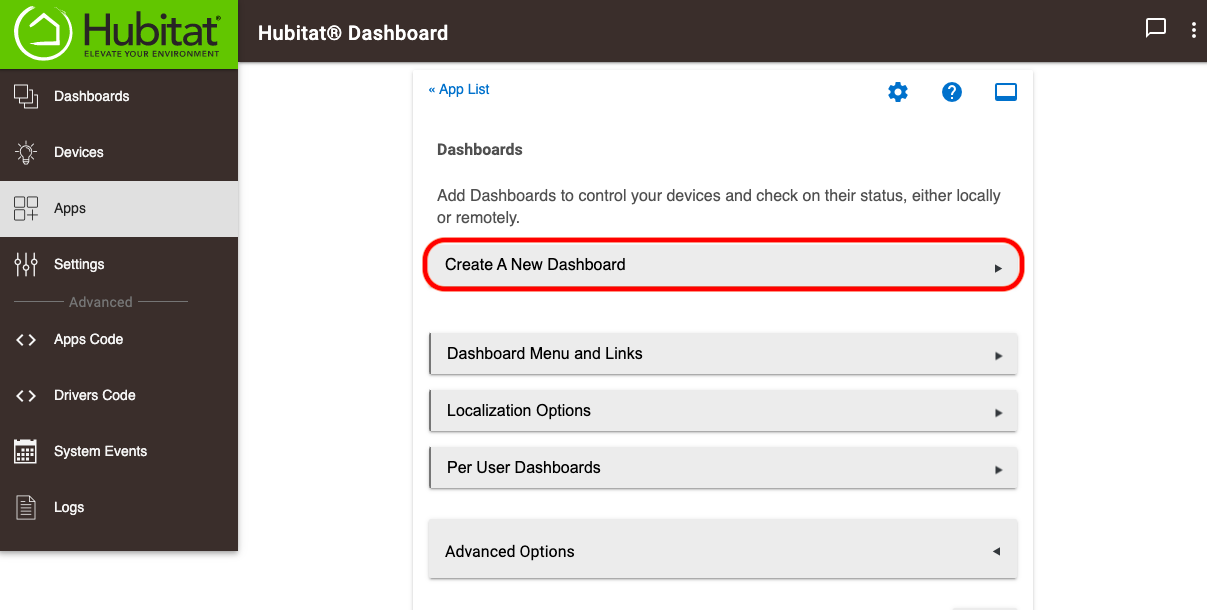
| − | #<big>Choose '''Create A New Dashboard.'''</big>[[File:Dashboard v4 Create New.png|none|thumb|600x600px]] | + | #<big>Choose '''Create A New Dashboard.'''</big>[[File:Dashboard v4 Create New.png|none|thumb|600x600px|link=https://docs.hubitat.com/images/2/2d/Dashboard_v4_Create_New.png |
| + | ]] | ||
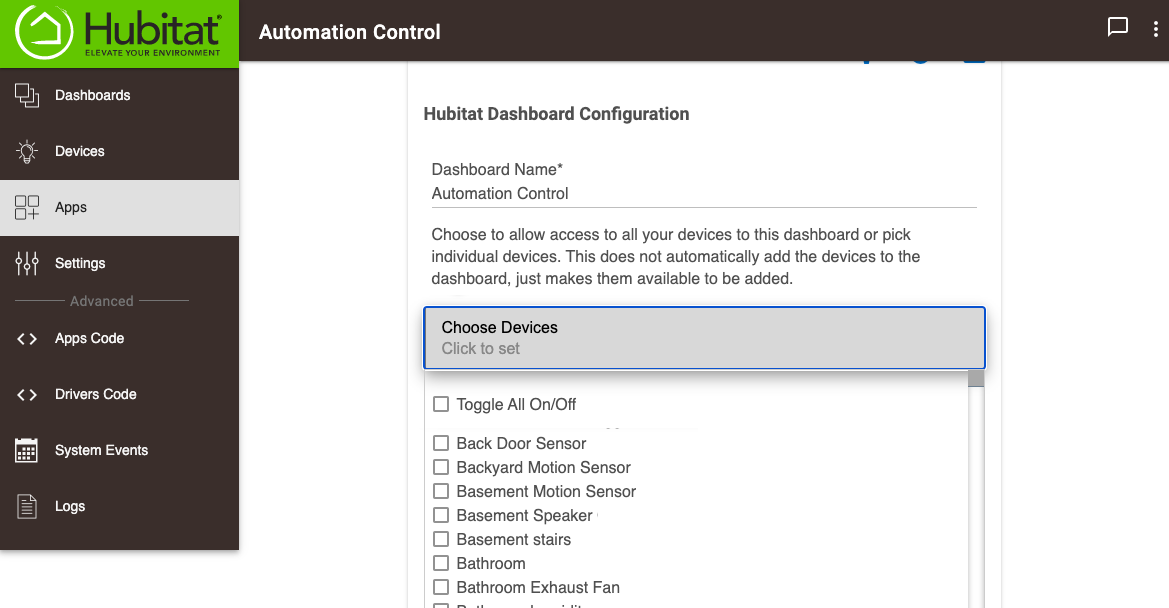
#<big>Select the devices you wish to use authorize for use in your Dashboard. To allow all devices to be used in a Dashboard, select the '''Toggle All On/Off''' option to allow any device on your hub to be authorized. Limiting the number of authorized devices will help speed up the loading of Dashboards.</big> | #<big>Select the devices you wish to use authorize for use in your Dashboard. To allow all devices to be used in a Dashboard, select the '''Toggle All On/Off''' option to allow any device on your hub to be authorized. Limiting the number of authorized devices will help speed up the loading of Dashboards.</big> | ||
| − | #*<big>'''NOTE:''' You must select a device before you can use them in a Dashboard. If you do not choose devices to use in your Dashboard, you will receive the warning '''<span style="color: red;;">No Device Authorized</span>''' when you attempt to '''Add A Tile''' to your dashboard.</big>[[File:Dashboard v4 choose devices.png|none|thumb|600x600px]] | + | #*<big>'''NOTE:''' You must select a device before you can use them in a Dashboard. If you do not choose devices to use in your Dashboard, you will receive the warning '''<span style="color: red;;">No Device Authorized</span>''' when you attempt to '''Add A Tile''' to your dashboard.</big>[[File:Dashboard v4 choose devices.png|none|thumb|600x600px|link=https://docs.hubitat.com/images/b/b1/Dashboard_v4_choose_devices.png |
| + | ]] | ||
#<big>Dashboard Direct Local and Cloud links may be copied and opened from the Dashboard child app settings. These URLs can be bookmarked to allow easy access to your Dashboards. '''Local LAN Link''' is accessible inside your home, while on the ''same IP network'' as your hub. '''Cloud Links''' are remotely accessible URLs that allow secure access to your Dashboard from anywhere.</big> | #<big>Dashboard Direct Local and Cloud links may be copied and opened from the Dashboard child app settings. These URLs can be bookmarked to allow easy access to your Dashboards. '''Local LAN Link''' is accessible inside your home, while on the ''same IP network'' as your hub. '''Cloud Links''' are remotely accessible URLs that allow secure access to your Dashboard from anywhere.</big> | ||
| − | #<big>Once you create your Dashboards, they can be found listed in the Hubitat Dashboard parent app settings</big>[[File:Dashboard v4 parent app settings.png|none|thumb|735x735px]] | + | #<big>Once you create your Dashboards, they can be found listed in the Hubitat Dashboard parent app settings</big>[[File:Dashboard v4 parent app settings.png|none|thumb|735x735px|link=https://docs.hubitat.com/images/2/27/Dashboard_v4_parent_app_settings.png |
| + | ]] | ||
====<big>Legacy Dashboard Links</big>==== | ====<big>Legacy Dashboard Links</big>==== | ||
| Line 19: | Line 24: | ||
<big>'''<span style="color: red;;">WARNING</span>''': Using Legacy Dashboard Links may allow access to all dashboards installed on your hub.</big> | <big>'''<span style="color: red;;">WARNING</span>''': Using Legacy Dashboard Links may allow access to all dashboards installed on your hub.</big> | ||
| − | [[File:Dashboard v4 Legacy Links.png|none|thumb|650x650px]] | + | [[File:Dashboard v4 Legacy Links.png|none|thumb|650x650px|link=https://docs.hubitat.com/images/7/7a/Dashboard_v4_Legacy_Links.png |
| + | ]] | ||
====<big>Advanced Options</big>==== | ====<big>Advanced Options</big>==== | ||
| Line 30: | Line 36: | ||
*<big>You may set read only access, thus preventing any changes to a specific Dashboard while this option is enabled.</big> | *<big>You may set read only access, thus preventing any changes to a specific Dashboard while this option is enabled.</big> | ||
*<big>Access to '''Dashboard Direct Local and Cloud''' links of a specific Dashboard can be revoked, requiring that a new link be copied.</big> | *<big>Access to '''Dashboard Direct Local and Cloud''' links of a specific Dashboard can be revoked, requiring that a new link be copied.</big> | ||
| − | **<big>'''NOTE:''' If you press '''Reset Access Token''' in a Dashboard child app settings page, the Local and Cloud '''Dashboard Direct Links''' for that particular Dashboard will be invalid and you will need to repair your bookmarks with new '''Dashboard Direct Links'''. The '''Dashboard Direct Links''' of other Dashboards, '''Dashboard Menu''' links, and '''Per User Dashboard''' links will not be affected.</big>[[File:Dashboard v4 child app settings v3.png|none|thumb|1203x1203px]] | + | **<big>'''NOTE:''' If you press '''Reset Access Token''' in a Dashboard child app settings page, the Local and Cloud '''Dashboard Direct Links''' for that particular Dashboard will be invalid and you will need to repair your bookmarks with new '''Dashboard Direct Links'''. The '''Dashboard Direct Links''' of other Dashboards, '''Dashboard Menu''' links, and '''Per User Dashboard''' links will not be affected.</big>[[File:Dashboard v4 child app settings v3.png|none|thumb|1203x1203px|link=https://docs.hubitat.com/images/e/ef/Dashboard_v4_child_app_settings_v3.png |
| + | ]] | ||
===<big>Dashboard Menu and Links</big>=== | ===<big>Dashboard Menu and Links</big>=== | ||
| − | #<big>If you need to copy links to the Local and Cloud Dashboard Menus, or links to individual Dashboards, you will find them conveniently located under '''Dashboard Menu and Links'''.</big>[[File:Dashboard v4 Menu and Links.png|none|thumb|600x600px]] | + | #<big>If you need to copy links to the Local and Cloud Dashboard Menus, or links to individual Dashboards, you will find them conveniently located under '''Dashboard Menu and Links'''.</big>[[File:Dashboard v4 Menu and Links.png|none|thumb|600x600px|link=https://docs.hubitat.com/images/a/ab/Dashboard_v4_Menu_and_Links.png |
| − | #<big>Right-click, or tap and hold to copy the links. Alternatively, you can open the links and copy them from a browser address bar.</big>[[File:Dashboard v4 Menu and Links setup.png|none|thumb|730x730px]] | + | ]] |
| + | #<big>Right-click, or tap and hold to copy the links. Alternatively, you can open the links and copy them from a browser address bar.</big>[[File:Dashboard v4 Menu and Links setup.png|none|thumb|730x730px|link=https://docs.hubitat.com/images/f/fe/Dashboard_v4_Menu_and_Links_setup.png | ||
| + | ]] | ||
====<big>Dashboards Menu</big>==== | ====<big>Dashboards Menu</big>==== | ||
| − | #<big>You can bookmark the Dashboards Menu links for easy access to all of your Dashboards. The example below shows Local Dashboards indicated by the house icon.</big>[[File:Dashboard v4 Local Dashboard Menu v2.png|none|thumb|658x658px]] | + | #<big>You can bookmark the Dashboards Menu links for easy access to all of your Dashboards. The example below shows Local Dashboards indicated by the house icon.</big>[[File:Dashboard v4 Local Dashboard Menu v2.png|none|thumb|658x658px|link=https://docs.hubitat.com/images/3/39/Dashboard_v4_Local_Dashboard_Menu_v2.png |
| − | #<big>The Cloud Dashboards Menu is indicated by a cloud icon and does not include the capability to add new dashboards.</big>[[File:Dashboard v4 Cloud Dashboard Menu.png|none|thumb|658x658px]] | + | ]] |
| + | #<big>The Cloud Dashboards Menu is indicated by a cloud icon and does not include the capability to add new dashboards.</big>[[File:Dashboard v4 Cloud Dashboard Menu.png|none|thumb|658x658px|link=https://docs.hubitat.com/images/5/5b/Dashboard_v4_Cloud_Dashboard_Menu.png | ||
| + | ]] | ||
===<big>Localization Options</big>=== | ===<big>Localization Options</big>=== | ||
| − | #<big>Select '''Localization Options''' to choose the primary language for the '''Getting Started''' dialogue and the '''Dashboard Editor'''. You can build Dashboards using different languages by selecting the '''Localization Options''' for creating new Dashboards. Once set, the language specified will be the default for new Dashboards. If you need to change the Dashboard Editor Localization language later, it can be set on a per Dashboard basis. See the '''Dashboard Editor Settings''' section for more information.</big>[[File:Dashboard v4 Localization Options.png|none|thumb|600x600px]][[File:Dashboard v4 Localization setup.png|none|thumb|600x600px]] | + | #<big>Select '''Localization Options''' to choose the primary language for the '''Getting Started''' dialogue and the '''Dashboard Editor'''. You can build Dashboards using different languages by selecting the '''Localization Options''' for creating new Dashboards. Once set, the language specified will be the default for new Dashboards. If you need to change the Dashboard Editor Localization language later, it can be set on a per Dashboard basis. See the '''Dashboard Editor Settings''' section for more information.</big>[[File:Dashboard v4 Localization Options.png|none|thumb|600x600px|link=https://docs.hubitat.com/images/8/87/Dashboard_v4_Localization_Options.png |
| + | ]][[File:Dashboard v4 Localization setup.png|none|thumb|600x600px|link=https://docs.hubitat.com/images/e/e1/Dashboard_v4_Localization_setup.png | ||
| + | ]] | ||
===<big>Per User Dashboards</big>=== | ===<big>Per User Dashboards</big>=== | ||
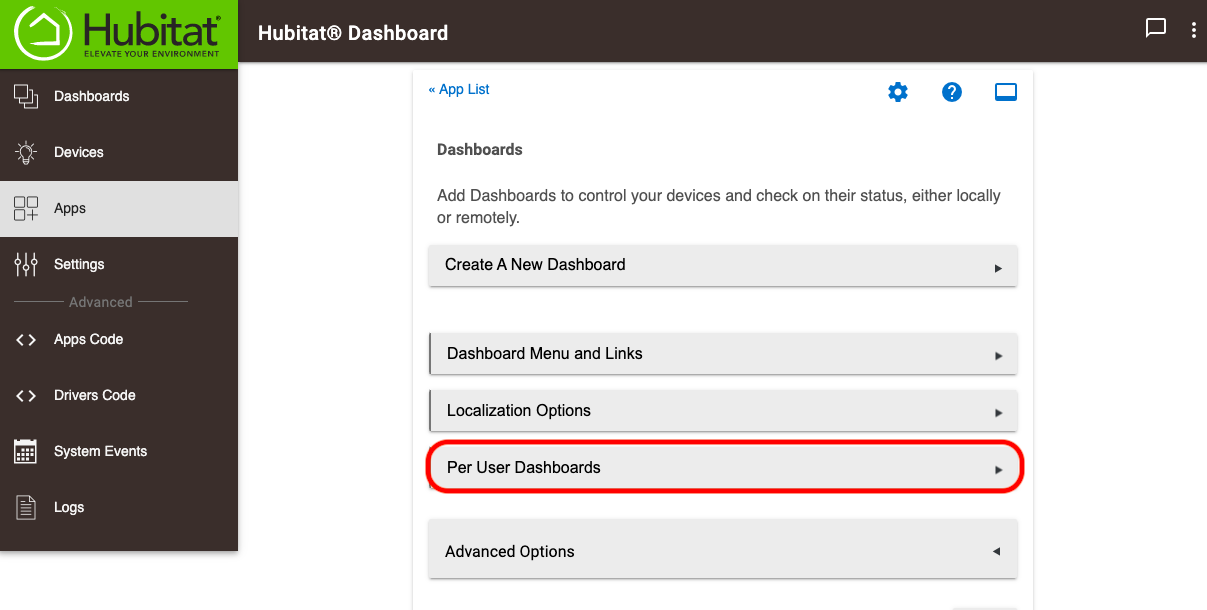
| − | #<big>You can restrict access for a particular Dashboard to specific users. A convenient QR code may be captured by mobile devices to grant access for the assigned Local and Cloud Dashboards on a per-user basis.</big>[[File:Dashboard v4 Per User Dashboards.png|none|thumb|600x600px]] | + | #<big>You can restrict access for a particular Dashboard to specific users. A convenient QR code may be captured by mobile devices to grant access for the assigned Local and Cloud Dashboards on a per-user basis.</big>[[File:Dashboard v4 Per User Dashboards.png|none|thumb|600x600px|link=https://docs.hubitat.com/images/a/a0/Dashboard_v4_Per_User_Dashboards.png |
| − | #<big>Select '''New''' to add a New User.</big>[[File:Dashboard v4 New user - per User Dashboard.png|none|thumb|600x600px]] | + | ]] |
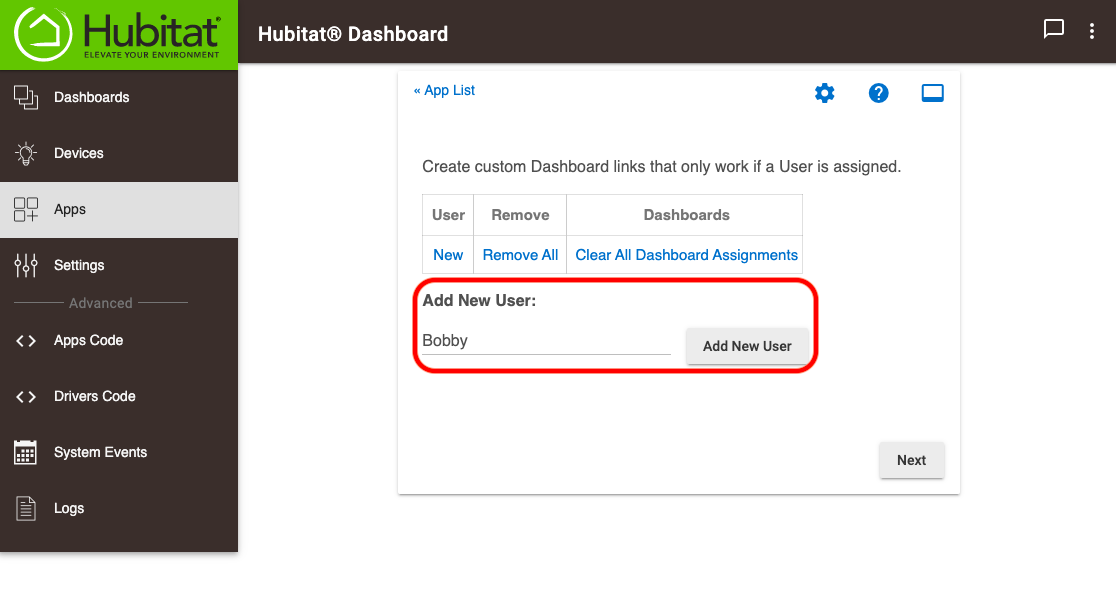
| − | #<big>Type a name for the user and press the '''Add New User''' button.</big>[[File:Dashboard v4 Add Name - per User Dashboard.png|none|thumb|600x600px]] | + | #<big>Select '''New''' to add a New User.</big>[[File:Dashboard v4 New user - per User Dashboard.png|none|thumb|600x600px|link=https://docs.hubitat.com/images/a/a3/Dashboard_v4_New_user_-_per_User_Dashboard.png |
| − | #<big>Select '''Add Dashboard to User'''.</big>[[File:Dashboard v4 Add Dashboard to User.png|none|thumb|600x600px]] | + | ]] |
| − | #<big>From the drop-down menu, choose the Dashboard you want the User to be able to access. '''NOTE:''' Each User and Dashboard combination assigned will have a unique access token in the URL. If you need a user to have access to multiple Dashboards, you will need to share the '''Dashboard Menu Links''' with them.</big>[[File:Dashboard v4 Pick Dashboard for User.png|none|thumb|600x600px]] | + | #<big>Type a name for the user and press the '''Add New User''' button.</big>[[File:Dashboard v4 Add Name - per User Dashboard.png|none|thumb|600x600px|link=https://docs.hubitat.com/images/d/d7/Dashboard_v4_Add_Name_-_per_User_Dashboard.png |
| − | #<big>Using a mobile device, you can capture the QR code for Dashboard Local and Cloud links, or you can copy the URL from the link above each QR code.</big>[[File:Dashboard v4 Local and Cloud QR.png|none|thumb|600x600px]] | + | ]] |
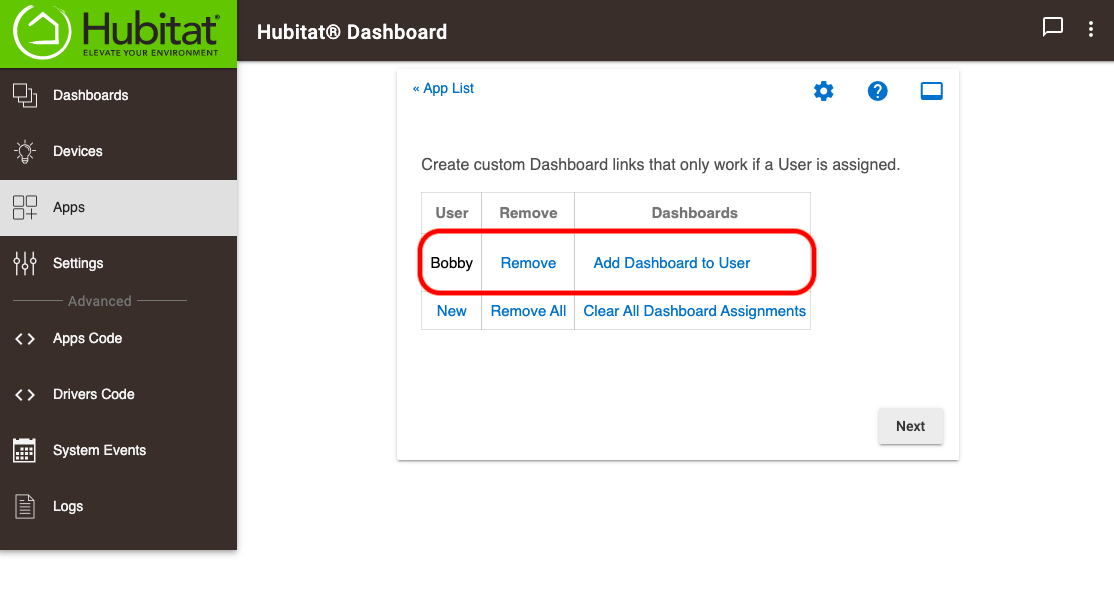
| + | #<big>Select '''Add Dashboard to User'''.</big>[[File:Dashboard v4 Add Dashboard to User.png|none|thumb|600x600px|link=https://docs.hubitat.com/images/7/77/Dashboard_v4_Add_Dashboard_to_User.png | ||
| + | ]] | ||
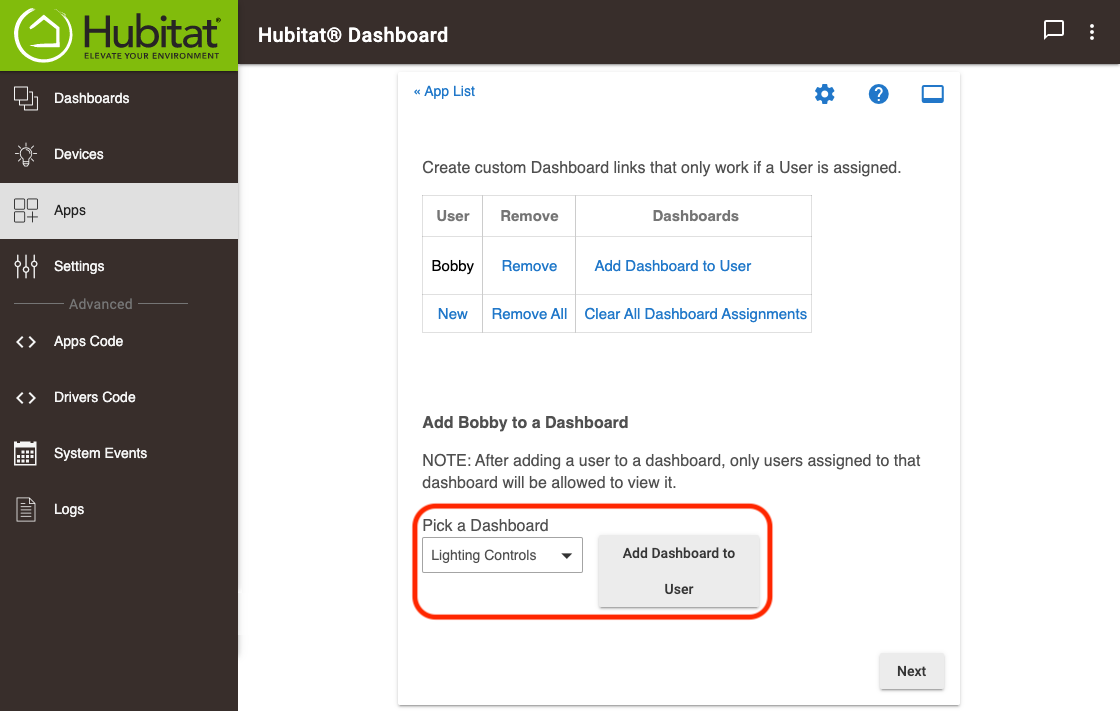
| + | #<big>From the drop-down menu, choose the Dashboard you want the User to be able to access. '''NOTE:''' Each User and Dashboard combination assigned will have a unique access token in the URL. If you need a user to have access to multiple Dashboards, you will need to share the '''Dashboard Menu Links''' with them.</big>[[File:Dashboard v4 Pick Dashboard for User.png|none|thumb|600x600px|link=https://docs.hubitat.com/images/e/e3/Dashboard_v4_Pick_Dashboard_for_User.png | ||
| + | ]] | ||
| + | #<big>Using a mobile device, you can capture the QR code for Dashboard Local and Cloud links, or you can copy the URL from the link above each QR code.</big>[[File:Dashboard v4 Local and Cloud QR.png|none|thumb|600x600px|link=https://docs.hubitat.com/images/3/30/Dashboard_v4_Local_and_Cloud_QR.png | ||
| + | ]] | ||
===<big>Dashboard Advanced Options</big>=== | ===<big>Dashboard Advanced Options</big>=== | ||
| Line 59: | Line 78: | ||
*<big>'''Allow new Dashboards to be created from Dashboard Menu when local? -''' This option enables you to control if new Dashboards are allowed to be created from the Dashboard Menu when accessed from a local connection.</big> | *<big>'''Allow new Dashboards to be created from Dashboard Menu when local? -''' This option enables you to control if new Dashboards are allowed to be created from the Dashboard Menu when accessed from a local connection.</big> | ||
*<big>'''Remove Hubitat Dashboard''' - Selecting this button will remove the Hubitat Dashboard parent app and all of the associated Dashboards child apps.</big> | *<big>'''Remove Hubitat Dashboard''' - Selecting this button will remove the Hubitat Dashboard parent app and all of the associated Dashboards child apps.</big> | ||
| − | *<big>'''Reset Access Token''' in the Dashboard parent app settings will generate new a new token for the Local and Cloud '''Dashboard Menu''' links. Existing '''Dashboard Menu''' links will be invalid and you will need to repair your bookmarks with new '''Dashboard Menu''' links. The '''Dashboard Direct Links''' and '''Per User Dashboard''' links will not be affected.</big>[[File:Dashboard v4 Advanced Parent Options.png|none|thumb|590x590px]] | + | *<big>'''Reset Access Token''' in the Dashboard parent app settings will generate new a new token for the Local and Cloud '''Dashboard Menu''' links. Existing '''Dashboard Menu''' links will be invalid and you will need to repair your bookmarks with new '''Dashboard Menu''' links. The '''Dashboard Direct Links''' and '''Per User Dashboard''' links will not be affected.</big>[[File:Dashboard v4 Advanced Parent Options.png|none|thumb|590x590px|link=https://docs.hubitat.com/images/3/38/Dashboard_v4_Advanced_Parent_Options.png |
| + | ]] | ||
===<big>Getting Started</big>=== | ===<big>Getting Started</big>=== | ||
#<big>Once Dashboards have been created, choose the local link to open the Dashboard in a new browser window or tab.</big> | #<big>Once Dashboards have been created, choose the local link to open the Dashboard in a new browser window or tab.</big> | ||
| − | #<big>You will first see the '''Getting Started''' dialogue window with helpful instructions to assist you in building a Dashboard.</big>[[File:Dashboard v4 Builder dialogue.png|none|thumb|600x600px]] | + | #<big>You will first see the '''Getting Started''' dialogue window with helpful instructions to assist you in building a Dashboard.</big>[[File:Dashboard v4 Builder dialogue.png|none|thumb|600x600px|link=https://docs.hubitat.com/images/1/15/Dashboard_v4_Builder_dialogue.png |
| + | ]] | ||
#<big>You can press the '''Auto Fill Grid 6 x 1''' button and devices will be automatically added to the Dashboard with a default tile template. '''Auto Fill Grid 6 x 1''' will automatically optimize the default Grid Size and build a Dashboard specifically for your device and the web browser it was initiated from. It is recommended to use a browser on the device you intend to normally use with Hubitat Dashboards. Alternatively, you may simply select the '''Manually Add Tiles''' button, or press the '''X''' at the top right to close the Dashboard Builder and start adding tiles without assistance.</big> | #<big>You can press the '''Auto Fill Grid 6 x 1''' button and devices will be automatically added to the Dashboard with a default tile template. '''Auto Fill Grid 6 x 1''' will automatically optimize the default Grid Size and build a Dashboard specifically for your device and the web browser it was initiated from. It is recommended to use a browser on the device you intend to normally use with Hubitat Dashboards. Alternatively, you may simply select the '''Manually Add Tiles''' button, or press the '''X''' at the top right to close the Dashboard Builder and start adding tiles without assistance.</big> | ||
| Line 70: | Line 91: | ||
#<big>Selecting the '''Dashboard Builder''' in the header bar as shown below allows creating a Dashboard based on the devices you have authorized and their specific ''attributes''. Select which device type attributes you want added and press the '''Build My Dashboard''' button to create a quick and easy Dashboard with device type groups that match the selected attributes.</big> | #<big>Selecting the '''Dashboard Builder''' in the header bar as shown below allows creating a Dashboard based on the devices you have authorized and their specific ''attributes''. Select which device type attributes you want added and press the '''Build My Dashboard''' button to create a quick and easy Dashboard with device type groups that match the selected attributes.</big> | ||
| − | #<big>'''Dashboard Builder''' will automatically optimize the default Grid Size and build a Dashboard specifically for your device and the web browser it was initiated from. It is recommended to use a browser on the device you intend to normally use with Hubitat Dashboards.</big>[[File:Dashboard v4 Dashboard Builder content.png|none|thumb|600x600px]] | + | #<big>'''Dashboard Builder''' will automatically optimize the default Grid Size and build a Dashboard specifically for your device and the web browser it was initiated from. It is recommended to use a browser on the device you intend to normally use with Hubitat Dashboards.</big>[[File:Dashboard v4 Dashboard Builder content.png|none|thumb|600x600px|link=https://docs.hubitat.com/images/0/09/Dashboard_v4_Dashboard_Builder_content.png |
| + | ]] | ||
===<big>Add A Tile</big>=== | ===<big>Add A Tile</big>=== | ||
| − | #<big>Select the '''+''' icon in the top right to open the '''Add A Tile''' dialog.</big>[[File:Dashboard v 4 Editor - Add A Tile.png|none|thumb|492x492px]] | + | #<big>Select the '''+''' icon in the top right to open the '''Add A Tile''' dialog.</big>[[File:Dashboard v 4 Editor - Add A Tile.png|none|thumb|492x492px|link=https://docs.hubitat.com/images/c/c6/Dashboard_v_4_Editor_-_Add_A_Tile.png |
| + | ]] | ||
#<big>You can change the tile '''Width''' and '''Height''' to set how big the tile will be.</big> | #<big>You can change the tile '''Width''' and '''Height''' to set how big the tile will be.</big> | ||
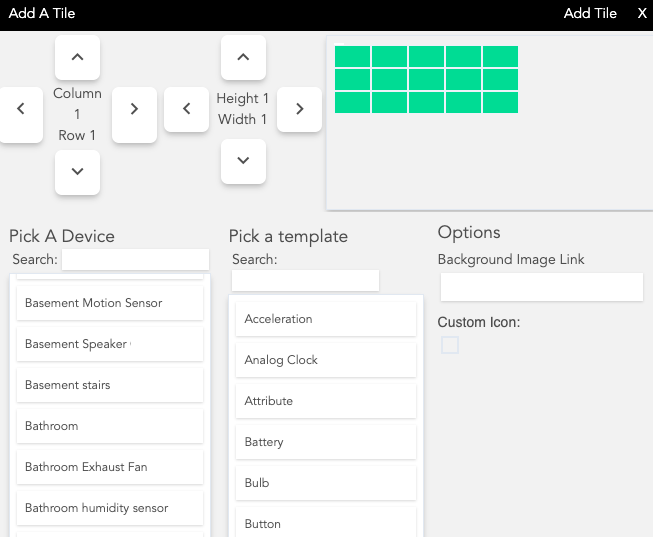
| − | #<big>'''Pick a Device''', then '''Pick a Template''', and finally set the '''Options''' for that template.</big>[[File:Dashboard v4 Add A Tile.png|none|thumb|600x600px]] | + | #<big>'''Pick a Device''', then '''Pick a Template''', and finally set the '''Options''' for that template.</big>[[File:Dashboard v4 Add A Tile.png|none|thumb|600x600px|link=https://docs.hubitat.com/images/d/d5/Dashboard_v4_Add_A_Tile.png |
| − | #<big>Press the '''Add Tile''' button and you will see the tile added to your Dashboard in the spot you selected. The Grid will change to gray in that spot where the Dashboard now has a tile.</big>[[File:Dashboard v4 Add Tile button.png|none|thumb|386x386px]] | + | ]] |
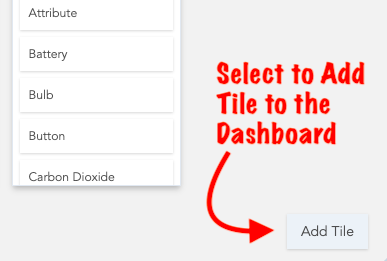
| + | #<big>Press the '''Add Tile''' button and you will see the tile added to your Dashboard in the spot you selected. The Grid will change to gray in that spot where the Dashboard now has a tile.</big>[[File:Dashboard v4 Add Tile button.png|none|thumb|386x386px|link=https://docs.hubitat.com/images/0/00/Dashboard_v4_Add_Tile_button.png | ||
| + | ]] | ||
===<big>Edit Tile</big>=== | ===<big>Edit Tile</big>=== | ||
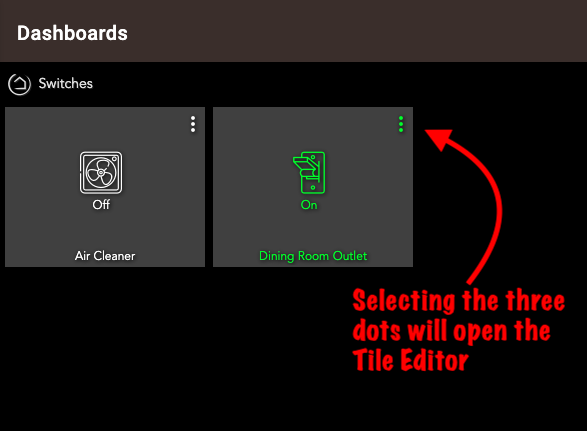
| − | #<big>You can edit any tile by clicking the 3 dot menu in the top right of any tile. This will open an editing window and allow you to move the tile around on the grid by pressing the arrow buttons or by selecting the position in the grid layout where you want this tile to move on the Dashboard.</big>[[File:Dashboard v4 Edit A Tile 3 dot.png|none|thumb|586x586px]] | + | #<big>You can edit any tile by clicking the 3 dot menu in the top right of any tile. This will open an editing window and allow you to move the tile around on the grid by pressing the arrow buttons or by selecting the position in the grid layout where you want this tile to move on the Dashboard.</big>[[File:Dashboard v4 Edit A Tile 3 dot.png|none|thumb|586x586px|link=https://docs.hubitat.com/images/c/cd/Dashboard_v4_Edit_A_Tile_3_dot.png |
| + | ]] | ||
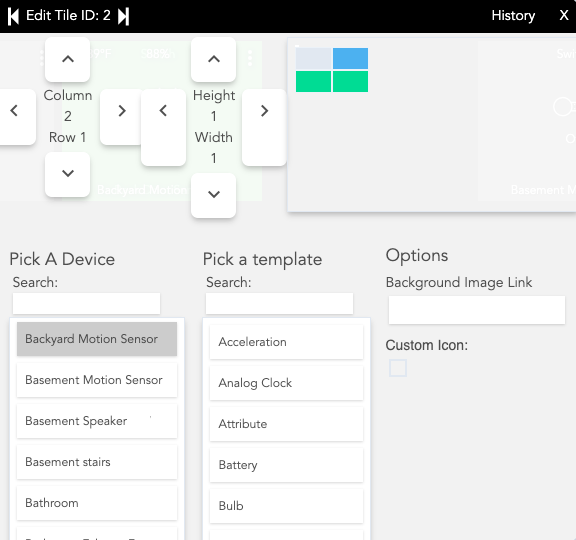
#<big>You can quickly jump between editing of tiles by using the back and forward buttons in the header bar to either side of '''Edit Tile ID:'''</big> | #<big>You can quickly jump between editing of tiles by using the back and forward buttons in the header bar to either side of '''Edit Tile ID:'''</big> | ||
| − | #<big>You may change the '''Device''', '''Template''' or any '''Options''' for the tile.</big>[[File:Dashboard v4 Edit a Tile.png|none|thumb|575x575px]] | + | #<big>You may change the '''Device''', '''Template''' or any '''Options''' for the tile.</big>[[File:Dashboard v4 Edit a Tile.png|none|thumb|575x575px|link=https://docs.hubitat.com/images/3/37/Dashboard_v4_Edit_a_Tile.png |
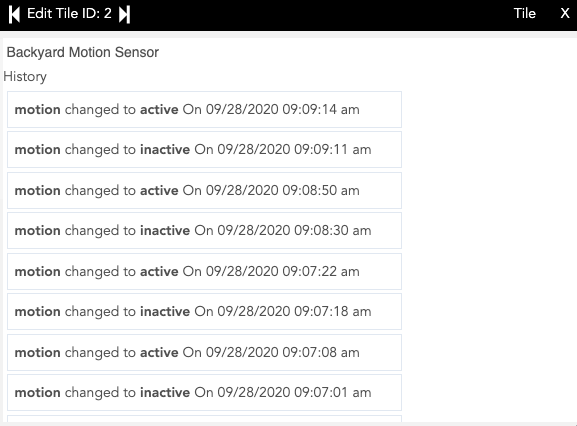
| − | #<big>Selecting '''History''' in the header bar will open up a window with a list of activities for that device from the event table. Selecting the '''Tile''' link in the header bar will return you to the '''Tile Editor'''.</big>[[File:Dashboard v4 Tile History.png|none|thumb|576x576px]] | + | ]] |
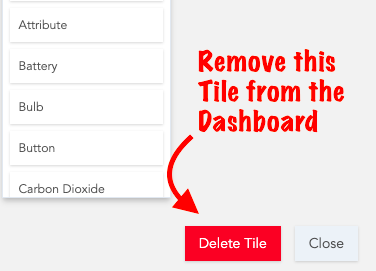
| − | #<big>If you want to remove the tile from Dashboard, press the '''Delete Tile''' button.</big>[[File:Dashboard v4 Remove Tile.png|none|thumb|375x375px]] | + | #<big>Selecting '''History''' in the header bar will open up a window with a list of activities for that device from the event table. Selecting the '''Tile''' link in the header bar will return you to the '''Tile Editor'''.</big>[[File:Dashboard v4 Tile History.png|none|thumb|576x576px|link=https://docs.hubitat.com/images/5/5d/Dashboard_v4_Tile_History.png |
| + | ]] | ||
| + | #<big>If you want to remove the tile from Dashboard, press the '''Delete Tile''' button.</big>[[File:Dashboard v4 Remove Tile.png|none|thumb|375x375px|link=https://docs.hubitat.com/images/3/30/Dashboard_v4_Remove_Tile.png | ||
| + | ]] | ||
===<big>Refresh Dashboard</big>=== | ===<big>Refresh Dashboard</big>=== | ||
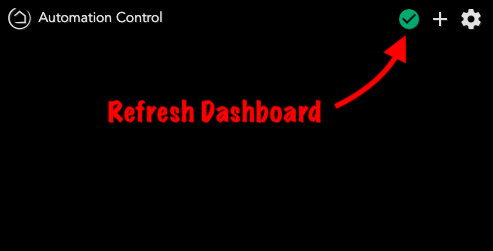
#<big>Press the green checkmark to refresh your Dashboard.</big> | #<big>Press the green checkmark to refresh your Dashboard.</big> | ||
| − | #*<big>'''NOTE:''' If you do not have any tiles added to your Dashboard, selecting the refresh checkmark will reopen the '''Getting Started''' dialogue.</big>[[File:Dashboard v 4 Editor - Refresh.png|none|thumb|492x492px]] | + | #*<big>'''NOTE:''' If you do not have any tiles added to your Dashboard, selecting the refresh checkmark will reopen the '''Getting Started''' dialogue.</big>[[File:Dashboard v 4 Editor - Refresh.png|none|thumb|492x492px|link=https://docs.hubitat.com/images/7/72/Dashboard_v_4_Editor_-_Refresh.png |
| + | ]] | ||
===<big>Dashboard Editor Settings</big>=== | ===<big>Dashboard Editor Settings</big>=== | ||
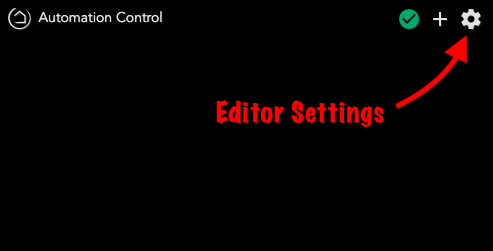
| − | #<big>Selecting the gear icon in the top right opens up the '''Editor''' '''Settings''' for this Dashboard.</big>[[File:Dashboard v 4 Editor - Settings.png|none|thumb|492x492px]] | + | #<big>Selecting the gear icon in the top right opens up the '''Editor''' '''Settings''' for this Dashboard.</big>[[File:Dashboard v 4 Editor - Settings.png|none|thumb|492x492px|link=https://docs.hubitat.com/images/7/7e/Dashboard_v_4_Editor_-_Settings.png |
| + | ]] | ||
#<big>Available links in the header bar include:</big> | #<big>Available links in the header bar include:</big> | ||
#*'''<big>Grid</big>''' | #*'''<big>Grid</big>''' | ||
| Line 102: | Line 133: | ||
====<big>Grid</big>==== | ====<big>Grid</big>==== | ||
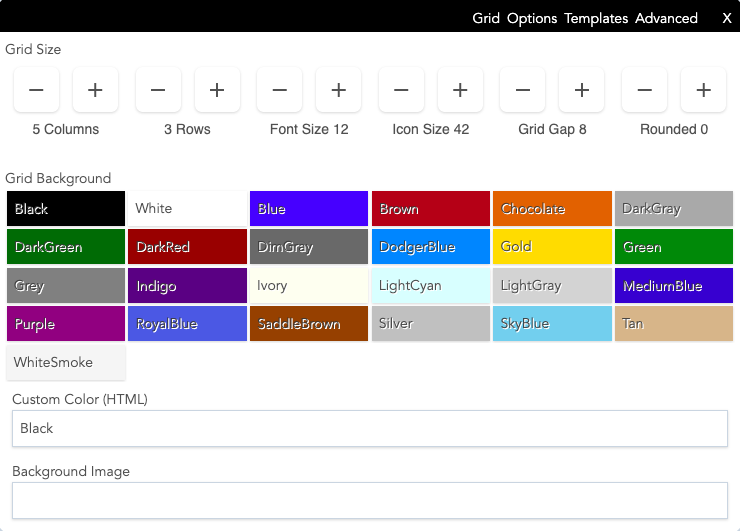
| − | <big>You can change the grid size (columns and rows), font size, icon size, grid gap, as well as how rounded the corners are for all tiles. You may also paste in a URL for a background image, or set a color using a custom HTML value for the background of the grid.</big>[[File:Dashboard v4 Editor Settings.png|none|thumb|600x600px]] | + | <big>You can change the grid size (columns and rows), font size, icon size, grid gap, as well as how rounded the corners are for all tiles. You may also paste in a URL for a background image, or set a color using a custom HTML value for the background of the grid.</big>[[File:Dashboard v4 Editor Settings.png|none|thumb|600x600px|link=https://docs.hubitat.com/images/3/37/Dashboard_v4_Editor_Settings.png |
| + | ]] | ||
====<big>Options</big>==== | ====<big>Options</big>==== | ||
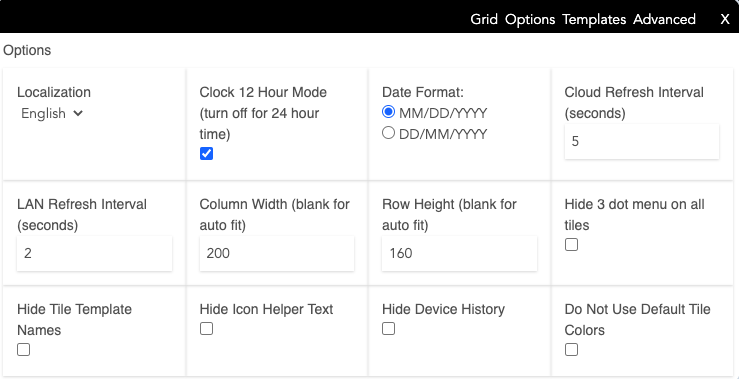
<big>You can change the options for how your Dashboard will display or hide information.</big> | <big>You can change the options for how your Dashboard will display or hide information.</big> | ||
| Line 118: | Line 150: | ||
*<big>'''Hide Icon Helper Text -''' Hides the text under each icon that indicates the attribute value.</big> | *<big>'''Hide Icon Helper Text -''' Hides the text under each icon that indicates the attribute value.</big> | ||
*<big>'''Hide Device History -''' Removes the option to view device history in the tile details area.</big> | *<big>'''Hide Device History -''' Removes the option to view device history in the tile details area.</big> | ||
| − | *<big>'''Do Not Use Default Tile Colors -''' Turning this on will disable the default colors for templates.</big>[[File:Dashboard v4 Editor Options.png|none|thumb|600x600px]] | + | *<big>'''Do Not Use Default Tile Colors -''' Turning this on will disable the default colors for templates.</big>[[File:Dashboard v4 Editor Options.png|none|thumb|600x600px|link=https://docs.hubitat.com/images/2/29/Dashboard_v4_Editor_Options.png |
| + | ]] | ||
====<big>Templates Color Editor</big>==== | ====<big>Templates Color Editor</big>==== | ||
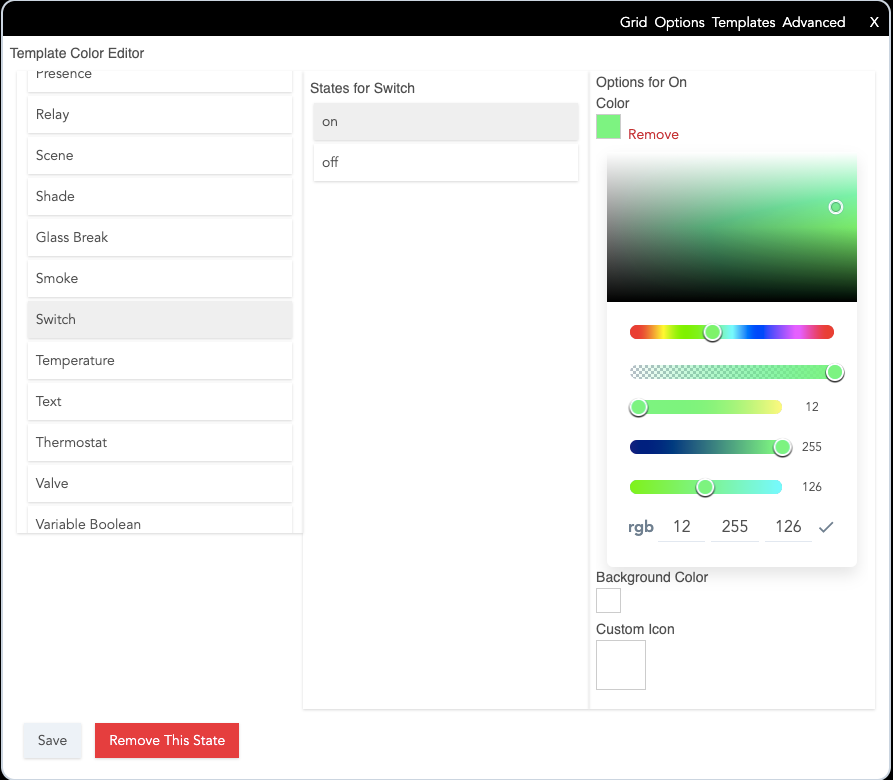
| − | <big>In this section you can change the Color, Background Color and Custom Icons for each state available for a template.</big>[[File:Dashboard v4 Template color editor.png|none|thumb|600x600px]] | + | <big>In this section you can change the Color, Background Color and Custom Icons for each state available for a template.</big>[[File:Dashboard v4 Template color editor.png|none|thumb|600x600px|link=https://docs.hubitat.com/images/1/18/Dashboard_v4_Template_color_editor.png |
| + | ]] | ||
====<big>Advanced</big>==== | ====<big>Advanced</big>==== | ||
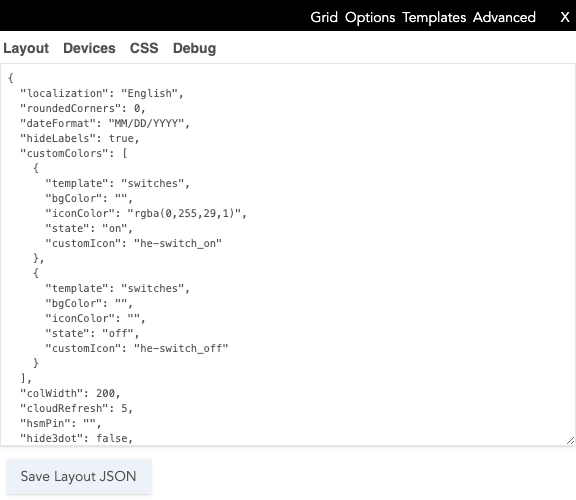
| − | *<big>'''Layout -''' This allows you to copy and paste in layouts, or make direct edits to your options, layout, and custom colors. Quickly share custom colors or layouts using the code from this window.</big>[[File:Dashboard v4 Editor Advanced Layout.png|none|thumb|575x575px]] | + | *<big>'''Layout -''' This allows you to copy and paste in layouts, or make direct edits to your options, layout, and custom colors. Quickly share custom colors or layouts using the code from this window.</big>[[File:Dashboard v4 Editor Advanced Layout.png|none|thumb|575x575px|link=https://docs.hubitat.com/images/e/ec/Dashboard_v4_Editor_Advanced_Layout.png |
| + | ]] | ||
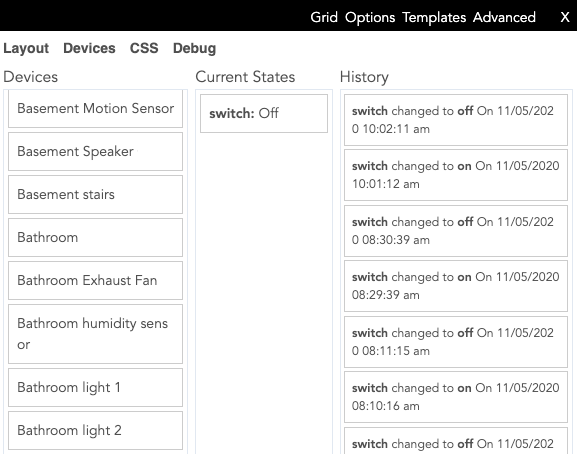
| − | *<big>'''Devices -''' This allows you to see a list of authorized devices, current states and the history (if enabled) for each device. This is helpful to troubleshoot whether a device is reporting proper states.</big>[[File:Dashboard v4 Editor Advanced Device List.png|none|thumb|576x576px]] | + | *<big>'''Devices -''' This allows you to see a list of authorized devices, current states and the history (if enabled) for each device. This is helpful to troubleshoot whether a device is reporting proper states.</big>[[File:Dashboard v4 Editor Advanced Device List.png|none|thumb|576x576px|link=https://docs.hubitat.com/images/6/6b/Dashboard_v4_Editor_Advanced_Device_List.png]] |
*<big>'''CSS''' - This is an advanced option which provides the ability to modify the Cascading Style Sheets of a Dashboard</big> | *<big>'''CSS''' - This is an advanced option which provides the ability to modify the Cascading Style Sheets of a Dashboard</big> | ||
Revision as of 16:57, 29 March 2021

Hubitat Dashboard app is a powerful and fast, grid-based tile solution for local and remote access. You can quickly create highly customizable Dashboards to monitor and control your devices from a phone, tablet or desktop. Dashboards can be assigned to specific users, allowing a custom layout for a single or multiple individuals. A convenient QR code may be captured by mobile devices to grant access for the assigned Dashboards on a per user basis.
Contents
Installing Hubitat Dashboard
- From the sidebar of your hub, select Apps and press the Add Built-In App button.
- Choose the Hubitat Dashboard from the list of Hubitat Elevation Built-In Apps.
Create A New Dashboard
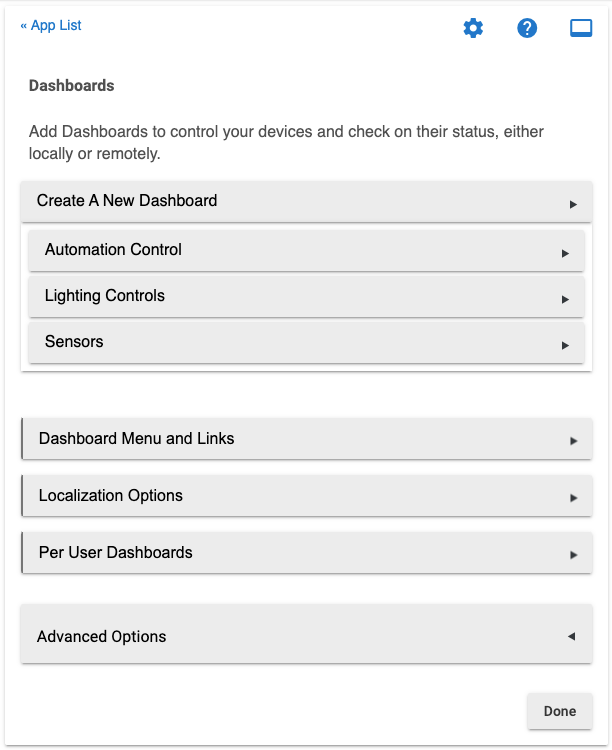
- Choose Create A New Dashboard.
- Select the devices you wish to use authorize for use in your Dashboard. To allow all devices to be used in a Dashboard, select the Toggle All On/Off option to allow any device on your hub to be authorized. Limiting the number of authorized devices will help speed up the loading of Dashboards.
- NOTE: You must select a device before you can use them in a Dashboard. If you do not choose devices to use in your Dashboard, you will receive the warning No Device Authorized when you attempt to Add A Tile to your dashboard.
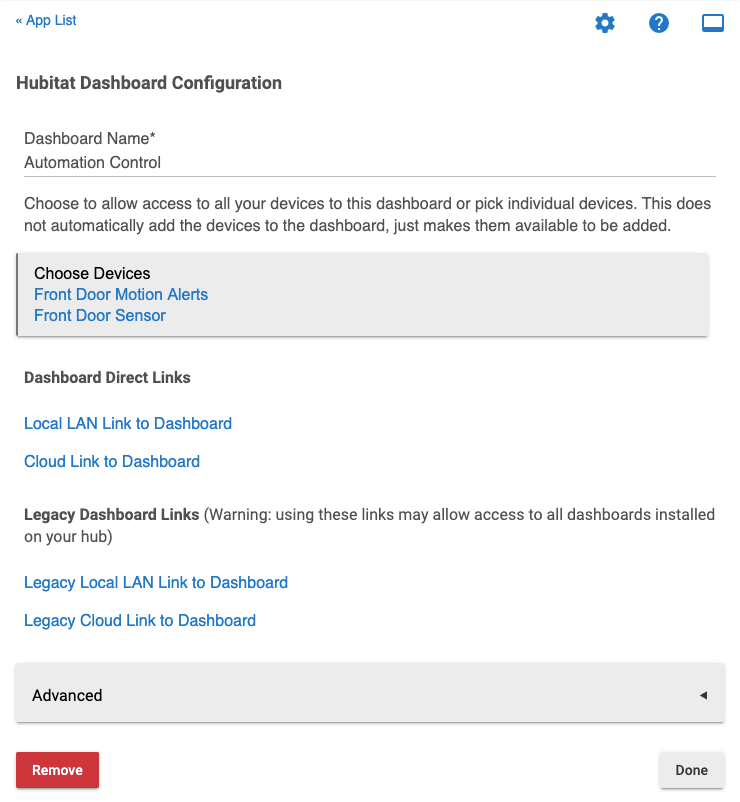
- Dashboard Direct Local and Cloud links may be copied and opened from the Dashboard child app settings. These URLs can be bookmarked to allow easy access to your Dashboards. Local LAN Link is accessible inside your home, while on the same IP network as your hub. Cloud Links are remotely accessible URLs that allow secure access to your Dashboard from anywhere.
- Once you create your Dashboards, they can be found listed in the Hubitat Dashboard parent app settings
Legacy Dashboard Links
Use these links to keep the former dashboard link behavior prior to hub platform version 2.2.4.x
WARNING: Using Legacy Dashboard Links may allow access to all dashboards installed on your hub.
Advanced Options
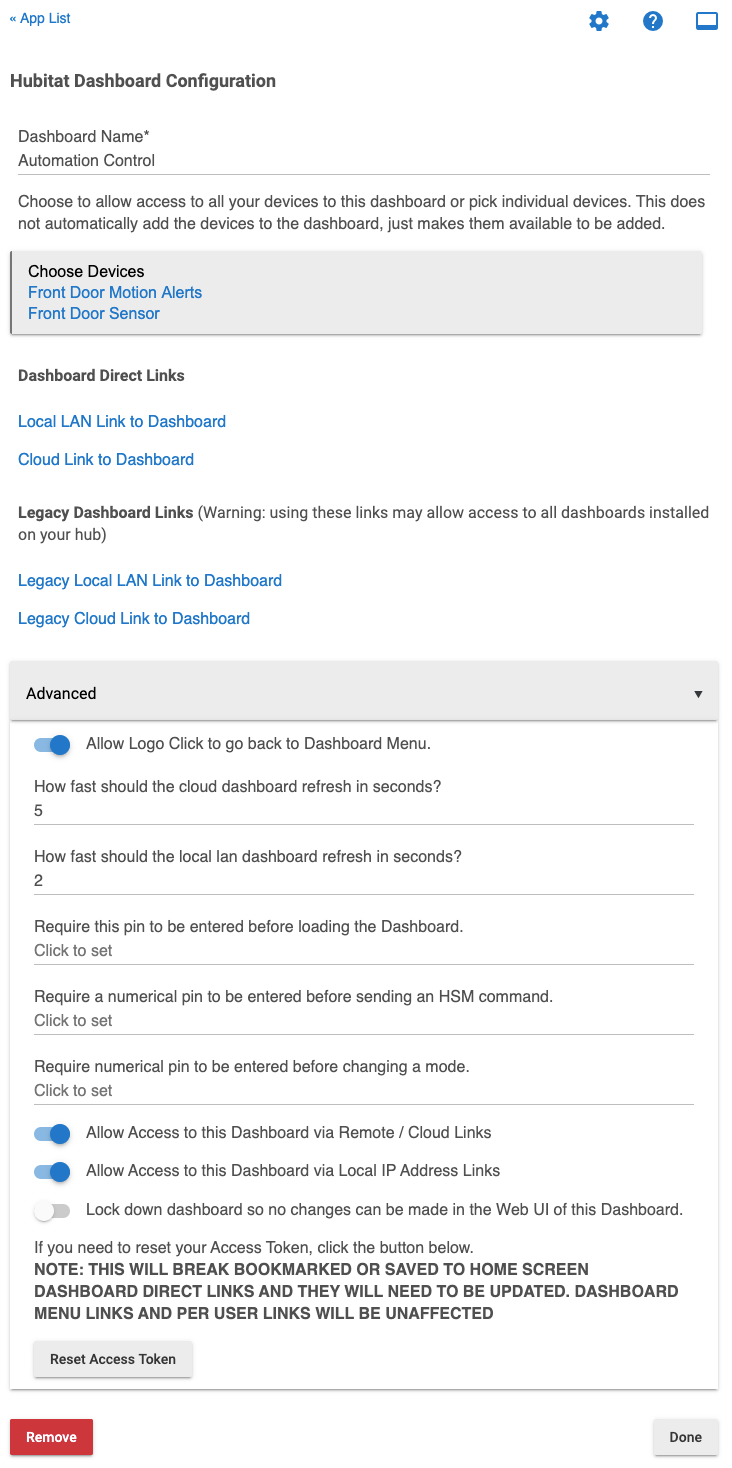
- Change how fast the Dashboard should refresh via Cloud and Local links.
- You can require that a PIN must entered before the specific Dashboard will load.
- You can require that a PIN must be entered before a Hubitat Safety Monitor command, such as Arm or Disarm can be sent.
- You may restrict Modes from being changed in the specific Dashboard until a PIN is entered.
- Access for a specific Dashboard via Cloud Links and Local Links can be disabled.
- You may set read only access, thus preventing any changes to a specific Dashboard while this option is enabled.
- Access to Dashboard Direct Local and Cloud links of a specific Dashboard can be revoked, requiring that a new link be copied.
- NOTE: If you press Reset Access Token in a Dashboard child app settings page, the Local and Cloud Dashboard Direct Links for that particular Dashboard will be invalid and you will need to repair your bookmarks with new Dashboard Direct Links. The Dashboard Direct Links of other Dashboards, Dashboard Menu links, and Per User Dashboard links will not be affected.
Dashboard Menu and Links
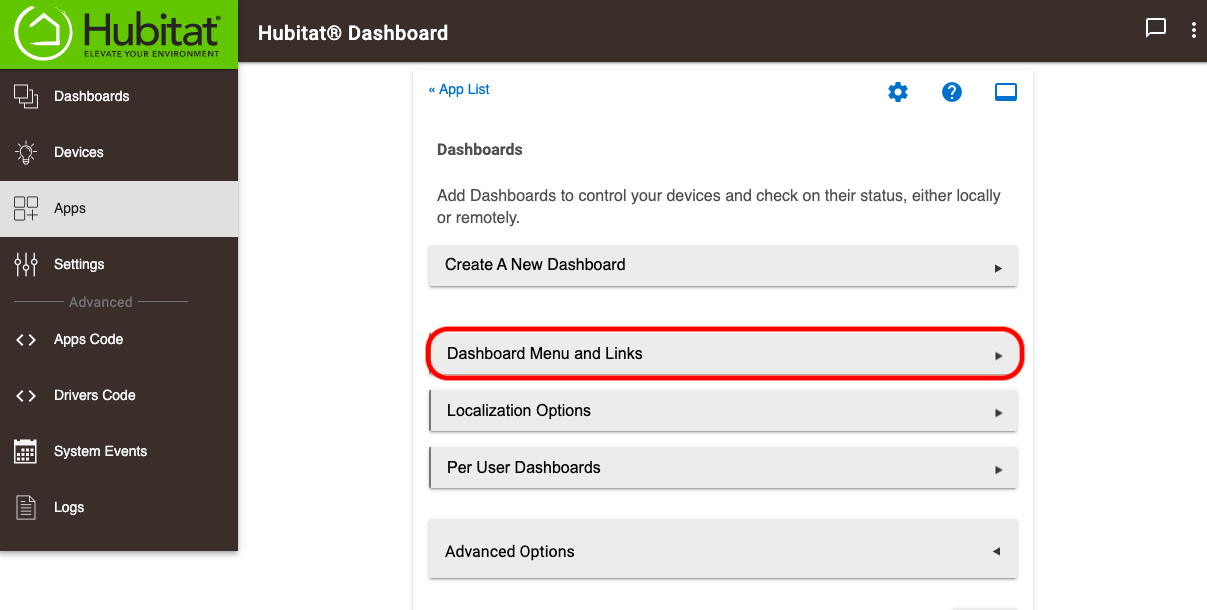
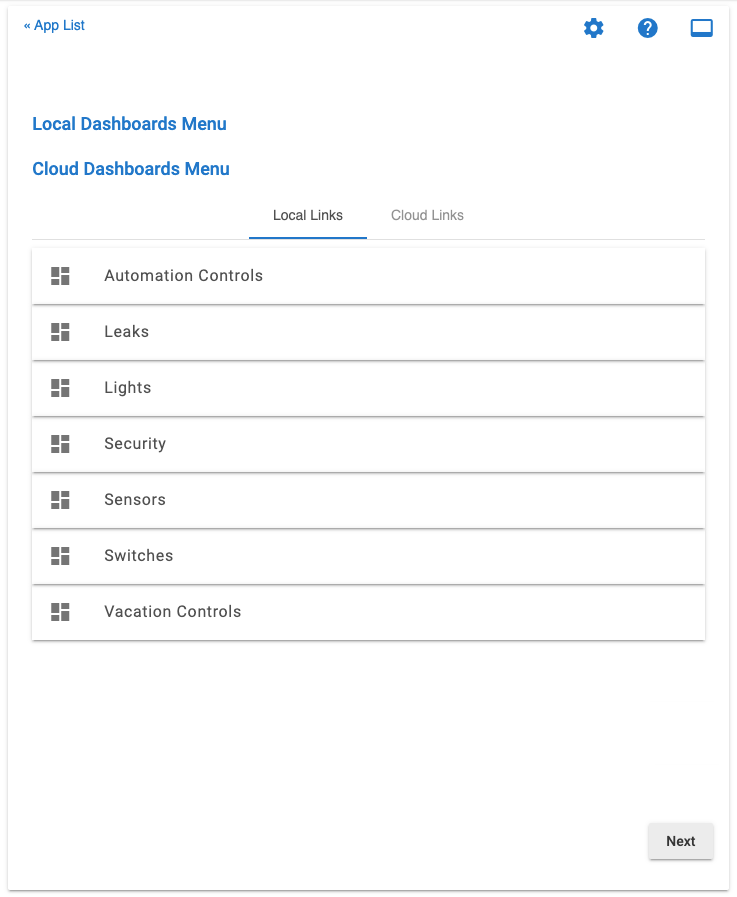
- If you need to copy links to the Local and Cloud Dashboard Menus, or links to individual Dashboards, you will find them conveniently located under Dashboard Menu and Links.
- Right-click, or tap and hold to copy the links. Alternatively, you can open the links and copy them from a browser address bar.
Dashboards Menu
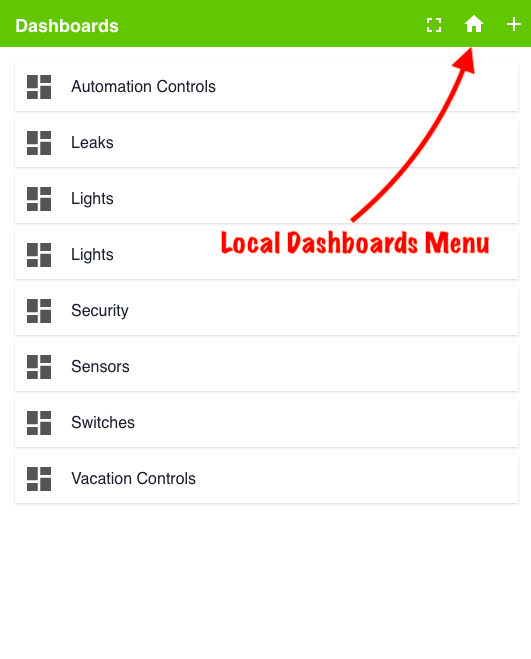
- You can bookmark the Dashboards Menu links for easy access to all of your Dashboards. The example below shows Local Dashboards indicated by the house icon.
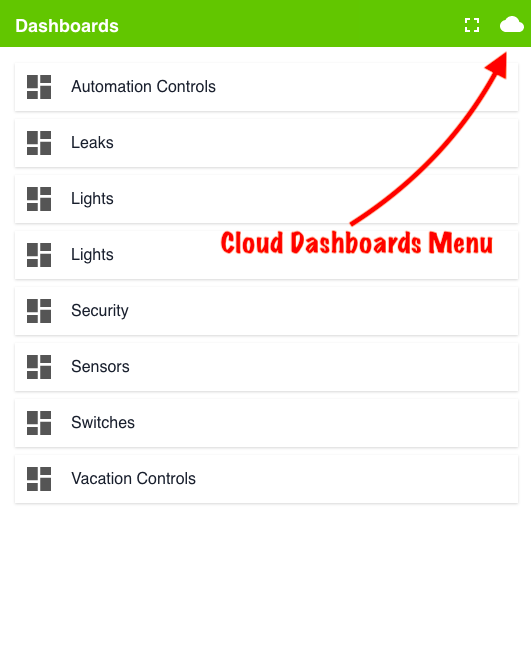
- The Cloud Dashboards Menu is indicated by a cloud icon and does not include the capability to add new dashboards.
Localization Options
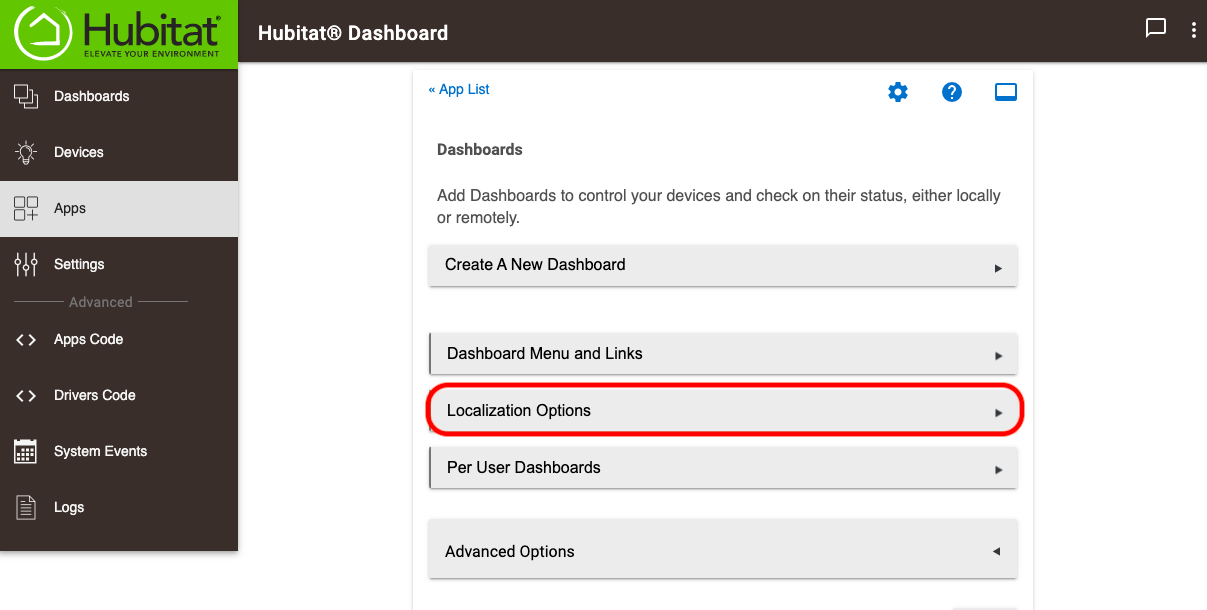
- Select Localization Options to choose the primary language for the Getting Started dialogue and the Dashboard Editor. You can build Dashboards using different languages by selecting the Localization Options for creating new Dashboards. Once set, the language specified will be the default for new Dashboards. If you need to change the Dashboard Editor Localization language later, it can be set on a per Dashboard basis. See the Dashboard Editor Settings section for more information.

Per User Dashboards
- You can restrict access for a particular Dashboard to specific users. A convenient QR code may be captured by mobile devices to grant access for the assigned Local and Cloud Dashboards on a per-user basis.
- Select New to add a New User.
- Type a name for the user and press the Add New User button.
- Select Add Dashboard to User.
- From the drop-down menu, choose the Dashboard you want the User to be able to access. NOTE: Each User and Dashboard combination assigned will have a unique access token in the URL. If you need a user to have access to multiple Dashboards, you will need to share the Dashboard Menu Links with them.
- Using a mobile device, you can capture the QR code for Dashboard Local and Cloud links, or you can copy the URL from the link above each QR code.


Dashboard Advanced Options
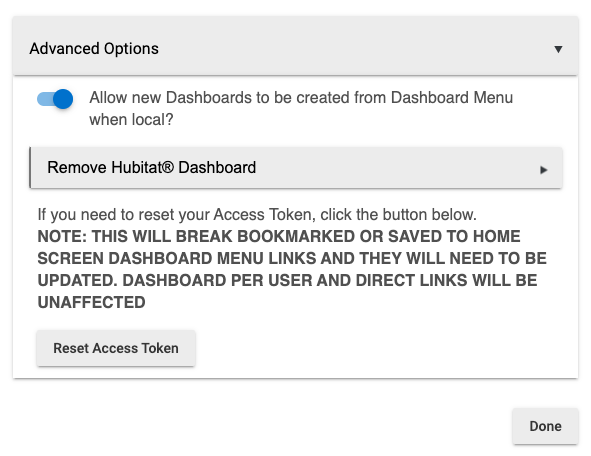
- Allow new Dashboards to be created from Dashboard Menu when local? - This option enables you to control if new Dashboards are allowed to be created from the Dashboard Menu when accessed from a local connection.
- Remove Hubitat Dashboard - Selecting this button will remove the Hubitat Dashboard parent app and all of the associated Dashboards child apps.
- Reset Access Token in the Dashboard parent app settings will generate new a new token for the Local and Cloud Dashboard Menu links. Existing Dashboard Menu links will be invalid and you will need to repair your bookmarks with new Dashboard Menu links. The Dashboard Direct Links and Per User Dashboard links will not be affected.
Getting Started
- Once Dashboards have been created, choose the local link to open the Dashboard in a new browser window or tab.
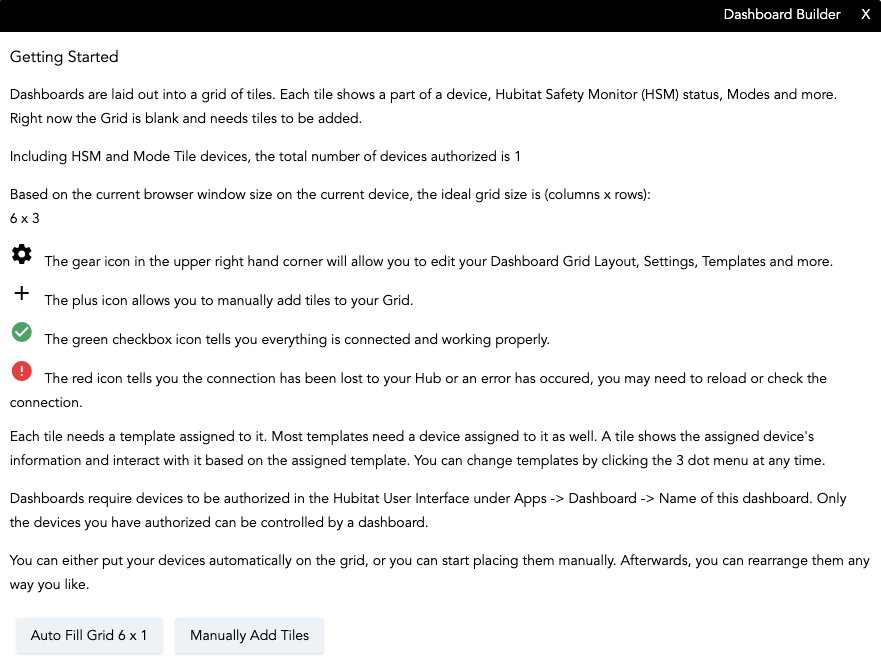
- You will first see the Getting Started dialogue window with helpful instructions to assist you in building a Dashboard.
- You can press the Auto Fill Grid 6 x 1 button and devices will be automatically added to the Dashboard with a default tile template. Auto Fill Grid 6 x 1 will automatically optimize the default Grid Size and build a Dashboard specifically for your device and the web browser it was initiated from. It is recommended to use a browser on the device you intend to normally use with Hubitat Dashboards. Alternatively, you may simply select the Manually Add Tiles button, or press the X at the top right to close the Dashboard Builder and start adding tiles without assistance.
Dashboard Builder
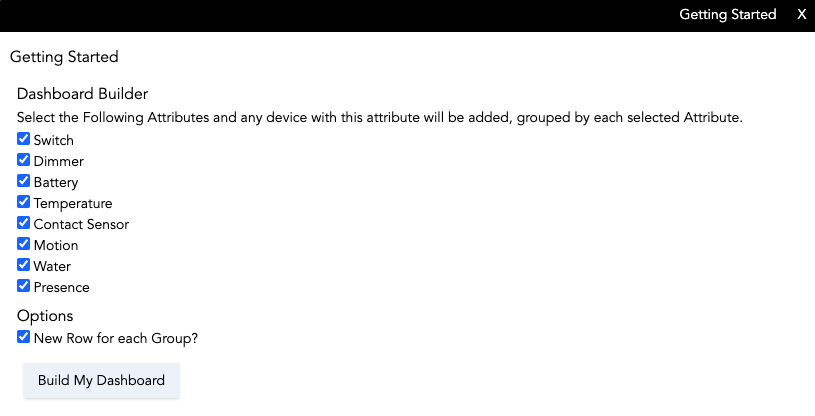
- Selecting the Dashboard Builder in the header bar as shown below allows creating a Dashboard based on the devices you have authorized and their specific attributes. Select which device type attributes you want added and press the Build My Dashboard button to create a quick and easy Dashboard with device type groups that match the selected attributes.
- Dashboard Builder will automatically optimize the default Grid Size and build a Dashboard specifically for your device and the web browser it was initiated from. It is recommended to use a browser on the device you intend to normally use with Hubitat Dashboards.
Add A Tile
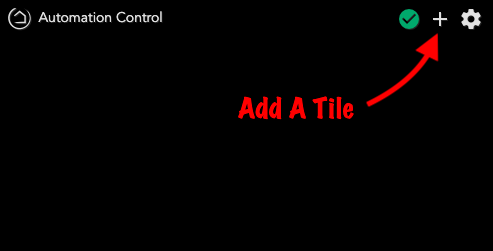
- Select the + icon in the top right to open the Add A Tile dialog.
- You can change the tile Width and Height to set how big the tile will be.
- Pick a Device, then Pick a Template, and finally set the Options for that template.
- Press the Add Tile button and you will see the tile added to your Dashboard in the spot you selected. The Grid will change to gray in that spot where the Dashboard now has a tile.
Edit Tile
- You can edit any tile by clicking the 3 dot menu in the top right of any tile. This will open an editing window and allow you to move the tile around on the grid by pressing the arrow buttons or by selecting the position in the grid layout where you want this tile to move on the Dashboard.
- You can quickly jump between editing of tiles by using the back and forward buttons in the header bar to either side of Edit Tile ID:
- You may change the Device, Template or any Options for the tile.
- Selecting History in the header bar will open up a window with a list of activities for that device from the event table. Selecting the Tile link in the header bar will return you to the Tile Editor.
- If you want to remove the tile from Dashboard, press the Delete Tile button.
Refresh Dashboard
- Press the green checkmark to refresh your Dashboard.
- NOTE: If you do not have any tiles added to your Dashboard, selecting the refresh checkmark will reopen the Getting Started dialogue.
Dashboard Editor Settings
- Selecting the gear icon in the top right opens up the Editor Settings for this Dashboard.
- Available links in the header bar include:
- Grid
- Options
- Templates
- Advanced
Grid
You can change the grid size (columns and rows), font size, icon size, grid gap, as well as how rounded the corners are for all tiles. You may also paste in a URL for a background image, or set a color using a custom HTML value for the background of the grid.
Options
You can change the options for how your Dashboard will display or hide information.
- Localization - You can modify the language of the Dashboard Editor and Getting Started dialogue for this specific Dashboard. To set the default language for new Dashboards, see the Localization Options section above.
- Clock 12 Hour Mode (turn off for 24 hour time) - Choose between 12 hour or 24 hour time display for any clock template or history.
- Date Format - Switch between Month/Day/Year or Day/Month/Year formats.
- Cloud and LAN Refresh Intervals - Set these to determine how fast the Dashboard will poll to show updates on screen.
- NOTE: LAN Refresh interval adjustment is only needed when a Dashboard can’t connect via websocket. Under normal circumstances, connections over websocket should update instantly.
- Column Width and Row Height - Removing these values will auto fit tiles to the grid. Setting specific values will result in the Dashboard rendering tiles at fixed sizes, thus forcing the Dashboard to scroll when it overflows the browser window.
- Allow Logo Click - Disable this if you don’t want to use this option as a means to return to the Dashboard menu.
- Hide 3 dots - This will hide all the 3 dot menu at the top-right of each tile. You will need to re-enable the 3 dot menu if you want to edit tiles.
- NOTE: This does not make the tiles read only, and the option can still be set from inside the Dashboard App settings in the Hubitat Web Interface.
- Hide Tile Template Names - This allows you to remove the names that are at the top of most templates.
- Hide Icon Helper Text - Hides the text under each icon that indicates the attribute value.
- Hide Device History - Removes the option to view device history in the tile details area.
- Do Not Use Default Tile Colors - Turning this on will disable the default colors for templates.
Templates Color Editor
In this section you can change the Color, Background Color and Custom Icons for each state available for a template.
Advanced
- Layout - This allows you to copy and paste in layouts, or make direct edits to your options, layout, and custom colors. Quickly share custom colors or layouts using the code from this window.
- Devices - This allows you to see a list of authorized devices, current states and the history (if enabled) for each device. This is helpful to troubleshoot whether a device is reporting proper states.
- CSS - This is an advanced option which provides the ability to modify the Cascading Style Sheets of a Dashboard