Difference between revisions of "Maker API"
(Add ALT text) (Tag: Visual edit) |
|||
| Line 5: | Line 5: | ||
==='''Installing Maker API'''=== | ==='''Installing Maker API'''=== | ||
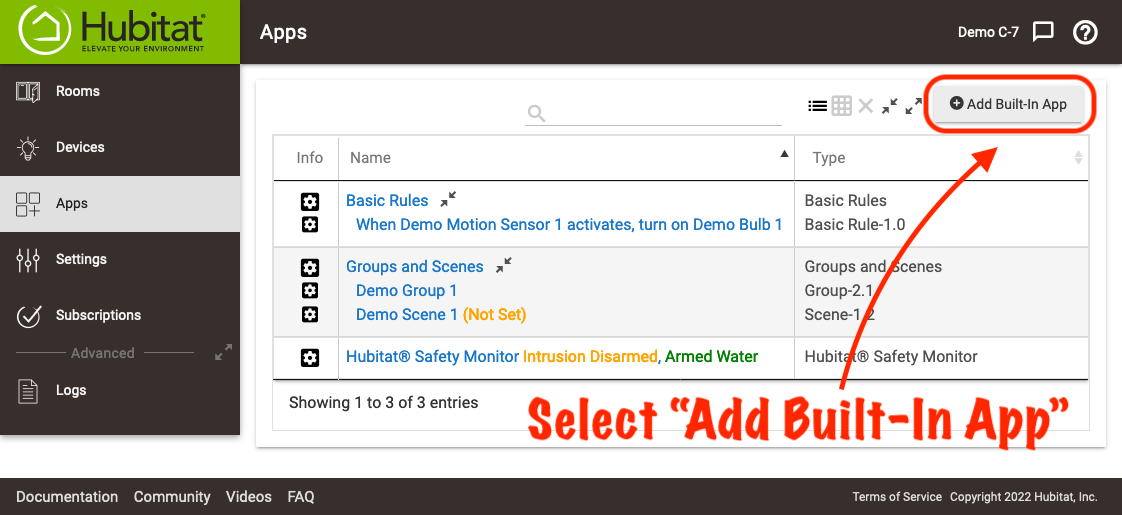
| − | #<big>From the sidebar of your hub, select '''Apps''' and press the '''Add Built-In App''' button.</big>[[File:Install Built-In App 2.0.png|none|thumb|600x600px|link=https://docs.hubitat.com/images/7/77/Install_Built-In_App_2.0.png | + | #<big>From the sidebar of your hub, select '''Apps''' and press the '''Add Built-In App''' button.</big>[[File:Install Built-In App 2.0.png|none|thumb|600x600px|link=https://docs.hubitat.com/images/7/77/Install_Built-In_App_2.0.png ]] |
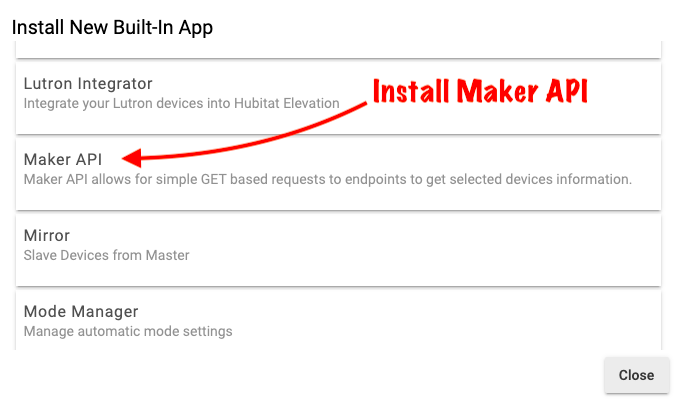
| − | ]] | + | #<big>Choose '''Maker API''' from the list of Hubitat Elevation Built-In Apps.</big>[[File:Install Maker API.png|none|thumb|600x600px|link=https://docs.hubitat.com/images/9/94/Install_Maker_API.png |alt=Screenshot of "Maker API" in Hubitat built-in apps list]] |
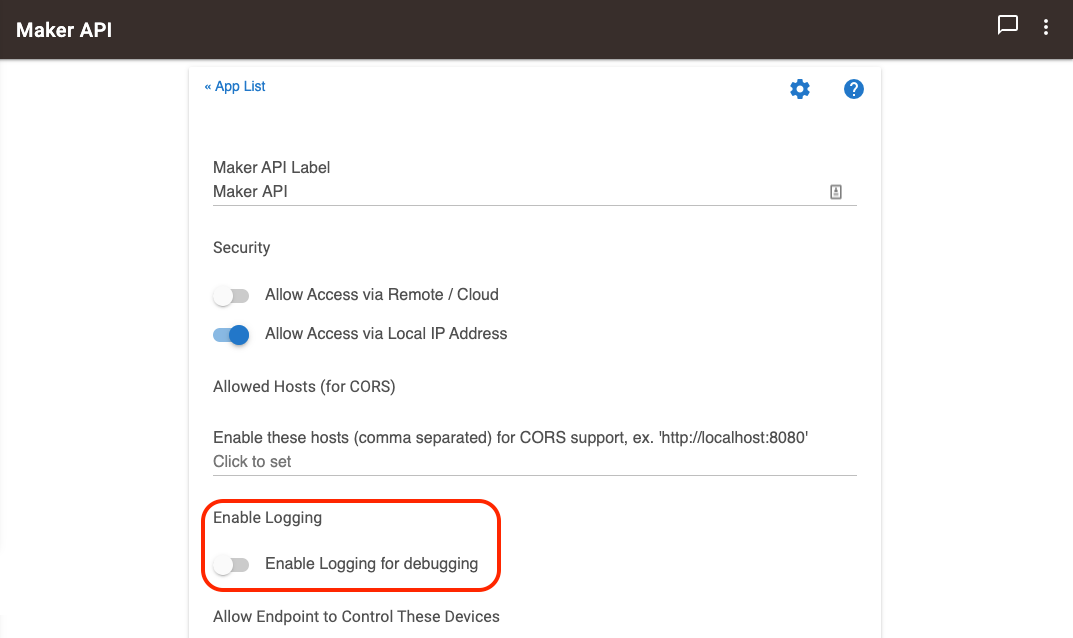
| − | #<big>Choose '''Maker API''' from the list of Hubitat Elevation Built-In Apps.</big>[[File:Install Maker API.png|none|thumb|600x600px|link=https://docs.hubitat.com/images/9/94/Install_Maker_API.png | + | #<big>You can enable Logging if you want to see detailed information in the [[logs]]. Remember to open up logs in another tab.</big>[[File:Enable Logging Maker API.png|none|thumb|600x600px|link=https://docs.hubitat.com/images/6/68/Enable_Logging_Maker_API.png |alt=Screenshot of "Enable logging for debugging" option in Maker API app]] |
| − | ]] | ||
| − | #<big>You can enable Logging if you want to see detailed information in the [[logs]]. Remember to open up logs in another tab.</big>[[File:Enable Logging Maker API.png|none|thumb|600x600px|link=https://docs.hubitat.com/images/6/68/Enable_Logging_Maker_API.png | ||
| − | ]] | ||
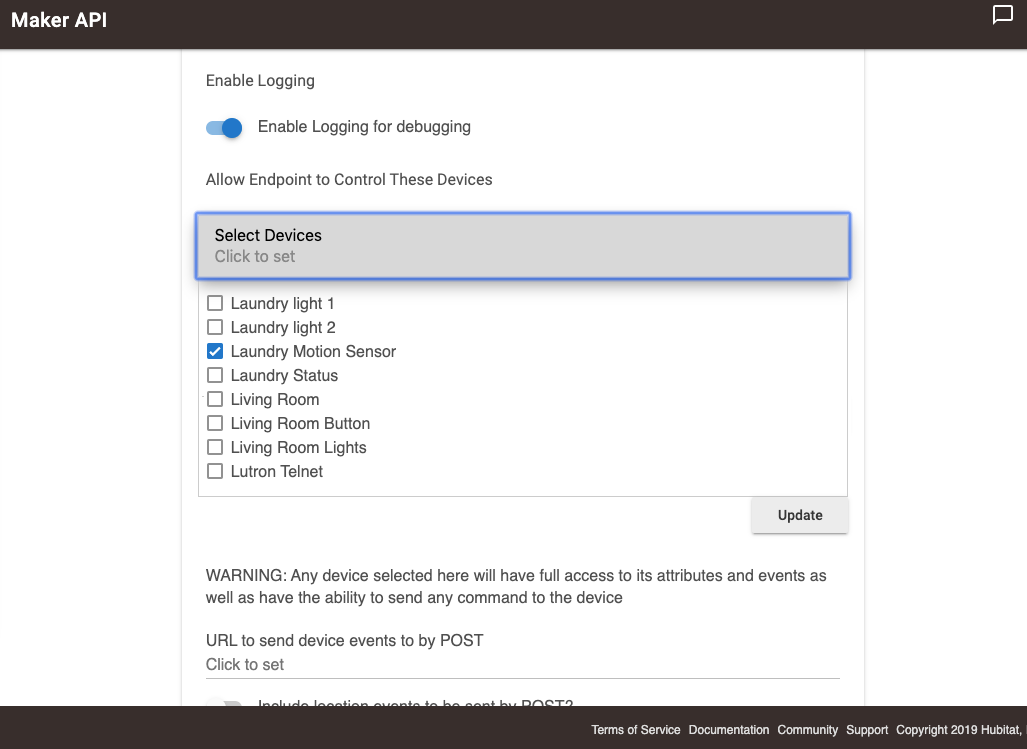
#<big>Select the devices you want to authorize for this API.</big> | #<big>Select the devices you want to authorize for this API.</big> | ||
| − | #*<big>'''NOTE''': Only the devices you select will be accessible via the endpoints.</big>[[File:Maker API Select Devices.png|none|thumb|600x600px|link=https://docs.hubitat.com/images/4/4f/Maker_API_Select_Devices.png | + | #*<big>'''NOTE''': Only the devices you select will be accessible via the endpoints.</big>[[File:Maker API Select Devices.png|none|thumb|600x600px|link=https://docs.hubitat.com/images/4/4f/Maker_API_Select_Devices.png |alt=Screenshot of "Select Devices" input to authorize devices for Maker API]] |
| − | ]] | ||
#<big>Select '''Update'''</big> | #<big>Select '''Update'''</big> | ||
#<big>Next, you will see URLs to get you started. Each endpoint URL is made up of the following segments: http:// [hub ip address] /apps/api/[app id] /[endpoint path ?access_token=[access_token]</big> | #<big>Next, you will see URLs to get you started. Each endpoint URL is made up of the following segments: http:// [hub ip address] /apps/api/[app id] /[endpoint path ?access_token=[access_token]</big> | ||
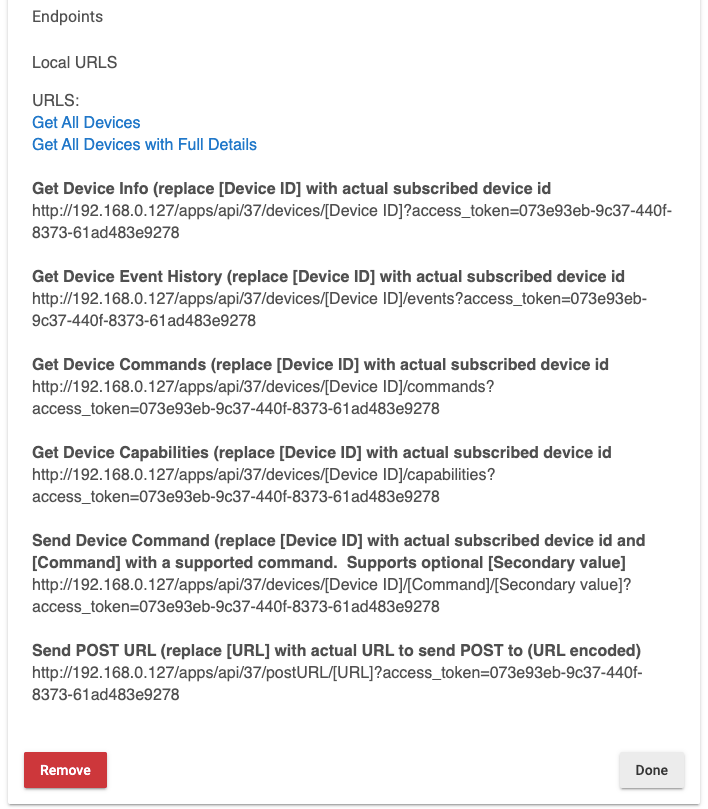
| − | #*<big>'''NOTE''': Your access token is an Authorization Token, similar to a username and password. Anyone with this token can access these endpoints. To reset your access token, you will need to remove and re-add the Maker API app.</big>[[File:Maker API endpoints.png|none|thumb|686x686px|link=https://docs.hubitat.com/images/c/c3/Maker_API_endpoints.png | + | #*<big>'''NOTE''': Your access token is an Authorization Token, similar to a username and password. Anyone with this token can access these endpoints. To reset your access token, you will need to remove and re-add the Maker API app.</big>[[File:Maker API endpoints.png|none|thumb|686x686px|link=https://docs.hubitat.com/images/c/c3/Maker_API_endpoints.png |alt=Screenshot: Example URLs for Maker API instance]] |
| − | ]] | ||
#<big>Press '''Done'''</big> | #<big>Press '''Done'''</big> | ||
Revision as of 23:59, 2 July 2022

This API is a simple HTTP GET API that allows you to get the status of your authorized devices and interact with them.
Installing Maker API
- From the sidebar of your hub, select Apps and press the Add Built-In App button.
- Choose Maker API from the list of Hubitat Elevation Built-In Apps.
- You can enable Logging if you want to see detailed information in the logs. Remember to open up logs in another tab.
- Select the devices you want to authorize for this API.
- NOTE: Only the devices you select will be accessible via the endpoints.
- Select Update
- Next, you will see URLs to get you started. Each endpoint URL is made up of the following segments: http:// [hub ip address] /apps/api/[app id] /[endpoint path ?access_token=[access_token]
- NOTE: Your access token is an Authorization Token, similar to a username and password. Anyone with this token can access these endpoints. To reset your access token, you will need to remove and re-add the Maker API app.
- Press Done
To Get a list of all authorized devices
/devices
This returns the following JSON:
[
    {
        "id": "1",
        "name": "My First Device",
        "label": "Living Room Light"
    },
    {
        "id": "2",
        "name": "My Second Device",
        "label": "Living Room Switch"
    }
]
/devices/all
This returns detailed information about each authorized device in JSON:
[
    {
        "name": "My First Device",
        "label": "Living Room Light",
        "type": "Virtual Switch",
        "id": "1",
        "date": "2018-10-16T00:08:18+0000",
        "model": null,
        "manufacturer": null,
        "capabilities": [
            "Switch",
            "Refresh"
        ],
        "attributes": {
            "switch": "off"
        },
        "commands": [
            {
                "command": "off"
            },
            {
                "command": "on"
            },
            {
                "command": "refresh"
            }
        ]
    },
    {
        "name": "My Second Device",
        "label": "Living Room Switch",
        "type": "Virtual Switch",
        "id": "2",
        "date": "2018-01-03T02:49:57+0000",
        "model": null,
        "manufacturer": null,
        "capabilities": [
            "Switch",
            "Refresh"
        ],
        "attributes": {
            "switch": "on"
        },
        "commands": [
            {
                "command": "off"
            },
            {
                "command": "on"
            },
            {
                "command": "refresh"
            }
        ]
    }
]
This endpoint contains all the known information about the device, including capabilities, attributes and commands.
- NOTE: There is a limited subset of allowed commands, so just because a command shows up in this list, does not mean it will work via the API.
/devices/[device id]
This endpoint returns back the same details as /devices/all but only for a specific device.
/devices/[device id]/events
Returns a JSON object of recent events for that [device id]
[
    {
        "device_id": "1",
        "label": "Living Room Light",
        "name": "My First Device",
        "value": "off",
        "date": "2018-10-16T00:08:18+0000",
        "isStateChange": null,
        "source": "DEVICE"
    }
]
/devices/[device id]/commands
Returns a JSON object of the commands for that [device id]
[
    {
        "command": "off"
    },
    {
        "command": "on"
    },
    {
        "command": "refresh"
    }
]
/devices/[device id]/[command]/[secondary value]
This is the most powerful endpoint, as it can send a command to the authorized [device id] including an optional [secondary value]
Example: To turn on a light device 1
/devices/1/on
Example 2: To set the level of a light to 50%
/devices/1/setLevel/50
You should get back a full detail response in JSON for that object.