Difference between revisions of "Sonos Integration"
| Line 53: | Line 53: | ||
#<big>Press '''Done''' to finish and test your rule by activating the trigger device.</big>[[File:RM4 TTS example finish rule.png|none|thumb|835x835px|link=https://docs.hubitat.com/images/9/91/RM4_TTS_example_finish_rule.png | #<big>Press '''Done''' to finish and test your rule by activating the trigger device.</big>[[File:RM4 TTS example finish rule.png|none|thumb|835x835px|link=https://docs.hubitat.com/images/9/91/RM4_TTS_example_finish_rule.png | ||
]] | ]] | ||
| − | #<big>As you become more familiar with building rules, you can explore using Rule Machine Actions called Custom Commands. These allow you to specify actions such as '''Pause''', '''nextTrack''', '''previousTrack''', '''Mute''', etc. These may be independent actions, or they can follow, or proceed the TTS action.</big>[[File:RM4 Sonos example of custom commands 2.png|none|thumb|960x960px]] | + | #<big>As you become more familiar with building rules, you can explore using Rule Machine Actions called Custom Commands. These allow you to specify actions such as '''Pause''', '''nextTrack''', '''previousTrack''', '''Mute''', etc. These may be independent actions, or they can follow, or proceed the TTS action.</big>[[File:RM4 Sonos example of custom commands 2.png|none|thumb|960x960px|link=https://docs.hubitat.com/images/9/97/RM4_Sonos_example_of_custom_commands_2.png]] |
<big>As you can see from the above examples, the power of Rule Machine can be leveraged to specify criteria that must be met before a rule action is run. In the example rule, the TTS message will be at a specified volume level. Once you are more familiar with building Rule Machine rules and '''[[Rule-4.0#Rule-4.0 Conditional Actions and Logical Expressions|Conditional Actions]]''' , TTS announcements at different volumes, occurring at different times of the day, only in specified '''[[Modes]]''', etc., becomes very simple to achieve.</big> | <big>As you can see from the above examples, the power of Rule Machine can be leveraged to specify criteria that must be met before a rule action is run. In the example rule, the TTS message will be at a specified volume level. Once you are more familiar with building Rule Machine rules and '''[[Rule-4.0#Rule-4.0 Conditional Actions and Logical Expressions|Conditional Actions]]''' , TTS announcements at different volumes, occurring at different times of the day, only in specified '''[[Modes]]''', etc., becomes very simple to achieve.</big> | ||
Revision as of 16:09, 30 March 2021

Connecting your Hubitat Elevation to your Sonos device is an easy way to add audio and text to speech voice notifications to your home automations. Using the Hubitat Sonos Integration, you can control the volume and playback functions of your Sonos speakers, plus send voice notifications using the built-in Text to Speech (TTS) capabilities of your Hubitat Elevation hub.
Contents
Installing the Hubitat Sonos Integration
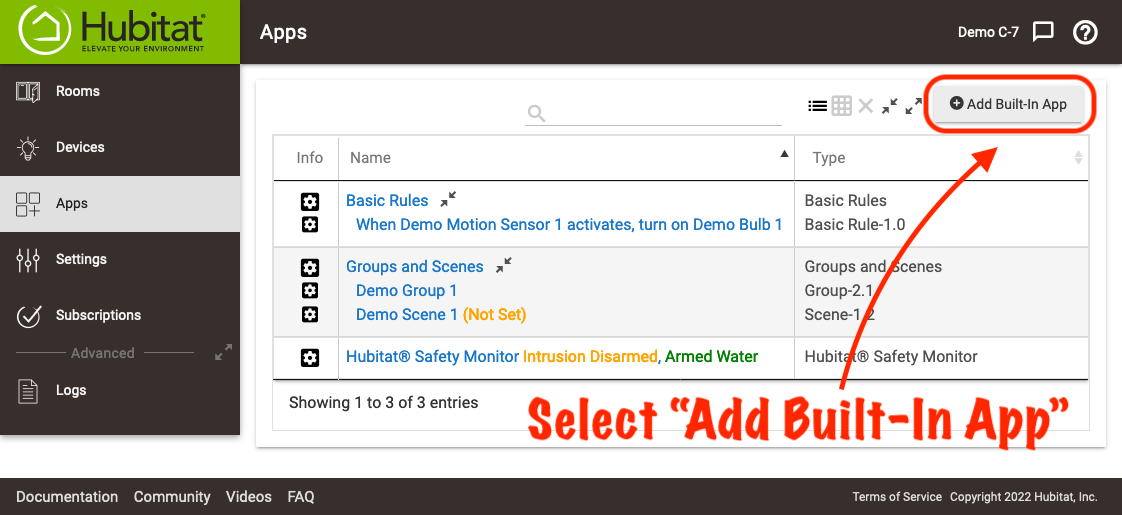
- From the sidebar of your hub, select Apps and press the Add Built-In App button.
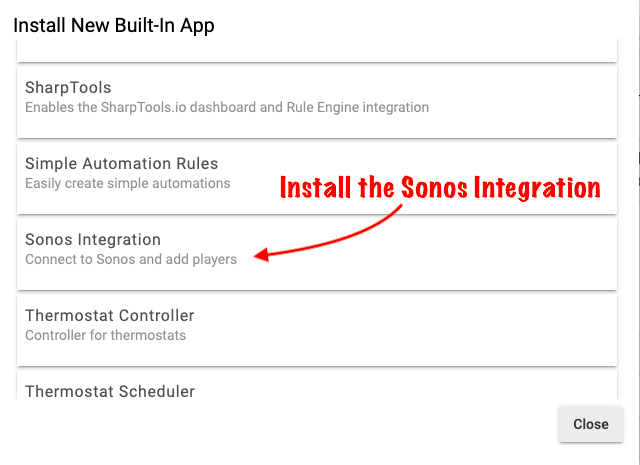
- Choose Sonos Integration from the list of Built-In Apps.
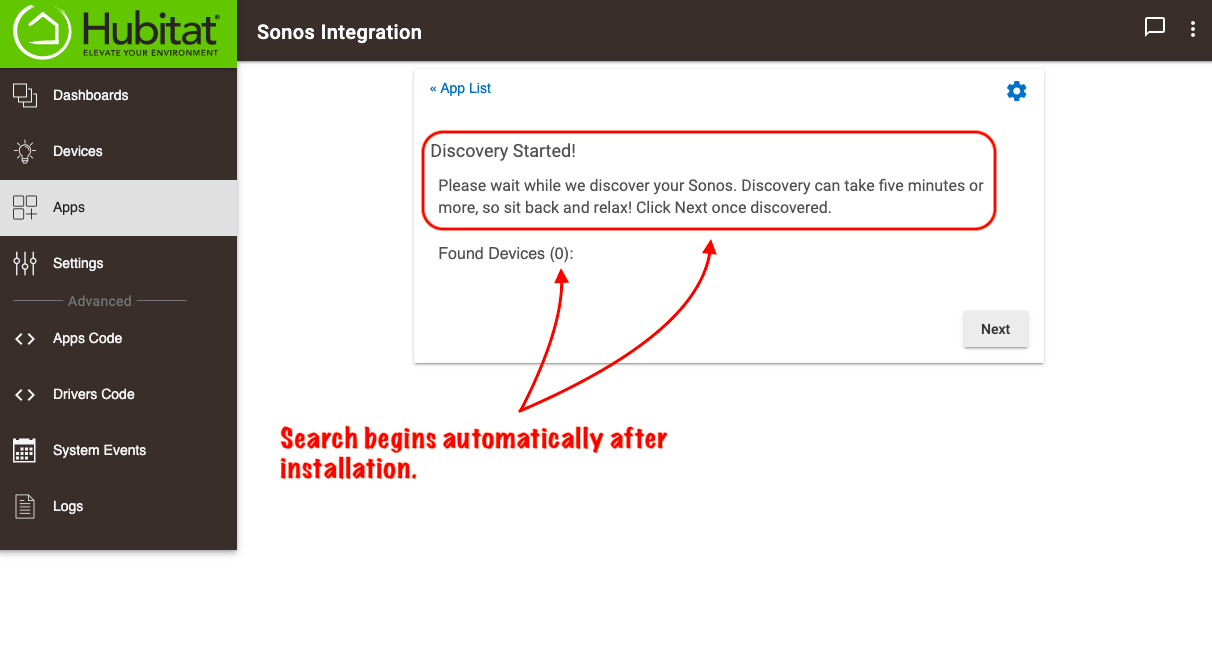
- Wait for your Hubitat Elevation hub to search for Sonos devices. This can take 5 minutes or more, but typically Sonos devices are found with 30 seconds from installation the Sonos Integration app.
- Once your Sonos device is found, press the Next button.
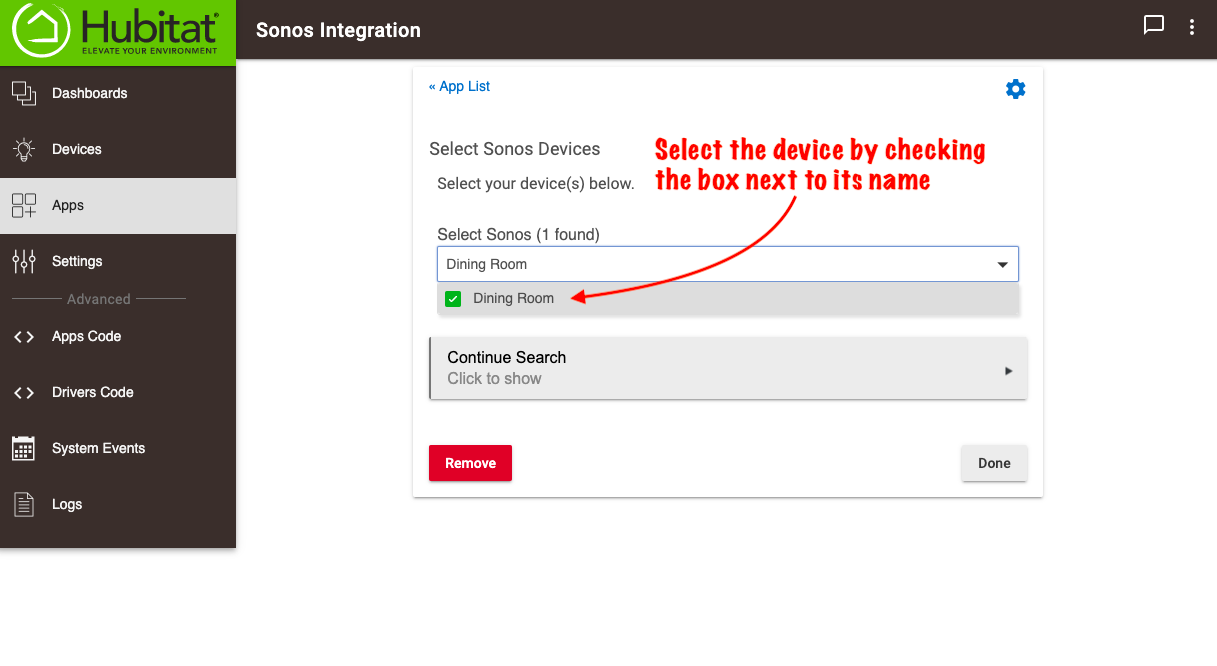
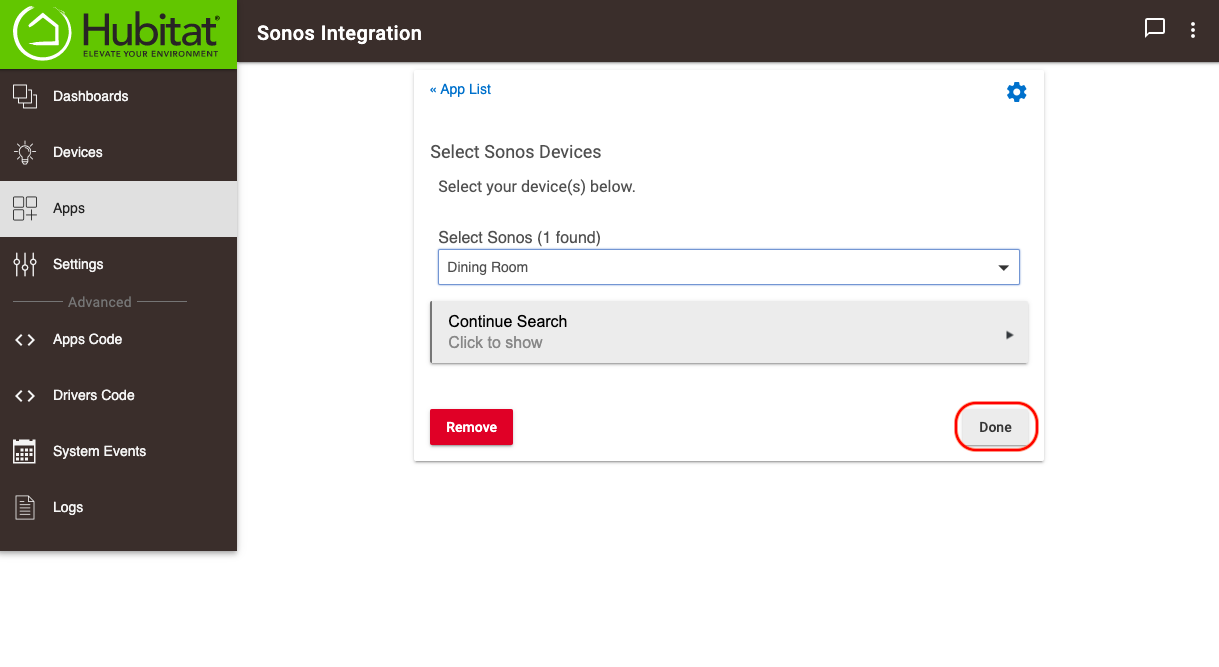
- Make your selection by checking the box next to the name of the found device you want to use. To add additional devices not discovered during the Sonos Integration installation, press the Continue Search button.
- Press the Done button to finish.

Test your Sonos Integration
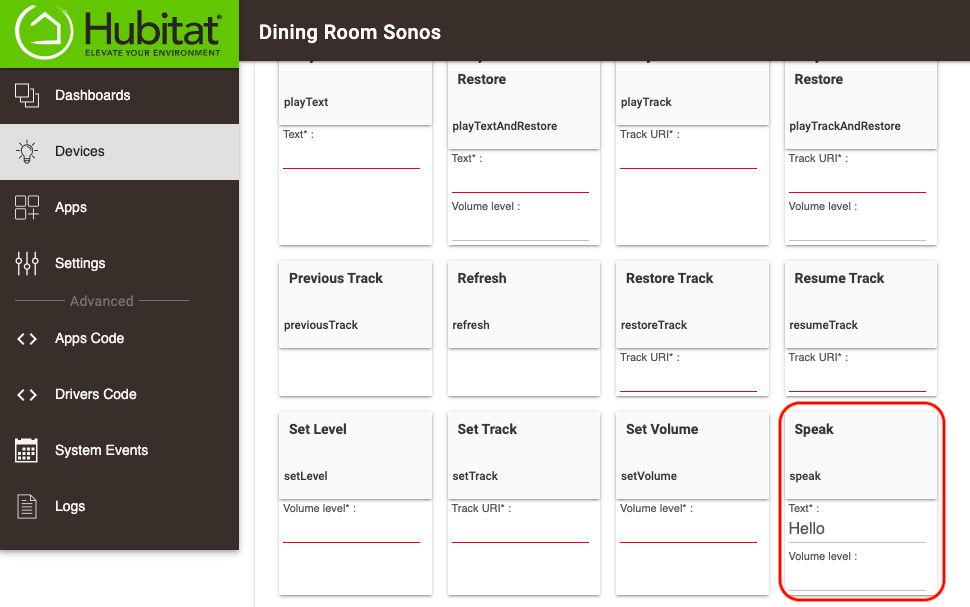
- In the list of Devices, find the name of your Sonos device you are testing. In the example above, it is named Dining Room Sonos.
- Scroll down and find the Speak command.
- NOTE: There will be some duplicate commands shown, since the same command is part of two separate capabilities of the integration. You will notice for example, one of the Speak commands also has a field for Volume level, while the other only has a single field for testing the TTS message you want to hear from the Sonos device.
- Type your test word or phrase into the Text box below the Speak command and press the Speak button. You should hear your word or phrase from your Sonos device.
Using the Hubitat Notifications app for Text to Speech (TTS) messages
The Notifications app can be used to send TTS messages to your Sonos device. This is the simplest way to play TTS announcements on your Sonos. For detail on how to use the Notifications app, please see the Notifications document.
Controlling your Sonos Integration with Rule Machine®
There are several ways to control your Sonos device with Rule Machine and send Text to Speech (TTS) messages. While it's possible to simply use the Notifications app to play TTS messages on your Sonos device, it is helpful to understand how to build Rule Machine rules, since you can combine multiple actions, control multiple devices, and trigger all actions within a single rule by way of one or multiple triggers. This is substantially more powerful than a single TTS Notification and will help you Elevate your home automation to new levels. For our basic example below however, the Sonos device will simply play the TTS message at volume 50, anytime the front door contact sensor is opened.
- If you have not already done so, install Rule-4.0 with the same method used to install the Sonos Integration at the beginning of this document.
- From the Apps page of the Hubitat Web Interface, select Rule Machine
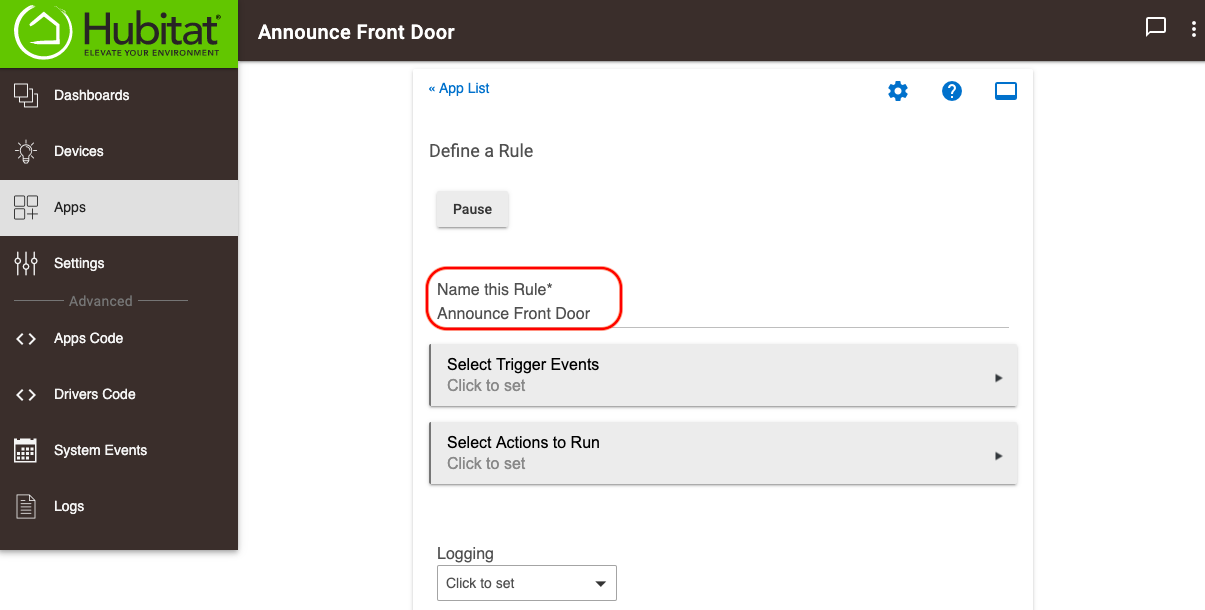
- Give your rule a name. For this simple example, we will announce the via TTS, the message "Front Door" anytime the front door contact sensor is open, so it therefore makes sense to name our example rule "Announce Front Door".
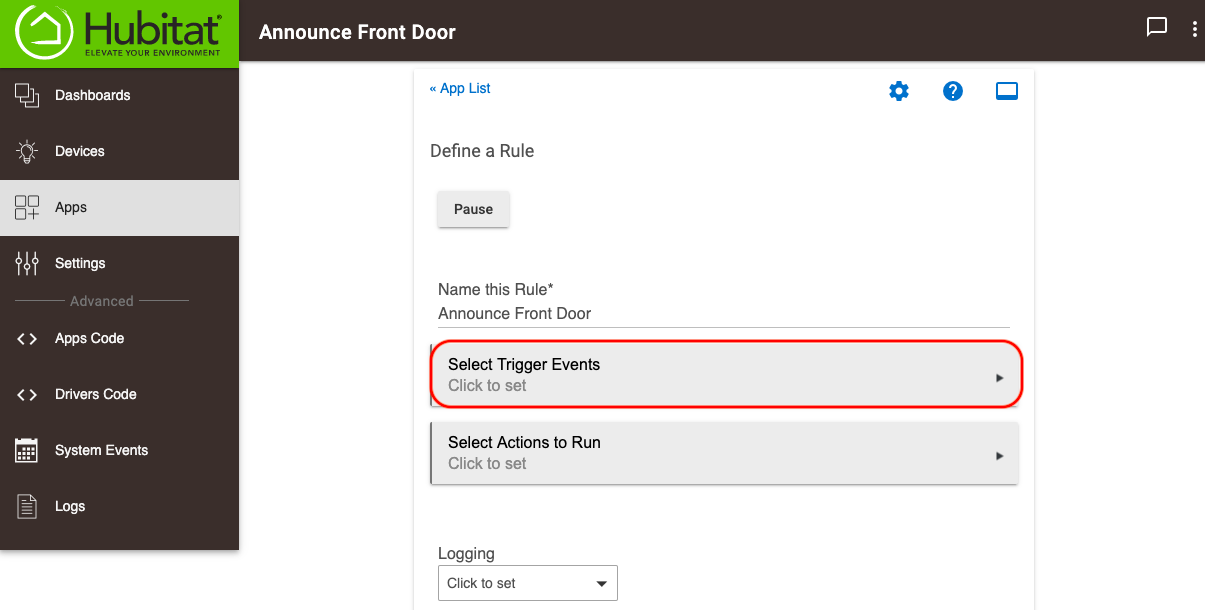
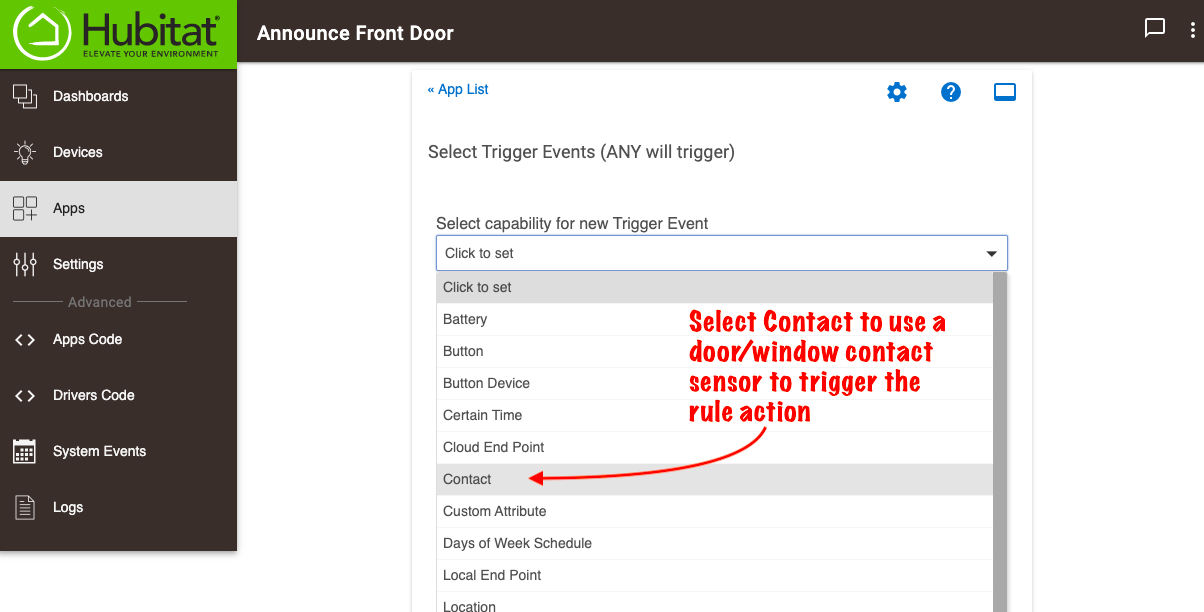
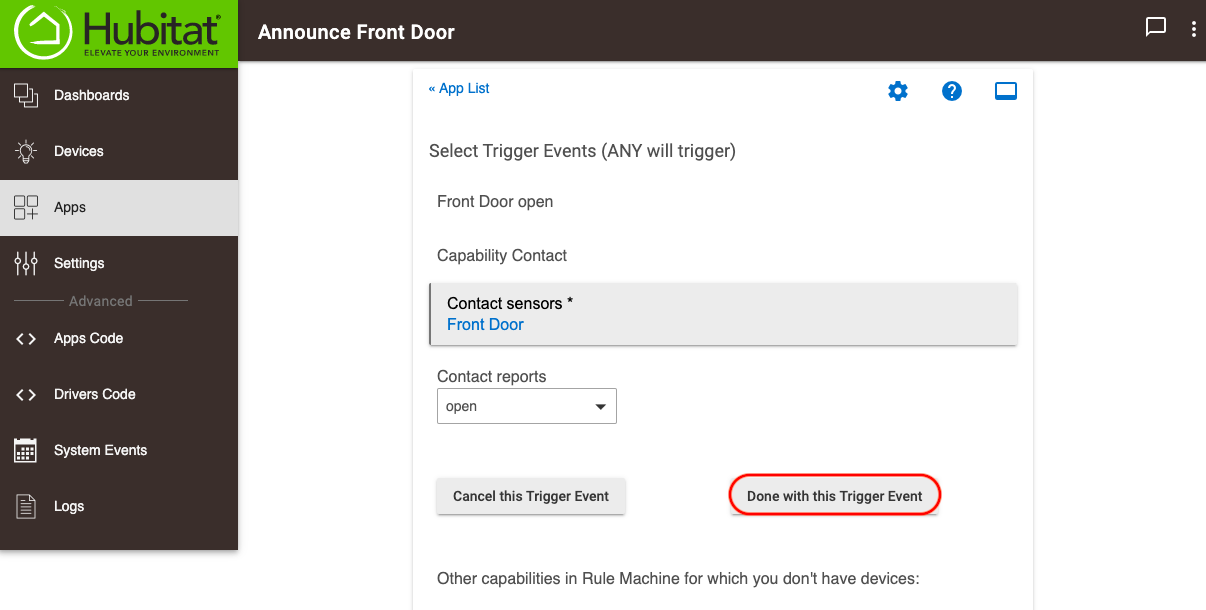
- For our example rule, we need to specify something to trigger the actions of the rule. We want the rule actions run when the front door is opened, so the trigger device we will select will be our Front Door contact sensor.
- You can of course have multiple triggers in Rule Machine, but for our simple example we only want to use a single trigger. Press the button Done with Trigger Events.
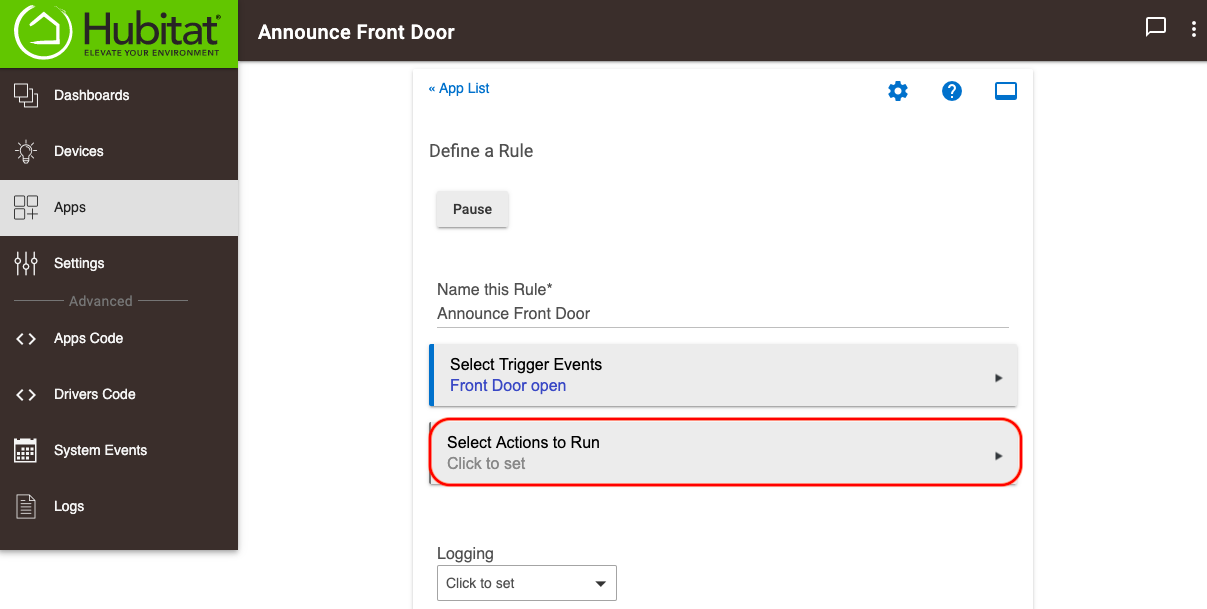
- We will now specify the Action for our example rule to Speak a message on our Sonos device. Press the Select Actions to Run button.
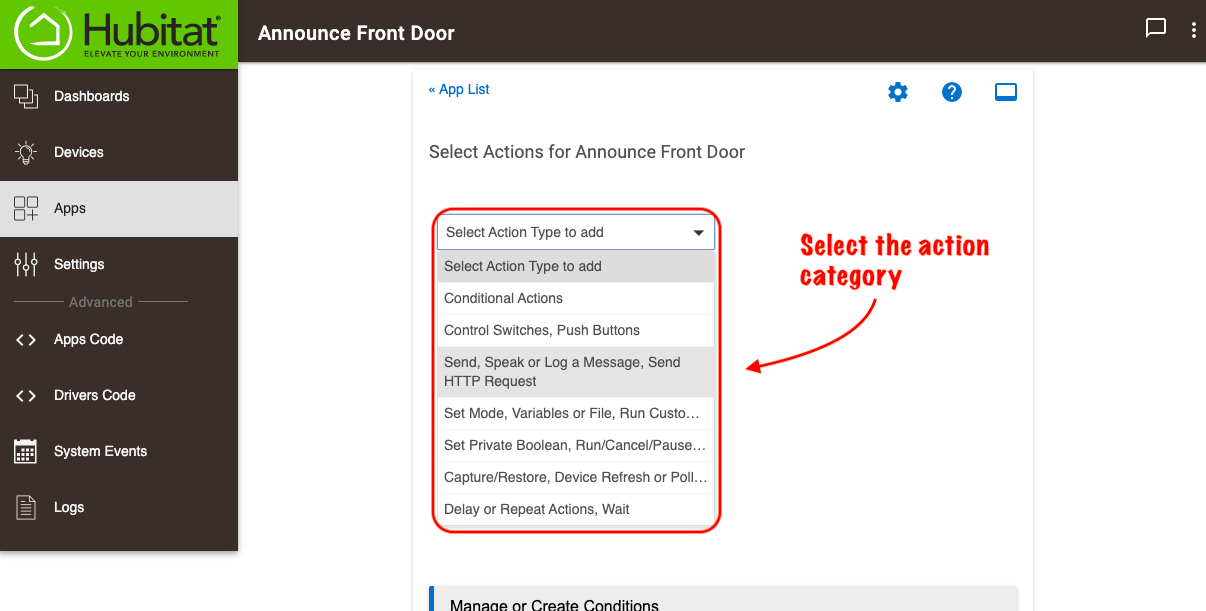
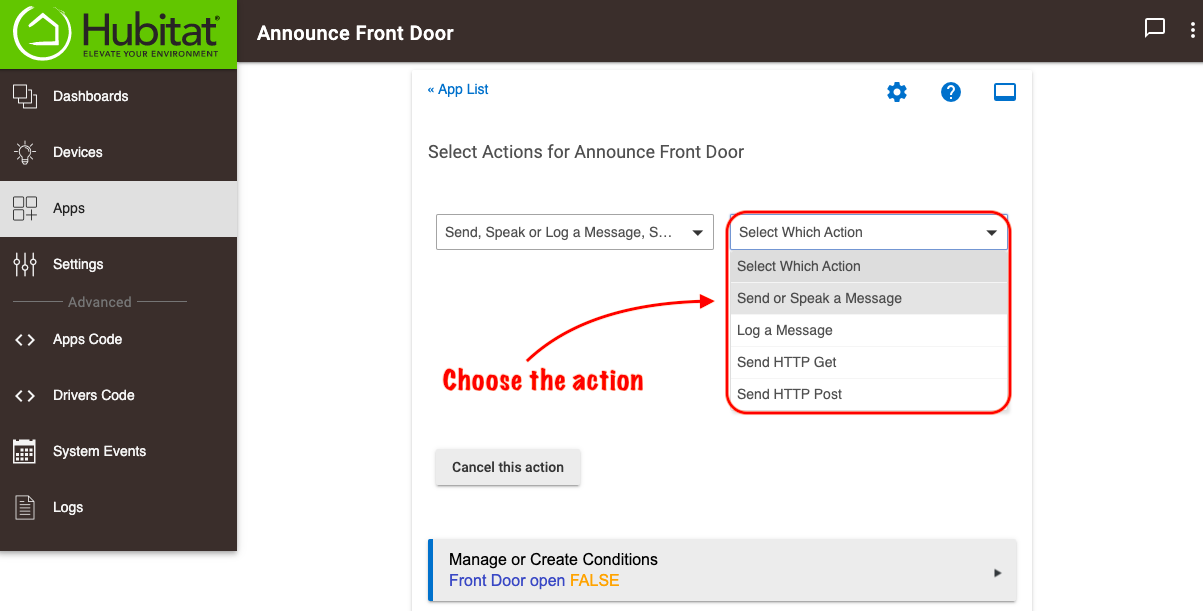
- From the drop-down menu, choose the Action Send, Speak or Log a Message, Send HTTP Request and then choose Send or Speak a Message.
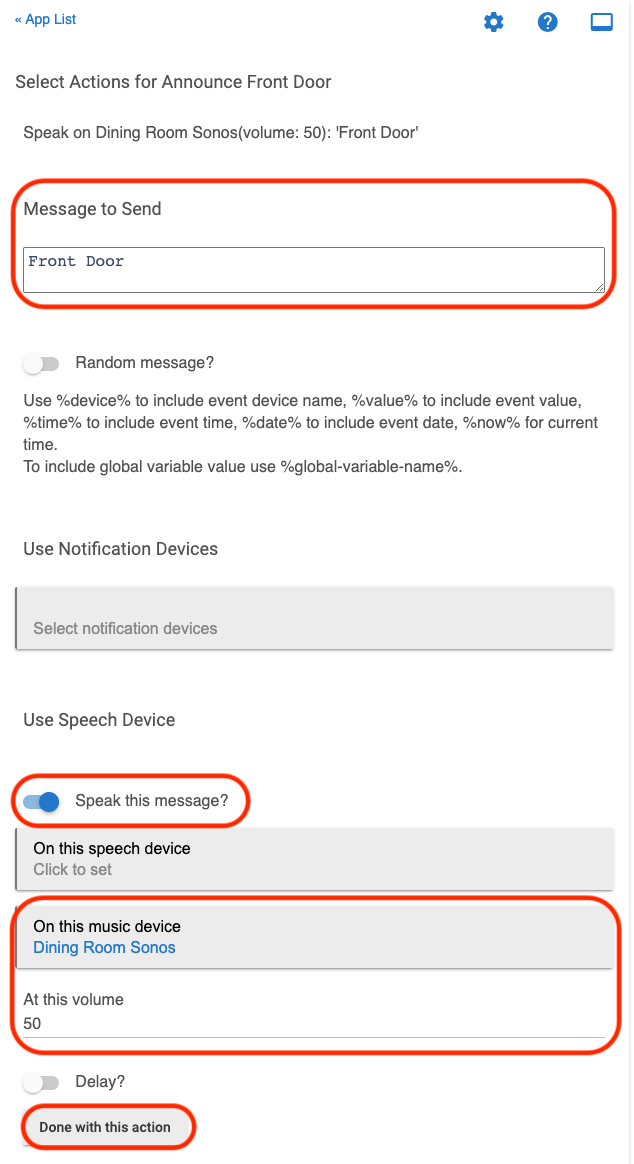
- For our example rule, we want our announcement to be "Front Door", so type this into the Message to Send field, then scroll down and activate the option Speak this message. For a Sonos device, there are two places where you can select the device to use. If you choose On this speech device, the TTS message will be spoken at the current volume level of the speaker. For our example, we will choose On this music device, since it will allow us to also specify the volume at the same time.
- Press Done with this action, and since we will only be adding a single action from our trigger device (the Front Door contact sensor), you should now select Done with Actions.
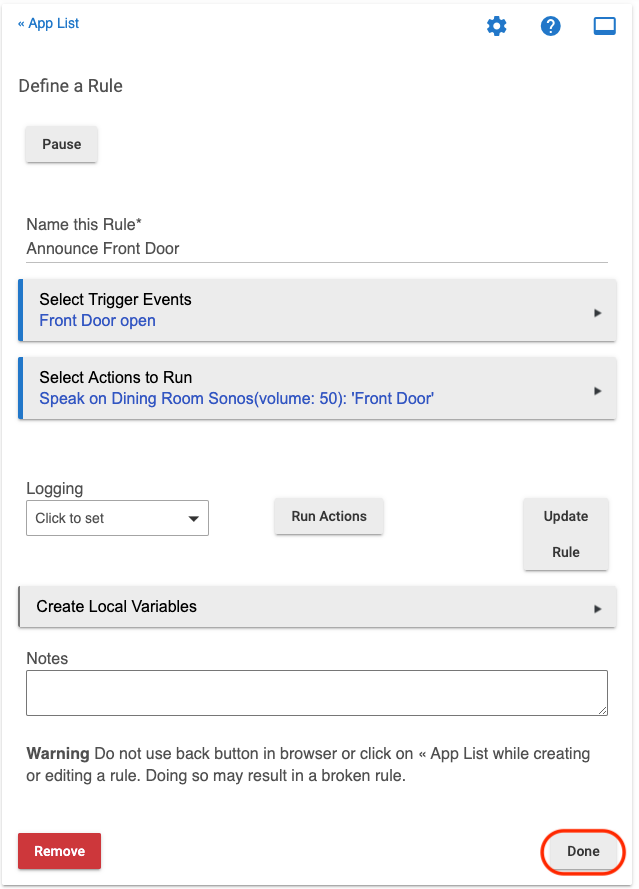
- Press Done to finish and test your rule by activating the trigger device.
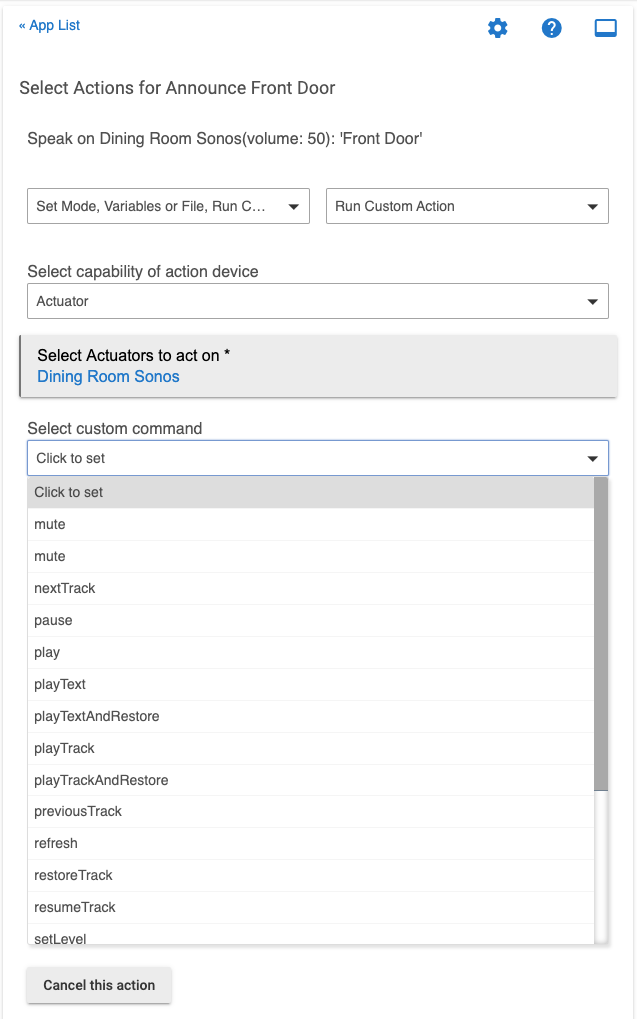
- As you become more familiar with building rules, you can explore using Rule Machine Actions called Custom Commands. These allow you to specify actions such as Pause, nextTrack, previousTrack, Mute, etc. These may be independent actions, or they can follow, or proceed the TTS action.


As you can see from the above examples, the power of Rule Machine can be leveraged to specify criteria that must be met before a rule action is run. In the example rule, the TTS message will be at a specified volume level. Once you are more familiar with building Rule Machine rules and Conditional Actions , TTS announcements at different volumes, occurring at different times of the day, only in specified Modes, etc., becomes very simple to achieve.