Difference between revisions of "Zone Motion Controllers"
(add ALT text) (Tag: Visual edit) |
|||
| Line 9: | Line 9: | ||
===<big>Installing the Zone Motion Controllers app</big>=== | ===<big>Installing the Zone Motion Controllers app</big>=== | ||
| − | #<big>From the sidebar of your hub, select '''Apps''' and press the '''Add Built-In App''' button.</big>[[File:Install Built-In App 2.0.png|none|thumb|600x600px|link=https://docs.hubitat.com/images/7/77/Install_Built-In_App_2.0.png | + | #<big>From the sidebar of your hub, select '''Apps''' and press the '''Add Built-In App''' button.</big>[[File:Install Built-In App 2.0.png|none|thumb|600x600px|link=https://docs.hubitat.com/images/7/77/Install_Built-In_App_2.0.png ]] |
| − | ]] | + | #<big>Choose '''Zone Motion Controllers''' from the list of Hubitat Elevation Built-In Apps</big>[[File:Install Zone Motion Controllers.png|none|thumb|600x600px|link=https://docs.hubitat.com/images/2/23/Install_Zone_Motion_Controllers.png |alt=Screenshot of Zone Motion Controllers in built-in apps list]] |
| − | #<big>Choose '''Zone Motion Controllers''' from the list of Hubitat Elevation Built-In Apps</big>[[File:Install Zone Motion Controllers.png|none|thumb|600x600px|link=https://docs.hubitat.com/images/2/23/Install_Zone_Motion_Controllers.png | ||
| − | ]] | ||
===<big>Creating a New Motion Zone</big>=== | ===<big>Creating a New Motion Zone</big>=== | ||
| Line 19: | Line 17: | ||
<big>A ''False Motion Reduction Zone'' can help prevent lights from being triggered accidentally by outdoor interference from clouds, sun or aliens. Motion detectors are typically placed with two or more pointing at your target area. When the specified number of sensors all detect motion, then the zone becomes active and triggers your lights, device or automation. A ''False Motion Reduction Zone'' is ideally suited for areas such as covered porches, where this union of overlapping Infrared beams can greatly increase the accuracy of intended detection.</big> | <big>A ''False Motion Reduction Zone'' can help prevent lights from being triggered accidentally by outdoor interference from clouds, sun or aliens. Motion detectors are typically placed with two or more pointing at your target area. When the specified number of sensors all detect motion, then the zone becomes active and triggers your lights, device or automation. A ''False Motion Reduction Zone'' is ideally suited for areas such as covered porches, where this union of overlapping Infrared beams can greatly increase the accuracy of intended detection.</big> | ||
[[File:Zone Motion Detection False Motion Reduction Zone diagram.png|none|thumb|600x600px|link=https://docs.hubitat.com/images/3/30/Zone_Motion_Detection_False_Motion_Reduction_Zone_diagram.png | [[File:Zone Motion Detection False Motion Reduction Zone diagram.png|none|thumb|600x600px|link=https://docs.hubitat.com/images/3/30/Zone_Motion_Detection_False_Motion_Reduction_Zone_diagram.png | ||
| − | ]] | + | |alt=Screenshot of ZMC "False Motion Reduction" behavior: if specified number of sensors become active within specified period, the zone activates]] |
#<big>Open the '''Zone Motion Controller'''s app.</big> | #<big>Open the '''Zone Motion Controller'''s app.</big> | ||
| − | #<big>Select '''Create New Motion Zone'''</big>[[File:Zone Motion Controllers - Create New Motion Zone.png|none|thumb|600x600px|link=https://docs.hubitat.com/images/3/3f/Zone_Motion_Controllers_-_Create_New_Motion_Zone.png | + | #<big>Select '''Create New Motion Zone'''</big>[[File:Zone Motion Controllers - Create New Motion Zone.png|none|thumb|600x600px|link=https://docs.hubitat.com/images/3/3f/Zone_Motion_Controllers_-_Create_New_Motion_Zone.png |alt=Screenshot of "Create New Motion Zone..." link]] |
| − | ]] | + | #<big>Name your Motion Controller Zone and select '''False Motion Reduction''' in the ''Zone Type'' drop-down menu.</big>[[File:Zone Motion Controller naming.png|none|thumb|600x600px|link=https://docs.hubitat.com/images/1/13/Zone_Motion_Controller_naming.png |alt=Screenshot of zone configuration options]] |
| − | #<big>Name your Motion Controller Zone and select '''False Motion Reduction''' in the ''Zone Type'' drop-down menu.</big>[[File:Zone Motion Controller naming.png|none|thumb|600x600px|link=https://docs.hubitat.com/images/1/13/Zone_Motion_Controller_naming.png | + | #<big>Select the motion sensors you would like to include in the motion zone and then set the '''Activation Window''' from the dropdown menu. This is the amount of time all motion sensors specified in the zone must detect movement before the zone will activate.</big>[[File:Zone Motion Controllers FMR Sensors and activation window.png|none|thumb|600x600px|link=https://docs.hubitat.com/images/4/49/Zone_Motion_Controllers_FMR_Sensors_and_activation_window.png |alt=Screenshot of options for selecting motion sensors, activiation window, and minimum active threshold]] |
| − | ]] | + | #<big>In the '''Minimum Active Threshold''' field, enter the number of devices required to activate the zone. The must be 2 or more motion sensors you selected in the previous step. The result will be that the motion zone will become active, ONLY if the minimum number of motion sensors detect movement within the number of seconds you chose for the activation timeframe.</big>[[File:Zone Motion Controllers FMR minimum active threshold.png|none|thumb|600x600px|link=https://docs.hubitat.com/images/4/43/Zone_Motion_Controllers_FMR_minimum_active_threshold.png |alt=Screenshot of "Minimum active threshold" option (requires this many sensors to become active within window)]] |
| − | #<big>Select the motion sensors you would like to include in the motion zone and then set the '''Activation Window''' from the dropdown menu. This is the amount of time all motion sensors specified in the zone must detect movement before the zone will activate.</big>[[File:Zone Motion Controllers FMR Sensors and activation window.png|none|thumb|600x600px|link=https://docs.hubitat.com/images/4/49/Zone_Motion_Controllers_FMR_Sensors_and_activation_window.png | + | #<big>If you only want the motion zone to activate in only certain modes, choose them under '''Set for specific mode(s)'''. If you don't make a selection, then the motion zone will be active in all modes.</big>[[File:Zone Motion Controllers active mode selection.png|none|thumb|600x600px|link=https://docs.hubitat.com/images/a/ac/Zone_Motion_Controllers_active_mode_selection.png |alt=Screenshot of "Set for specific mode(s) only" option]] |
| − | ]] | ||
| − | #<big>In the '''Minimum Active Threshold''' field, enter the number of devices required to activate the zone. The must be 2 or more motion sensors you selected in the previous step. The result will be that the motion zone will become active, ONLY if the minimum number of motion sensors detect movement within the number of seconds you chose for the activation timeframe.</big>[[File:Zone Motion Controllers FMR minimum active threshold.png|none|thumb|600x600px|link=https://docs.hubitat.com/images/4/43/Zone_Motion_Controllers_FMR_minimum_active_threshold.png | ||
| − | ]] | ||
| − | #<big>If you only want the motion zone to activate in only certain modes, choose them under '''Set for specific mode(s)'''. If you don't make a selection, then the motion zone will be active in all modes.</big>[[File:Zone Motion Controllers active mode selection.png|none|thumb|600x600px|link=https://docs.hubitat.com/images/a/ac/Zone_Motion_Controllers_active_mode_selection.png | ||
| − | ]] | ||
#<big>When your motion zone is finished, press the '''Done''' button.</big> | #<big>When your motion zone is finished, press the '''Done''' button.</big> | ||
| Line 38: | Line 31: | ||
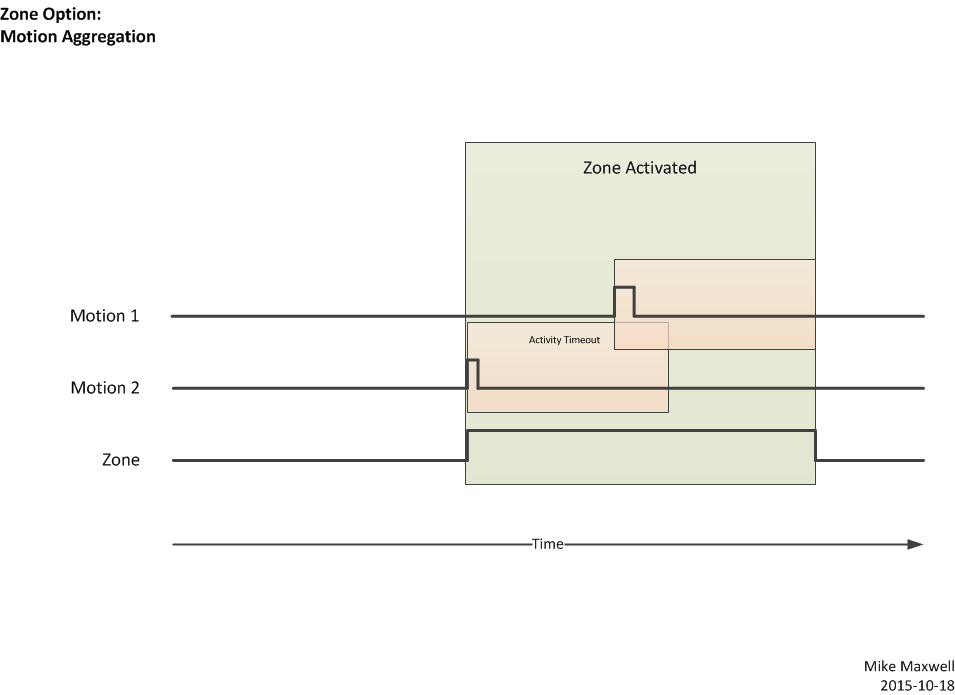
<big>A ''Motion Aggregation Zone'' activates whenever any one of the motion sensors in a zone are activated, and it will remain active until all the motion sensors in the zone are no longer detecting movement and the '''Activity Timeout''' period has not expired. Each time motion activity is detected by any motion sensor within the ''Motion Aggregation Zone'', it will reset the ''Activity Timeout'' period. This type of zone is ideal for large or odd-shaped rooms where multiple motion sensors are required to provide ample coverage, allowing them to work together as team to keep you from being unexpectedly left in the dark. A ''Motion Aggregation Zone'' is also a useful way to add multiple motion sensors to a single room in Hubitat Dashboard.</big> | <big>A ''Motion Aggregation Zone'' activates whenever any one of the motion sensors in a zone are activated, and it will remain active until all the motion sensors in the zone are no longer detecting movement and the '''Activity Timeout''' period has not expired. Each time motion activity is detected by any motion sensor within the ''Motion Aggregation Zone'', it will reset the ''Activity Timeout'' period. This type of zone is ideal for large or odd-shaped rooms where multiple motion sensors are required to provide ample coverage, allowing them to work together as team to keep you from being unexpectedly left in the dark. A ''Motion Aggregation Zone'' is also a useful way to add multiple motion sensors to a single room in Hubitat Dashboard.</big> | ||
[[File:Motion Zone Controller Motion Aggregation diagram.png|none|thumb|600x600px|link=https://docs.hubitat.com/images/e/e6/Motion_Zone_Controller_Motion_Aggregation_diagram.png | [[File:Motion Zone Controller Motion Aggregation diagram.png|none|thumb|600x600px|link=https://docs.hubitat.com/images/e/e6/Motion_Zone_Controller_Motion_Aggregation_diagram.png | ||
| − | ]] | + | |alt=Diagram of motion aggregation zone behavior, demonstrating the above-described behavior (zone active when any sensors active, remaining so for at least the specified timeout)]] |
#<big>Open the '''Zone Motion Controllers''' app.</big> | #<big>Open the '''Zone Motion Controllers''' app.</big> | ||
| − | #<big>Select '''Create New Motion Zone'''</big>[[File:Zone Motion Controllers - Create New Motion Zone.png|none|thumb|600x600px|link=https://docs.hubitat.com/images/3/3f/Zone_Motion_Controllers_-_Create_New_Motion_Zone.png | + | #<big>Select '''Create New Motion Zone'''</big>[[File:Zone Motion Controllers - Create New Motion Zone.png|none|thumb|600x600px|link=https://docs.hubitat.com/images/3/3f/Zone_Motion_Controllers_-_Create_New_Motion_Zone.png |alt=Screenshot of "Create New Motion Zone..." link]] |
| − | ]] | + | #<big>Name your Motion Controller Zone and select '''Motion Aggregation''' in the ''Zone Type'' drop-down menu.</big>[[File:Zone Motion Controller Motion Aggregation.png|none|thumb|600x600px|link=https://docs.hubitat.com/images/0/0d/Zone_Motion_Controller_Motion_Aggregation.png |alt=Screenshot of "Zone Configuration" options]] |
| − | #<big>Name your Motion Controller Zone and select '''Motion Aggregation''' in the ''Zone Type'' drop-down menu.</big>[[File:Zone Motion Controller Motion Aggregation.png|none|thumb|600x600px|link=https://docs.hubitat.com/images/0/0d/Zone_Motion_Controller_Motion_Aggregation.png | + | #<big>Select the motion sensors you would like to include in the motion zone and then set the '''Activity Timeout''' period from the drop-down menu. The zone will stay activated as long as there is motion on ANY of the motion sensors within that timeframe. The ''Activity Timeout'' will be reset when any motion is detected.</big>[[File:Zone Motion Controllers MA Sensors and Timeout.png|none|thumb|600x600px|link=https://docs.hubitat.com/images/f/fc/Zone_Motion_Controllers_MA_Sensors_and_Timeout.png |alt=Screenshot of "Activity Timeout" option]] |
| − | ]] | + | #<big>If you only want the motion zone to activate in only certain modes, choose them under '''Set for specific mode(s)'''. If you don't make a selection, then the motion zone will be active in all modes.</big>[[File:Zone Motion Controllers active mode selection.png|none|thumb|600x600px|link=https://docs.hubitat.com/images/a/ac/Zone_Motion_Controllers_active_mode_selection.png |alt=Screenshot of "Set for specific mode(s) only" option]] |
| − | #<big>Select the motion sensors you would like to include in the motion zone and then set the '''Activity Timeout''' period from the drop-down menu. The zone will stay activated as long as there is motion on ANY of the motion sensors within that timeframe. The ''Activity Timeout'' will be reset when any motion is detected.</big>[[File:Zone Motion Controllers MA Sensors and Timeout.png|none|thumb|600x600px|link=https://docs.hubitat.com/images/f/fc/Zone_Motion_Controllers_MA_Sensors_and_Timeout.png | ||
| − | ]] | ||
| − | #<big>If you only want the motion zone to activate in only certain modes, choose them under '''Set for specific mode(s)'''. If you don't make a selection, then the motion zone will be active in all modes.</big>[[File:Zone Motion Controllers active mode selection.png|none|thumb|600x600px|link=https://docs.hubitat.com/images/a/ac/Zone_Motion_Controllers_active_mode_selection.png | ||
| − | ]] | ||
#<big>When your motion zone is finished, press the '''Done''' button.</big> | #<big>When your motion zone is finished, press the '''Done''' button.</big> | ||
| Line 54: | Line 43: | ||
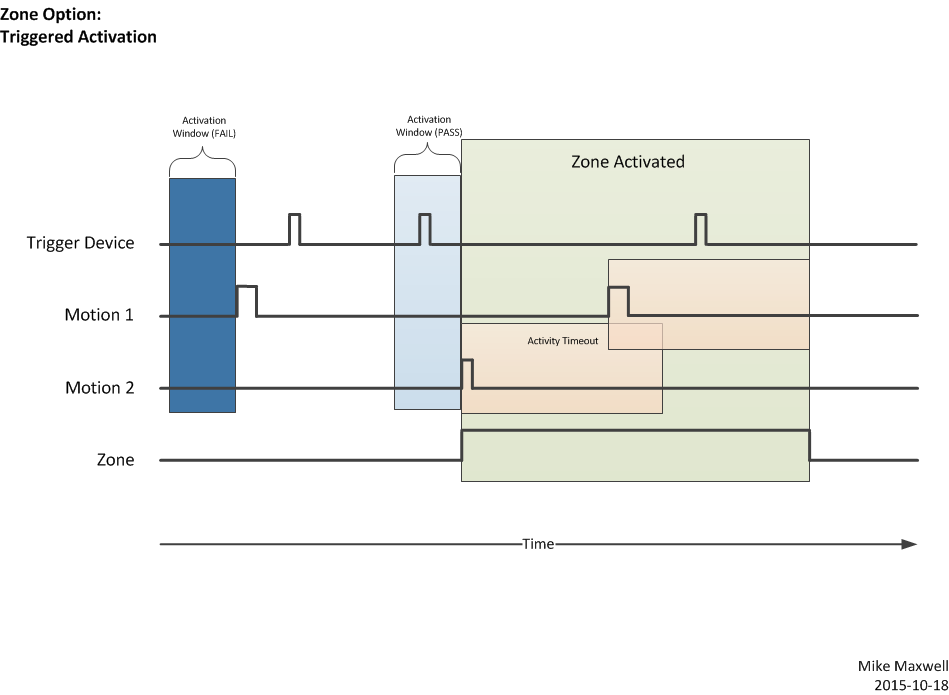
<big>This type of zone allows multiple sensor types to work together in the activation of a motion zone. It requires at least two corresponding events for the zone to activate a device or an automaton. Valid trigger devices may be a motion sensor, contact sensor, switch or vibration sensor. The zone will stay activated as long as there is motion on ANY of the motion sensors within that timeframe. The ''Activity Timeout'' will be reset when any motion is detected. This can be helpful to prevent motion sensors from triggering in areas you don't want lights active when animals are present, but you do want them active when people are. For example, you might use a motion sensor at the bottom of a staircase mounted in such a way that it would not be triggered by a pet, but when a person passes by, it would enable the ''Triggered Activation Zone'' for motion sensors at the top of the staircase.</big> | <big>This type of zone allows multiple sensor types to work together in the activation of a motion zone. It requires at least two corresponding events for the zone to activate a device or an automaton. Valid trigger devices may be a motion sensor, contact sensor, switch or vibration sensor. The zone will stay activated as long as there is motion on ANY of the motion sensors within that timeframe. The ''Activity Timeout'' will be reset when any motion is detected. This can be helpful to prevent motion sensors from triggering in areas you don't want lights active when animals are present, but you do want them active when people are. For example, you might use a motion sensor at the bottom of a staircase mounted in such a way that it would not be triggered by a pet, but when a person passes by, it would enable the ''Triggered Activation Zone'' for motion sensors at the top of the staircase.</big> | ||
[[File:Zone Motion Controller Triggered Motion diagram.png|none|thumb|600x600px|link=https://docs.hubitat.com/images/9/99/Zone_Motion_Controller_Triggered_Motion_diagram.png | [[File:Zone Motion Controller Triggered Motion diagram.png|none|thumb|600x600px|link=https://docs.hubitat.com/images/9/99/Zone_Motion_Controller_Triggered_Motion_diagram.png | ||
| − | ]] | + | |alt=Diagram of "Triggered Activation" zone behavior, demonstrating the above]] |
#<big>Open the '''Zone Motion Controllers''' app.</big> | #<big>Open the '''Zone Motion Controllers''' app.</big> | ||
| − | #<big>Select '''Create New Motion Zone'''</big>[[File:Zone Motion Controllers - Create New Motion Zone.png|none|thumb|600x600px|link=https://docs.hubitat.com/images/3/3f/Zone_Motion_Controllers_-_Create_New_Motion_Zone.png | + | #<big>Select '''Create New Motion Zone'''</big>[[File:Zone Motion Controllers - Create New Motion Zone.png|none|thumb|600x600px|link=https://docs.hubitat.com/images/3/3f/Zone_Motion_Controllers_-_Create_New_Motion_Zone.png |alt=Screenshot of "Create New Motion Zone..." link]] |
| − | ]] | + | #<big>Name your Motion Controller Zone select '''Trigger Activation Zone''' in the ''Zone Type'' drop-down menu.</big>[[File:Zone Motion Controllers Trigger Activation.png|none|thumb|600x600px|link=https://docs.hubitat.com/images/7/77/Zone_Motion_Controllers_Trigger_Activation.png |alt=Screenshot of "Zone Configuration" options]] |
| − | #<big>Name your Motion Controller Zone select '''Trigger Activation Zone''' in the ''Zone Type'' drop-down menu.</big>[[File:Zone Motion Controllers Trigger Activation.png|none|thumb|600x600px|link=https://docs.hubitat.com/images/7/77/Zone_Motion_Controllers_Trigger_Activation.png | ||
| − | ]] | ||
#<big>Select the motion sensors you would like to include in the motion zone and press '''Update'''.</big> | #<big>Select the motion sensors you would like to include in the motion zone and press '''Update'''.</big> | ||
| − | #<big>Select an '''Activation Window''' from the drop-down menu. This is the time period after a trigger device is activated, that motion detected by the specified motion sensors will still activate the motion zone. If the trigger device activates, but the specified ''Activation Window'' has expired, then the motion zone will not be active, even though the motion sensors may be detecting movement.</big>[[File:Zone Motion Controllers TA Sensor and Activation Window.png|none|thumb|600x600px|link=https://docs.hubitat.com/images/0/02/Zone_Motion_Controllers_TA_Sensor_and_Activation_Window.png | + | #<big>Select an '''Activation Window''' from the drop-down menu. This is the time period after a trigger device is activated, that motion detected by the specified motion sensors will still activate the motion zone. If the trigger device activates, but the specified ''Activation Window'' has expired, then the motion zone will not be active, even though the motion sensors may be detecting movement.</big>[[File:Zone Motion Controllers TA Sensor and Activation Window.png|none|thumb|600x600px|link=https://docs.hubitat.com/images/0/02/Zone_Motion_Controllers_TA_Sensor_and_Activation_Window.png |alt=Screenshot of motion sensor and activation window options]] |
| − | ]] | + | #<big>Press the '''Trigger Devices''' button to select the ''motion sensors, contact sensors, switches or vibration sensors'' you want to trigger the activation window for the selected motion sensors. When you select a device, you may be offered additional options for activation, such as whether to activate when a door ''opens'' or ''closes''.</big>[[File:Zone Motion Controllers Trigger Devices.png|none|thumb|600x600px|link=https://docs.hubitat.com/images/c/ca/Zone_Motion_Controllers_Trigger_Devices.png |alt=Screenshot of trigger device selectors]] |
| − | #<big>Press the '''Trigger Devices''' button to select the ''motion sensors, contact sensors, switches or vibration sensors'' you want to trigger the activation window for the selected motion sensors. When you select a device, you may be offered additional options for activation, such as whether to activate when a door ''opens'' or ''closes''.</big>[[File:Zone Motion Controllers Trigger Devices.png|none|thumb|600x600px|link=https://docs.hubitat.com/images/c/ca/Zone_Motion_Controllers_Trigger_Devices.png | + | #<big>Select the trigger devices you would like to be responsible for enabling the motion sensors in the zone, and then set the '''Activity Timeout''' period from the drop-down menu. The zone will stay activated as long as there is still motion on ANY of the motion sensors and the ''Activity Timeout'' period has not expired. The ''Activity Timeout'' period will be reset if a trigger devices again activates and the motion sensors detect movement within the ''Activation Window,'' following a trigger event.</big>[[File:Zone Motion Controller TA Activity Timeout period.png|none|thumb|600x600px|link=https://docs.hubitat.com/images/4/44/Zone_Motion_Controller_TA_Activity_Timeout_period.png |alt=Screenshot of activity timeout option]] |
| − | ]] | + | #<big>If you only want the motion zone to activate in only certain modes, choose them under '''Set for specific mode(s)'''. If you don't make a selection, then the motion zone will be active in all modes.</big>[[File:Zone Motion Controllers active mode selection.png|none|thumb|600x600px|link=https://docs.hubitat.com/images/a/ac/Zone_Motion_Controllers_active_mode_selection.png|alt=Screenshot of "Set for specific mode(s)" option]] |
| − | #<big>Select the trigger devices you would like to be responsible for enabling the motion sensors in the zone, and then set the '''Activity Timeout''' period from the drop-down menu. The zone will stay activated as long as there is still motion on ANY of the motion sensors and the ''Activity Timeout'' period has not expired. The ''Activity Timeout'' period will be reset if a trigger devices again activates and the motion sensors detect movement within the ''Activation Window,'' following a trigger event.</big>[[File:Zone Motion Controller TA Activity Timeout period.png|none|thumb|600x600px|link=https://docs.hubitat.com/images/4/44/Zone_Motion_Controller_TA_Activity_Timeout_period.png | ||
| − | ]] | ||
| − | #<big>If you only want the motion zone to activate in only certain modes, choose them under '''Set for specific mode(s)'''. If you don't make a selection, then the motion zone will be active in all modes.</big>[[File:Zone Motion Controllers active mode selection.png|none|thumb|600x600px|link=https://docs.hubitat.com/images/a/ac/Zone_Motion_Controllers_active_mode_selection.png]] | ||
#<big>When your motion zone is finished, press the '''Done''' button.</big> | #<big>When your motion zone is finished, press the '''Done''' button.</big> | ||
# | # | ||
Revision as of 00:18, 9 July 2022

Zone Motion Controllers is designed to combine multiple motion sensors to act as one “zone” for triggering actions in Rule Machine and other apps. Creating zones will allow multiple motion sensors to work together to achieve a desired effect within the zone. Zones can be used to help eliminate false motion from triggering your lights and automations, they can prevent lights from turning off in large or obstructed spaces where a single motion sensor might not continuously detect your presence, or they can prevent motion sensors from activating until triggered by another source, such as a door sensor.
Once a Motion Zone is created, it can be selected as an mZone motion sensor in Rule Machine and other apps to trigger actions.
Here's how to get started with Zone Motion Controllers:
Contents
Installing the Zone Motion Controllers app
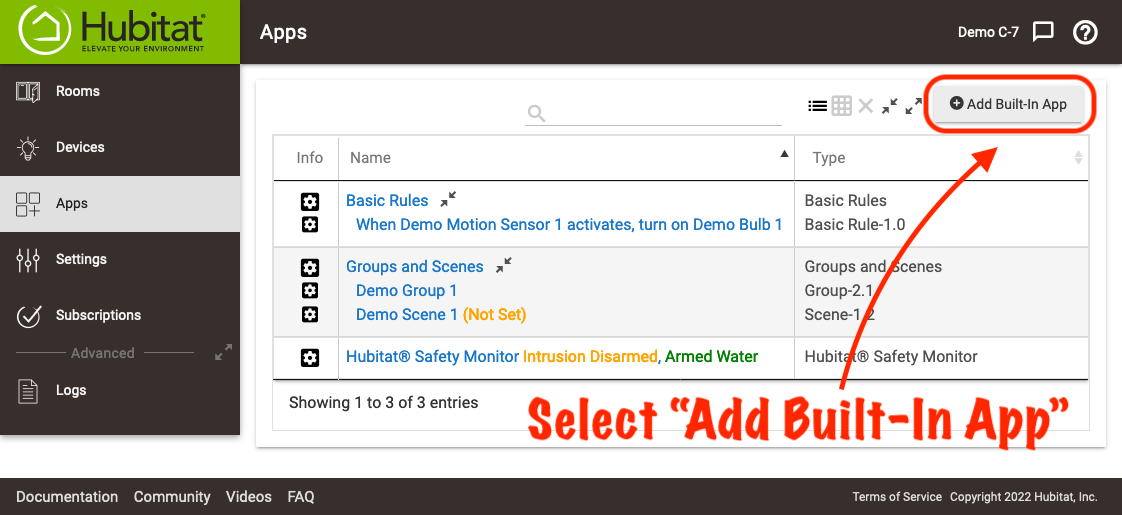
- From the sidebar of your hub, select Apps and press the Add Built-In App button.
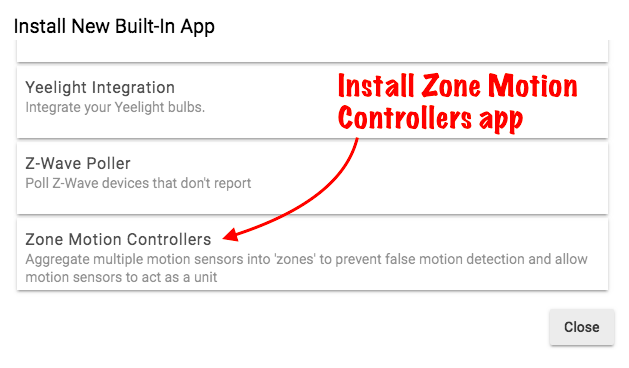
- Choose Zone Motion Controllers from the list of Hubitat Elevation Built-In Apps
Creating a New Motion Zone
Create a False Motion Reduction Zone
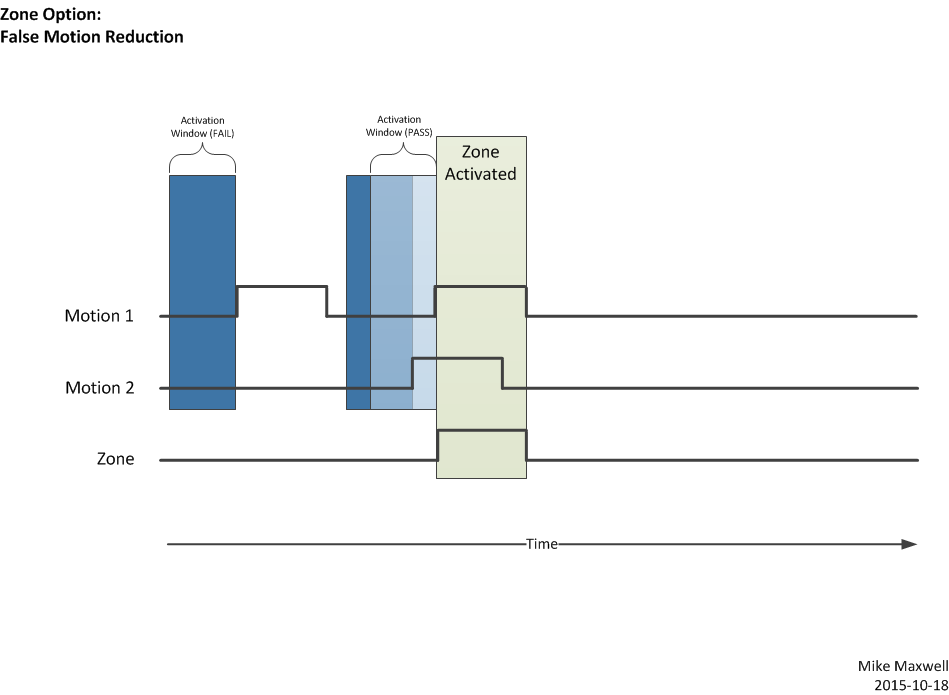
A False Motion Reduction Zone can help prevent lights from being triggered accidentally by outdoor interference from clouds, sun or aliens. Motion detectors are typically placed with two or more pointing at your target area. When the specified number of sensors all detect motion, then the zone becomes active and triggers your lights, device or automation. A False Motion Reduction Zone is ideally suited for areas such as covered porches, where this union of overlapping Infrared beams can greatly increase the accuracy of intended detection.
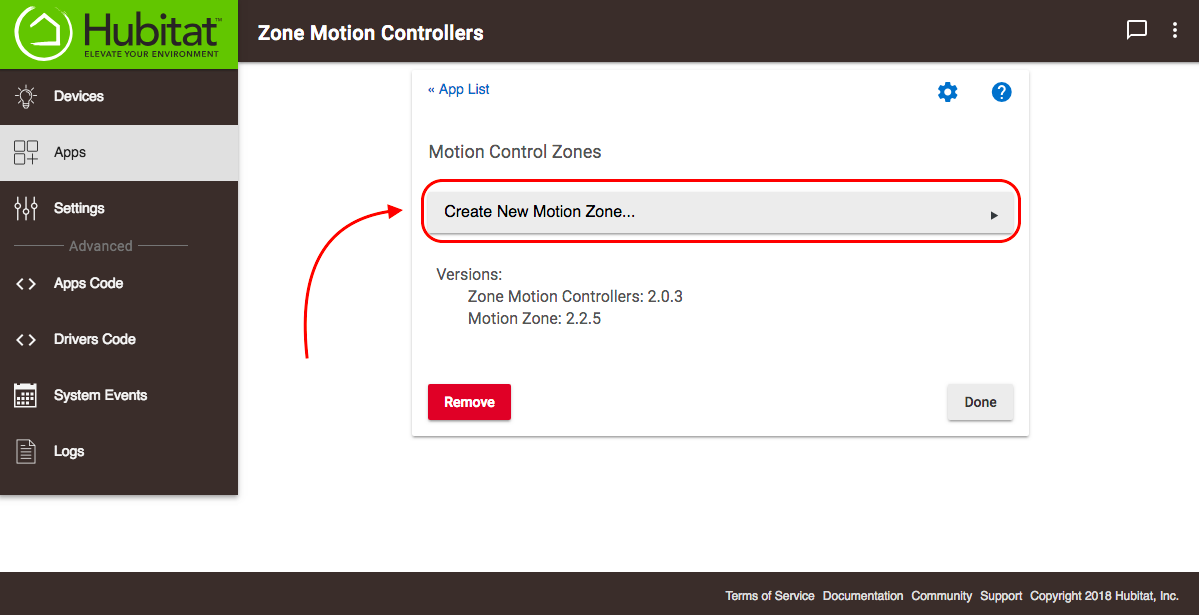
- Open the Zone Motion Controllers app.
- Select Create New Motion Zone
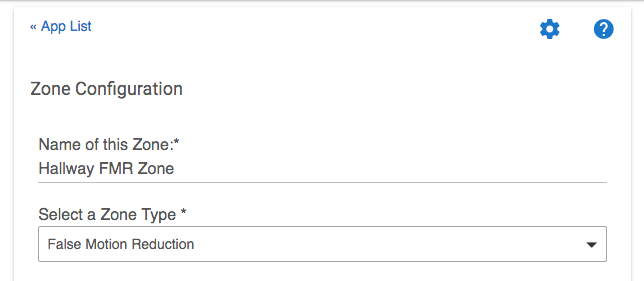
- Name your Motion Controller Zone and select False Motion Reduction in the Zone Type drop-down menu.
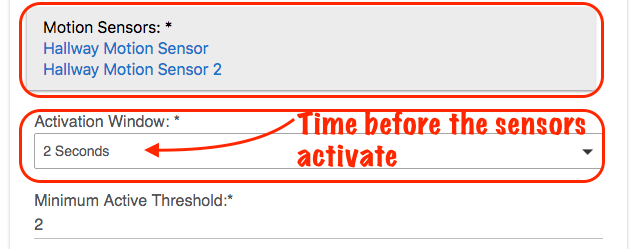
- Select the motion sensors you would like to include in the motion zone and then set the Activation Window from the dropdown menu. This is the amount of time all motion sensors specified in the zone must detect movement before the zone will activate.
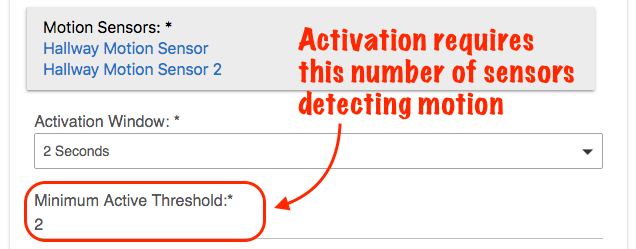
- In the Minimum Active Threshold field, enter the number of devices required to activate the zone. The must be 2 or more motion sensors you selected in the previous step. The result will be that the motion zone will become active, ONLY if the minimum number of motion sensors detect movement within the number of seconds you chose for the activation timeframe.
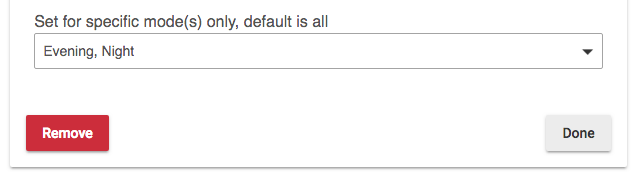
- If you only want the motion zone to activate in only certain modes, choose them under Set for specific mode(s). If you don't make a selection, then the motion zone will be active in all modes.
- When your motion zone is finished, press the Done button.
Create a Motion Aggregation Zone
A Motion Aggregation Zone activates whenever any one of the motion sensors in a zone are activated, and it will remain active until all the motion sensors in the zone are no longer detecting movement and the Activity Timeout period has not expired. Each time motion activity is detected by any motion sensor within the Motion Aggregation Zone, it will reset the Activity Timeout period. This type of zone is ideal for large or odd-shaped rooms where multiple motion sensors are required to provide ample coverage, allowing them to work together as team to keep you from being unexpectedly left in the dark. A Motion Aggregation Zone is also a useful way to add multiple motion sensors to a single room in Hubitat Dashboard.
- Open the Zone Motion Controllers app.
- Select Create New Motion Zone
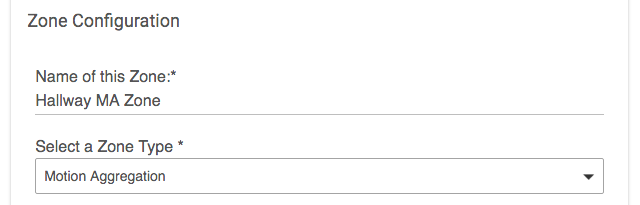
- Name your Motion Controller Zone and select Motion Aggregation in the Zone Type drop-down menu.
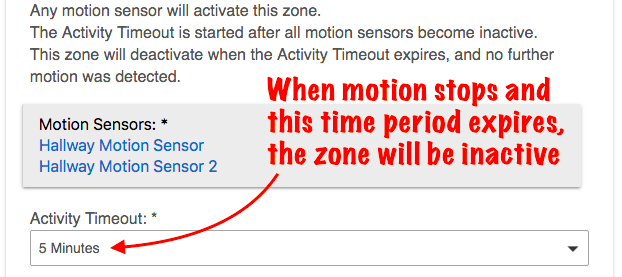
- Select the motion sensors you would like to include in the motion zone and then set the Activity Timeout period from the drop-down menu. The zone will stay activated as long as there is motion on ANY of the motion sensors within that timeframe. The Activity Timeout will be reset when any motion is detected.
- If you only want the motion zone to activate in only certain modes, choose them under Set for specific mode(s). If you don't make a selection, then the motion zone will be active in all modes.
- When your motion zone is finished, press the Done button.
Create a Triggered Activation Zone
This type of zone allows multiple sensor types to work together in the activation of a motion zone. It requires at least two corresponding events for the zone to activate a device or an automaton. Valid trigger devices may be a motion sensor, contact sensor, switch or vibration sensor. The zone will stay activated as long as there is motion on ANY of the motion sensors within that timeframe. The Activity Timeout will be reset when any motion is detected. This can be helpful to prevent motion sensors from triggering in areas you don't want lights active when animals are present, but you do want them active when people are. For example, you might use a motion sensor at the bottom of a staircase mounted in such a way that it would not be triggered by a pet, but when a person passes by, it would enable the Triggered Activation Zone for motion sensors at the top of the staircase.
- Open the Zone Motion Controllers app.
- Select Create New Motion Zone
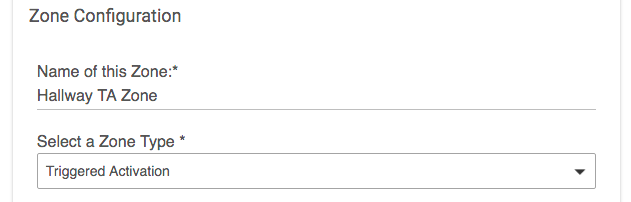
- Name your Motion Controller Zone select Trigger Activation Zone in the Zone Type drop-down menu.
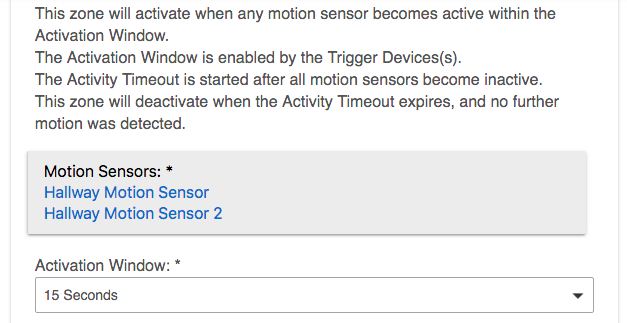
- Select the motion sensors you would like to include in the motion zone and press Update.
- Select an Activation Window from the drop-down menu. This is the time period after a trigger device is activated, that motion detected by the specified motion sensors will still activate the motion zone. If the trigger device activates, but the specified Activation Window has expired, then the motion zone will not be active, even though the motion sensors may be detecting movement.
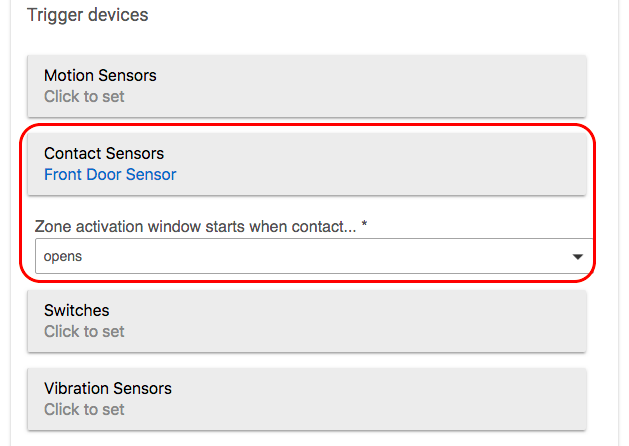
- Press the Trigger Devices button to select the motion sensors, contact sensors, switches or vibration sensors you want to trigger the activation window for the selected motion sensors. When you select a device, you may be offered additional options for activation, such as whether to activate when a door opens or closes.
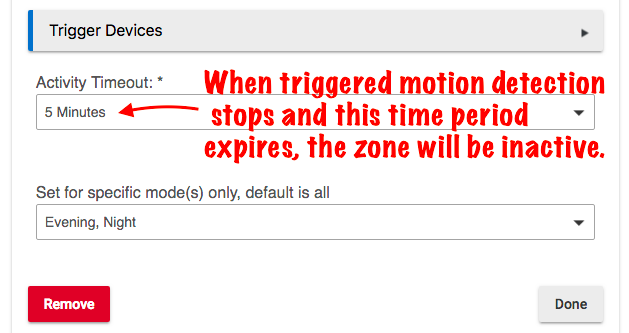
- Select the trigger devices you would like to be responsible for enabling the motion sensors in the zone, and then set the Activity Timeout period from the drop-down menu. The zone will stay activated as long as there is still motion on ANY of the motion sensors and the Activity Timeout period has not expired. The Activity Timeout period will be reset if a trigger devices again activates and the motion sensors detect movement within the Activation Window, following a trigger event.
- If you only want the motion zone to activate in only certain modes, choose them under Set for specific mode(s). If you don't make a selection, then the motion zone will be active in all modes.
- When your motion zone is finished, press the Done button.