Difference between revisions of "App Status"
(Font adjustment to ease export) |
(Update for import/export/clone; better description of other aspects) (Tag: Visual edit) |
||
| Line 1: | Line 1: | ||
{{Top}} | {{Top}} | ||
| − | The App Status page is where you will find detailed information about the app | + | The App Status page is where you will find detailed, read-only information about the internal data values of an app. This page is generally most useful for app developers or advanced users. The App Status page can be accessed by clicking the gear icon to the left of any app in the '''Apps''' list (under the "Info" column) or the same icon towards the upper right when inside the app. |
| + | [[File:App Status (Gear Icon).png|alt=Screenshot of "App Status" icon in Apps list|center|thumb|750x750px|Location of "App Status" icon in Apps list]] | ||
| − | == | + | == Export/Import/Clone == |
| − | + | Most apps can be duplicated (cloned), exported (for later import to this hub or another hub), or imported (from a previous export) using the buttons at the top of the App Status page. | |
| + | [[File:App Status Export-Import-Clone Btn.png|alt=Screenshot of "Export/Import/Clone" button on App Status page|none|thumb]] | ||
| + | The '''Export/Import/Clone''' button will take you to a screen where you can export, import, or clone the app: | ||
| + | [[File:App Status Export-Import-Clone page.png|alt=Screenshot of "Export/Import/Clone" page, accessed from App Status Page|none|thumb]] | ||
| − | *''' | + | * '''Export <''app name>'':''' clicking this button will take you to another page with a '''Download ''<app name>''.json''' button, which can be clicked to download the exported app. This can be used to import the app on the same or different hub later from either this screen on the corresponding app or the '''Restore Apps''' feature on the '''Settings''' page. |
| + | * '''Import Apps:''' Click the '''Browse...''' button to locate and import a previously-exported '''.json''' file for any app. (Alternatively, this can be done from '''Settings > Restore Apps'''.)On the next screen, you will be given two options: | ||
| + | ** '''Restore ''<app name>'':''' Recommended only if restoring a deleted app to the same hub with the same devices; will use same devices (by internal ID or name) as specified in export. This will fail if the app exists, whether because the original was never deleted or a restore has already been performed. | ||
| + | ** '''Import ''<app name''>:''' Recommended for all other cases; will offer option to replace devices in export with new/different devices before importing. | ||
| + | * '''Clone <''app name>'':''' clicking this button (and then '''Clone...''' on the next page) will create a second copy of this app and will offer the option to replace devices with new/different devices before creating the new copy. This is effectively the same result as an export and then import (without the need to download and upload the export file). | ||
| − | + | When you are finished doing the export/import/clone operation you want, hitting the '''Done''' button takes you to the Apps page. You can also use the back button in your browser to return you to whatever page you were on before opening the utility. | |
| − | + | '''WARNING''': Do not open Export/Import/Clone utility in more than a single browser window/tab at one time. There is a single instance of the utility for all apps, and it knows the context from which it was launched. If you launch multiple windows/tabs, an error may result. | |
| − | *''' | + | ==ettings== |
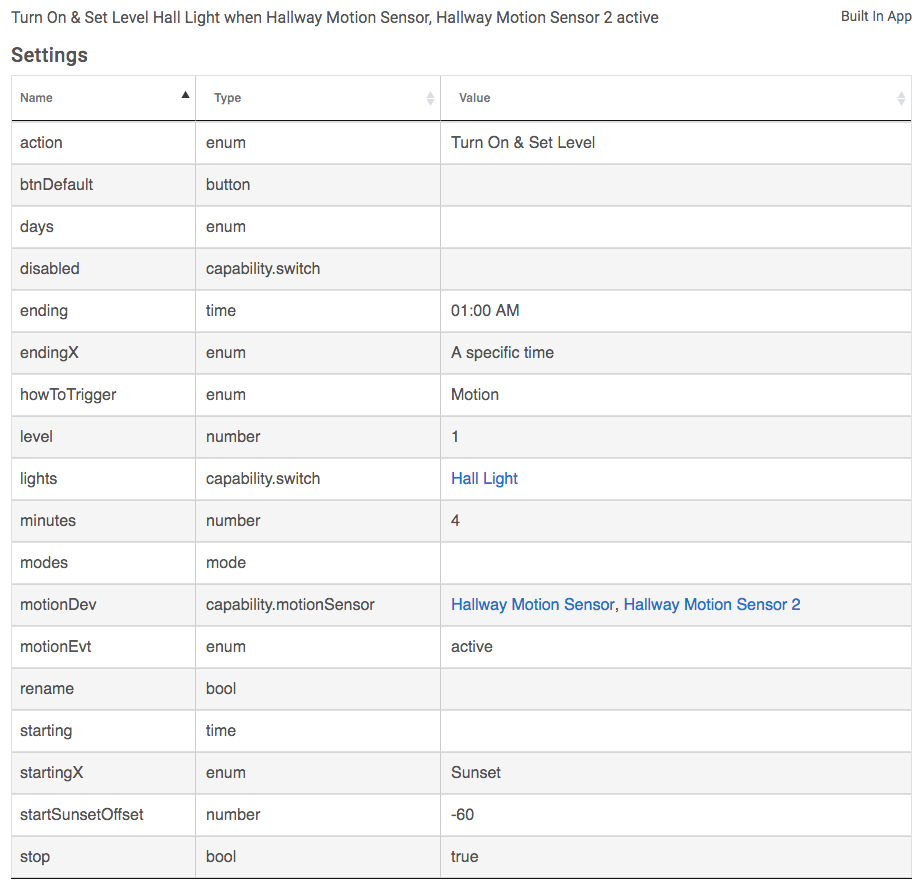
| + | These are the values for what is set inside the application--the inputs, checkboxes, enums (drop-downs), and device selections. This shows all specified settings for the app, but all settings may not always contain a value. These names and values provide a read-only view into one the app's internal data structures and may be most useful if you are developing this app or working with the developer to troubleshoot an issue. | ||
| + | |||
| + | *'''App Title''' is shown at the top of the App Status page. It may also show the state for certain apps, "Armed" or "Disarmed" for [[Hubitat® Safety Monitor|Hubitat Safety Monitor]] or "Paused" for [[Rule Machine|Rule Machine]] rules. | ||
| + | |||
| + | *'''Name''' is a list of the setting/input name (as determined by the app code) | ||
| + | |||
| + | *'''Type''' shows the type specified for the setting/input (as determined by the app code) | ||
| + | |||
| + | *'''Value''' displays the currently selected value (generally from user input) for the specified setting/input. For example, if an app allows you to select a dimmer to turn on or off, the selected dimmer(s) should appear as the value for one or more settings in this list. | ||
[[File:App Status - Settings 2.png|none|thumb|600x600px|link=https://docs.hubitat.com/images/c/cb/App_Status_-_Settings_2.png | [[File:App Status - Settings 2.png|none|thumb|600x600px|link=https://docs.hubitat.com/images/c/cb/App_Status_-_Settings_2.png | ||
|alt=The Settings section of the apps status window displays the app capabilities by "name" in the first column, the capability "type" in the second column, and the app capability "Value" in the third column]] | |alt=The Settings section of the apps status window displays the app capabilities by "name" in the first column, the capability "type" in the second column, and the app capability "Value" in the third column]] | ||
| − | + | ==Event Subscriptions== | |
| − | + | Apps can subscribe to events, which will cause the app to "wake" and execute the specified handler (a method name as determined internally by the app code; again, this is generally most useful if you are developing the app or troubleshooting with a developer). | |
*'''Source''' for the ''Event Subscription'' might be a ''device'', ''mode'', ''location'', etc. | *'''Source''' for the ''Event Subscription'' might be a ''device'', ''mode'', ''location'', etc. | ||
| − | *'''Event''' is what has been subscribed to. | + | *'''Event''' is what has been subscribed to, for example, an event (attribute) name. |
*'''Handler''' is the method inside the code that will be called when the event is triggered. | *'''Handler''' is the method inside the code that will be called when the event is triggered. | ||
| − | *'''Filter''' | + | *'''Filter''' refers to whether the developer specified that events that do not result in a state change should be filtered out (<code>true</code>, the default value) or not (<code>false</code>). |
[[File:App Status - Event Subscriptions.png|none|thumb|600x600px|link=https://docs.hubitat.com/images/4/4e/App_Status_-_Event_Subscriptions.png | [[File:App Status - Event Subscriptions.png|none|thumb|600x600px|link=https://docs.hubitat.com/images/4/4e/App_Status_-_Event_Subscriptions.png | ||
|alt=The "Event Subscriptions" section of the App Status page lists the "Source" of the Event Subscription in the first column, the "Event" that has been subscribed to in the second column, the "Handler" method in the third column. This is the method inside the code that will be called when the event is triggered, and a "Filter" column that corresponds to "sendEvent" from the device driver, and whether or not it has true and false filter events.]] | |alt=The "Event Subscriptions" section of the App Status page lists the "Source" of the Event Subscription in the first column, the "Event" that has been subscribed to in the second column, the "Handler" method in the third column. This is the method inside the code that will be called when the event is triggered, and a "Filter" column that corresponds to "sendEvent" from the device driver, and whether or not it has true and false filter events.]] | ||
| − | + | ==Application State== | |
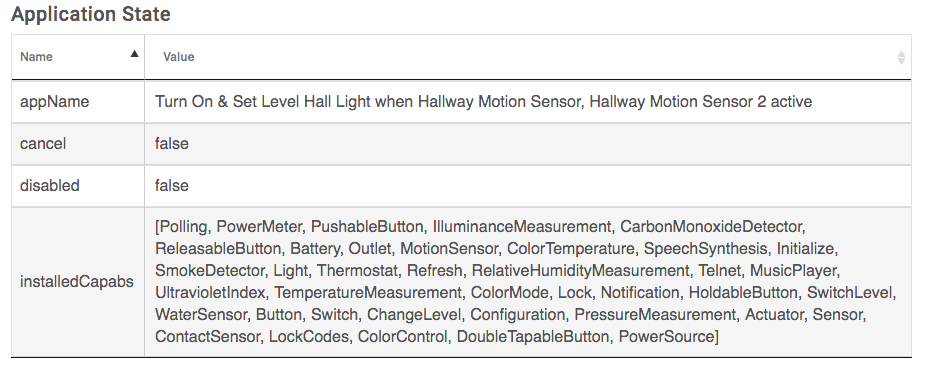
| − | This | + | This represents a location apps can use for internal data storage. Anything the developer writes to <code>state</code> or <code>atomicState</code> will show up here as a with values under the '''Name''' and '''Value''' columns. (Again, this information is generally most useful if you are developing an application and need a way to see this information or are troubleshooting with a developer who asks for this information.) |
[[File:App Status - Applications State.png|none|thumb|600x600px|link=https://docs.hubitat.com/images/8/8d/App_Status_-_Applications_State.png | [[File:App Status - Applications State.png|none|thumb|600x600px|link=https://docs.hubitat.com/images/8/8d/App_Status_-_Applications_State.png | ||
|alt=The "Application State" section of the App Status page displays anything written to "State". It will show up here as a pairing of Name and Value.]] | |alt=The "Application State" section of the App Status page displays anything written to "State". It will show up here as a pairing of Name and Value.]] | ||
| − | + | ==Scheduled Jobs== | |
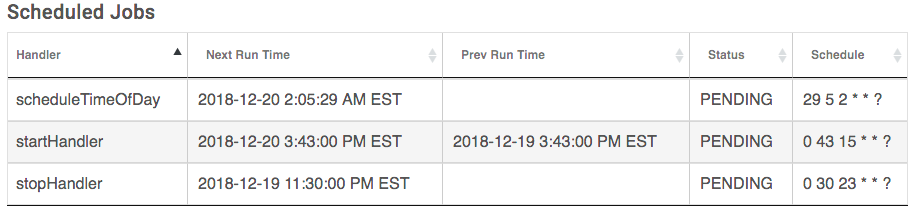
| + | Apps can schedule jobs to run, and the App Status page is one place you can see those for a particular app. (All scheduled jobs are also available from a special tab on the '''Logs''' page.) For example, if you have an app or rule scheduled to perform something at 6:15 AM every day, you will likely see a scheduled job here representing that information. (Different app developers may handle scheduling in different ways, so again this information is most likely to be useful if you are developing an app and need to see this information or are working with someone who is.) | ||
| − | *'''Handler''' is | + | *'''Handler''' is the name of the method (in the app code) that will execute when the scheduled job executes. |
| − | *'''Next Run Time''' | + | *'''Next Run Time''' represents the next scheduled execution of this job (when the handler will run). |
| − | *'''Prev Run Time''' will show the last time the | + | *'''Prev Run Time''' will show the last time the scheduled job executed (when the handler last ran). |
| − | *'''Status''' shows if the Job is ''PENDING'' or ''ACTIVE''. Typically, this will show ''PENDING''. | + | *'''Status''' shows if the Job is ''PENDING'' or ''ACTIVE''. Typically (as most wakes for scheduled jobs are short), this will show ''PENDING''. |
| − | *'''Schedule''' is the frequency of the job. Once, every ''x'' or a cron schedule are possible values. | + | *'''Schedule''' is the frequency of the job. Once, every ''x,'' or a cron schedule are possible values. |
[[File:App Status - Scheduled Jobs.png|none|thumb|600x600px|link=https://docs.hubitat.com/images/7/7e/App_Status_-_Scheduled_Jobs.png|alt=The "Scheduled Jobs" section of the App Status page shows the "Handler" in the first column. This is "what" will be triggered. In the second column is the "Next Run Time", which is when the "Handler" is scheduled to run. The "Previous Run Time" column shows when the handler last ran, and the Status column shows whether the job is "Pending" or "Active". Lastly, the "Schedule" column displays the frequency of the job.]] | [[File:App Status - Scheduled Jobs.png|none|thumb|600x600px|link=https://docs.hubitat.com/images/7/7e/App_Status_-_Scheduled_Jobs.png|alt=The "Scheduled Jobs" section of the App Status page shows the "Handler" in the first column. This is "what" will be triggered. In the second column is the "Next Run Time", which is when the "Handler" is scheduled to run. The "Previous Run Time" column shows when the handler last ran, and the Status column shows whether the job is "Pending" or "Active". Lastly, the "Schedule" column displays the frequency of the job.]] | ||
* | * | ||
Revision as of 03:45, 7 March 2022

The App Status page is where you will find detailed, read-only information about the internal data values of an app. This page is generally most useful for app developers or advanced users. The App Status page can be accessed by clicking the gear icon to the left of any app in the Apps list (under the "Info" column) or the same icon towards the upper right when inside the app.
.png)
Export/Import/Clone
Most apps can be duplicated (cloned), exported (for later import to this hub or another hub), or imported (from a previous export) using the buttons at the top of the App Status page.

The Export/Import/Clone button will take you to a screen where you can export, import, or clone the app:

- Export <app name>: clicking this button will take you to another page with a Download <app name>.json button, which can be clicked to download the exported app. This can be used to import the app on the same or different hub later from either this screen on the corresponding app or the Restore Apps feature on the Settings page.
- Import Apps: Click the Browse... button to locate and import a previously-exported .json file for any app. (Alternatively, this can be done from Settings > Restore Apps.)On the next screen, you will be given two options:
- Restore <app name>: Recommended only if restoring a deleted app to the same hub with the same devices; will use same devices (by internal ID or name) as specified in export. This will fail if the app exists, whether because the original was never deleted or a restore has already been performed.
- Import <app name>: Recommended for all other cases; will offer option to replace devices in export with new/different devices before importing.
- Clone <app name>: clicking this button (and then Clone... on the next page) will create a second copy of this app and will offer the option to replace devices with new/different devices before creating the new copy. This is effectively the same result as an export and then import (without the need to download and upload the export file).
When you are finished doing the export/import/clone operation you want, hitting the Done button takes you to the Apps page. You can also use the back button in your browser to return you to whatever page you were on before opening the utility.
WARNING: Do not open Export/Import/Clone utility in more than a single browser window/tab at one time. There is a single instance of the utility for all apps, and it knows the context from which it was launched. If you launch multiple windows/tabs, an error may result.
ettings
These are the values for what is set inside the application--the inputs, checkboxes, enums (drop-downs), and device selections. This shows all specified settings for the app, but all settings may not always contain a value. These names and values provide a read-only view into one the app's internal data structures and may be most useful if you are developing this app or working with the developer to troubleshoot an issue.
- App Title is shown at the top of the App Status page. It may also show the state for certain apps, "Armed" or "Disarmed" for Hubitat Safety Monitor or "Paused" for Rule Machine rules.
- Name is a list of the setting/input name (as determined by the app code)
- Type shows the type specified for the setting/input (as determined by the app code)
- Value displays the currently selected value (generally from user input) for the specified setting/input. For example, if an app allows you to select a dimmer to turn on or off, the selected dimmer(s) should appear as the value for one or more settings in this list.
Event Subscriptions
Apps can subscribe to events, which will cause the app to "wake" and execute the specified handler (a method name as determined internally by the app code; again, this is generally most useful if you are developing the app or troubleshooting with a developer).
- Source for the Event Subscription might be a device, mode, location, etc.
- Event is what has been subscribed to, for example, an event (attribute) name.
- Handler is the method inside the code that will be called when the event is triggered.
- Filter refers to whether the developer specified that events that do not result in a state change should be filtered out (
true, the default value) or not (false).

Application State
This represents a location apps can use for internal data storage. Anything the developer writes to state or atomicState will show up here as a with values under the Name and Value columns. (Again, this information is generally most useful if you are developing an application and need a way to see this information or are troubleshooting with a developer who asks for this information.)
Scheduled Jobs
Apps can schedule jobs to run, and the App Status page is one place you can see those for a particular app. (All scheduled jobs are also available from a special tab on the Logs page.) For example, if you have an app or rule scheduled to perform something at 6:15 AM every day, you will likely see a scheduled job here representing that information. (Different app developers may handle scheduling in different ways, so again this information is most likely to be useful if you are developing an app and need to see this information or are working with someone who is.)
- Handler is the name of the method (in the app code) that will execute when the scheduled job executes.
- Next Run Time represents the next scheduled execution of this job (when the handler will run).
- Prev Run Time will show the last time the scheduled job executed (when the handler last ran).
- Status shows if the Job is PENDING or ACTIVE. Typically (as most wakes for scheduled jobs are short), this will show PENDING.
- Schedule is the frequency of the job. Once, every x, or a cron schedule are possible values.