Difference between revisions of "Care and Maintenance"
(Updates for 2.3.1) |
(Updates for 2.3.1) (Tag: Visual edit) |
||
| Line 8: | Line 8: | ||
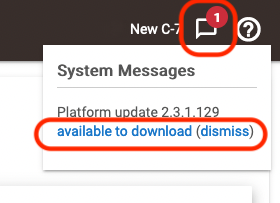
#<big>If a notification is shown in the message center, check to see if a platform update is available for your hub.</big>[[File:System message - Platform update available.png|none|thumb|262x262px|link=https://docs.hubitat.com/images/a/ad/System_message_-_Platform_update_available.png |alt=The message center at the top right of your browser window will indicate if a hub update is available.]] | #<big>If a notification is shown in the message center, check to see if a platform update is available for your hub.</big>[[File:System message - Platform update available.png|none|thumb|262x262px|link=https://docs.hubitat.com/images/a/ad/System_message_-_Platform_update_available.png |alt=The message center at the top right of your browser window will indicate if a hub update is available.]] | ||
| − | #<big>Select '''Settings''' in the sidebar of your hub and press the '''Check for Updates''' | + | #<big>Select '''Settings''' in the sidebar of your hub and press the '''Check for Updates''' item.</big>[[File:Check for updates 3.0.png|none|thumb|600x600px|link=https://docs.hubitat.com/images/f/fd/Check_for_updates_3.0.png |alt=Even if the system messages doesn't show an indication, you can check for the most recently available hub platform update by pressing the "Check for Updates" card on the Settings page of your hub.]] |
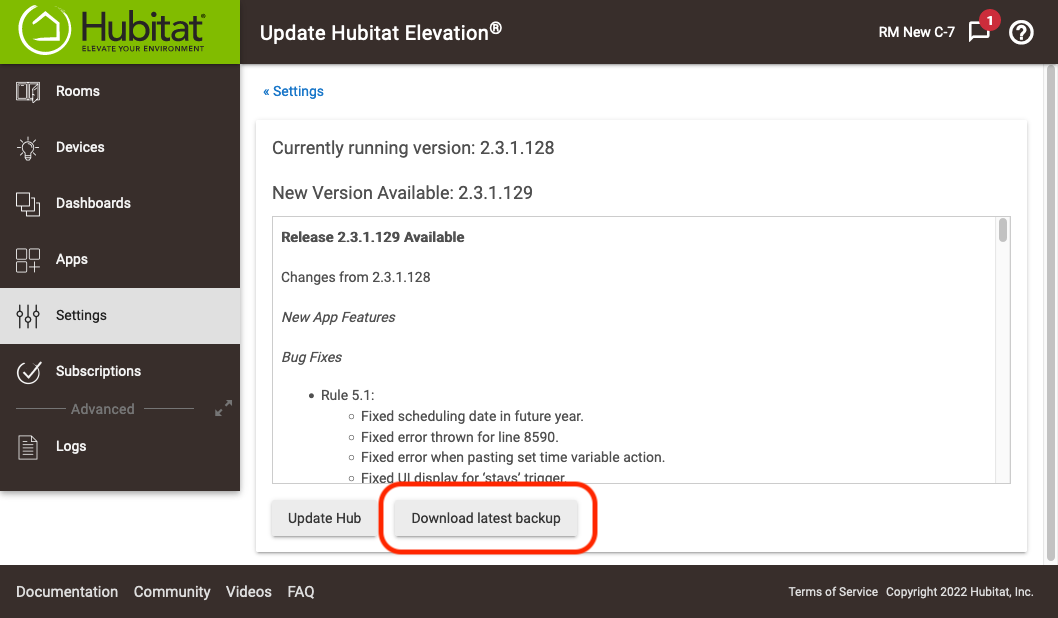
#<big>It's recommended that you first download a backup of your current database '''before''' updating the hub.</big> | #<big>It's recommended that you first download a backup of your current database '''before''' updating the hub.</big> | ||
#*<big>'''NOTE''': It is not mandatory that you update your hub. The choice is yours alone. If you choose to update, you can view the release notes in the update window or at a later time by visiting the Platform [[Release Notes]].</big>[[File:Download lasted backup before update.png|none|thumb|600x600px|link=https://docs.hubitat.com/images/6/6c/Download_lasted_backup_before_update.png |alt=If an update is available, you will be presented with the currently installed hub platform version, the new version that is now available, and release notes. Pressing the "Update Hub" button in this window will start the update. However, it is recommended that you first press the "Download Latest Backup" button just to the right of the "Update Hub" button. This will ensure that you have a local backup of your hub database readily available if anything should not function as expected during or following the hub platform update. ]] | #*<big>'''NOTE''': It is not mandatory that you update your hub. The choice is yours alone. If you choose to update, you can view the release notes in the update window or at a later time by visiting the Platform [[Release Notes]].</big>[[File:Download lasted backup before update.png|none|thumb|600x600px|link=https://docs.hubitat.com/images/6/6c/Download_lasted_backup_before_update.png |alt=If an update is available, you will be presented with the currently installed hub platform version, the new version that is now available, and release notes. Pressing the "Update Hub" button in this window will start the update. However, it is recommended that you first press the "Download Latest Backup" button just to the right of the "Update Hub" button. This will ensure that you have a local backup of your hub database readily available if anything should not function as expected during or following the hub platform update. ]] | ||
| Line 61: | Line 61: | ||
#<big>Select '''Settings''' in the sidebar of your hub.</big> | #<big>Select '''Settings''' in the sidebar of your hub.</big> | ||
| − | #<big> | + | #<big>Select the '''Backup and Restore''' item.</big>[[File:Backup and Restore card 3.0.png|none|thumb|600x600px|link=https://docs.hubitat.com/images/f/fd/Backup_and_Restore_card_3.0.png |alt=To begin a restore of your hub database, press the "Backup and Restore" card found on the Settings page of your hub.]] |
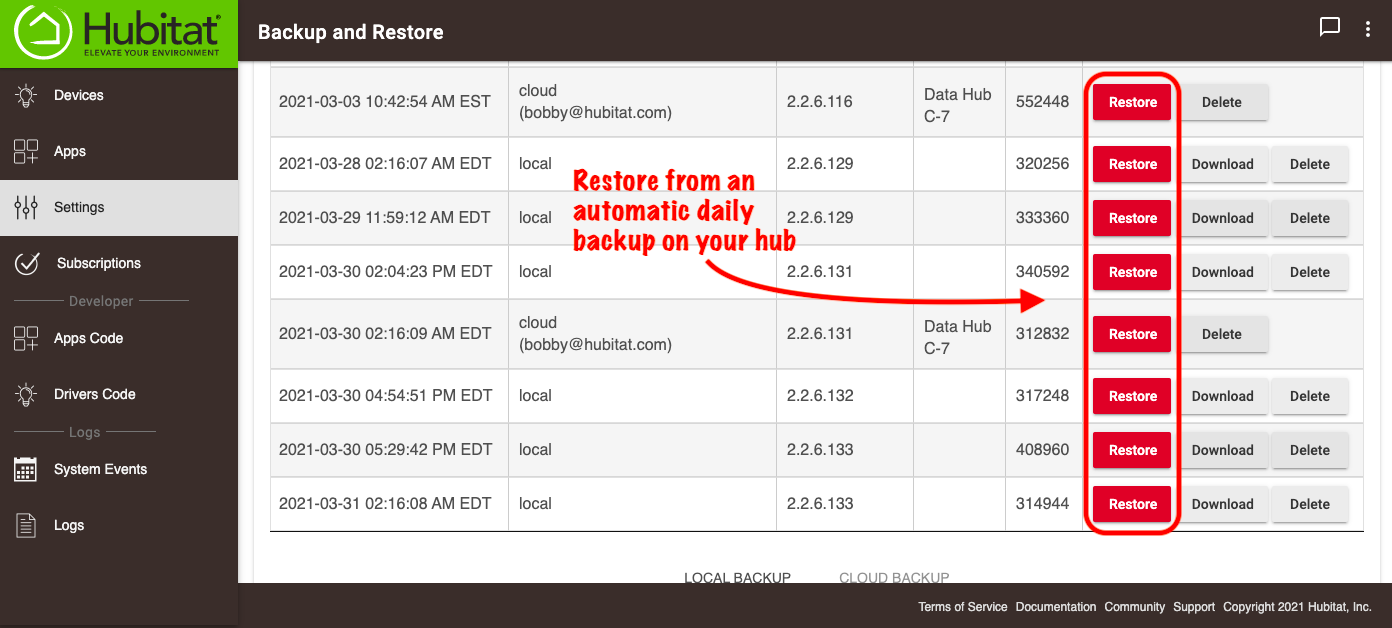
#<big>If you want to restore from one of the automatic backup files, select the '''Restore''' button for the database backup you want to restore to your hub.</big>[[File:Restore from backup on hub 3.0.png|none|thumb|600x600px|link=https://docs.hubitat.com/images/5/57/Restore_from_backup_on_hub_3.0.png |alt=There is a "Restore" button on the right, in the list of hub backups. These backups are either stored on the hub itself, or if you have a Hub Protect subscription, then they are stored in the Hubbitat cloud. Pressing one of them will automatically restore that database snapshot, and your hub will revert to the state if was in at the time of that backup.]] | #<big>If you want to restore from one of the automatic backup files, select the '''Restore''' button for the database backup you want to restore to your hub.</big>[[File:Restore from backup on hub 3.0.png|none|thumb|600x600px|link=https://docs.hubitat.com/images/5/57/Restore_from_backup_on_hub_3.0.png |alt=There is a "Restore" button on the right, in the list of hub backups. These backups are either stored on the hub itself, or if you have a Hub Protect subscription, then they are stored in the Hubbitat cloud. Pressing one of them will automatically restore that database snapshot, and your hub will revert to the state if was in at the time of that backup.]] | ||
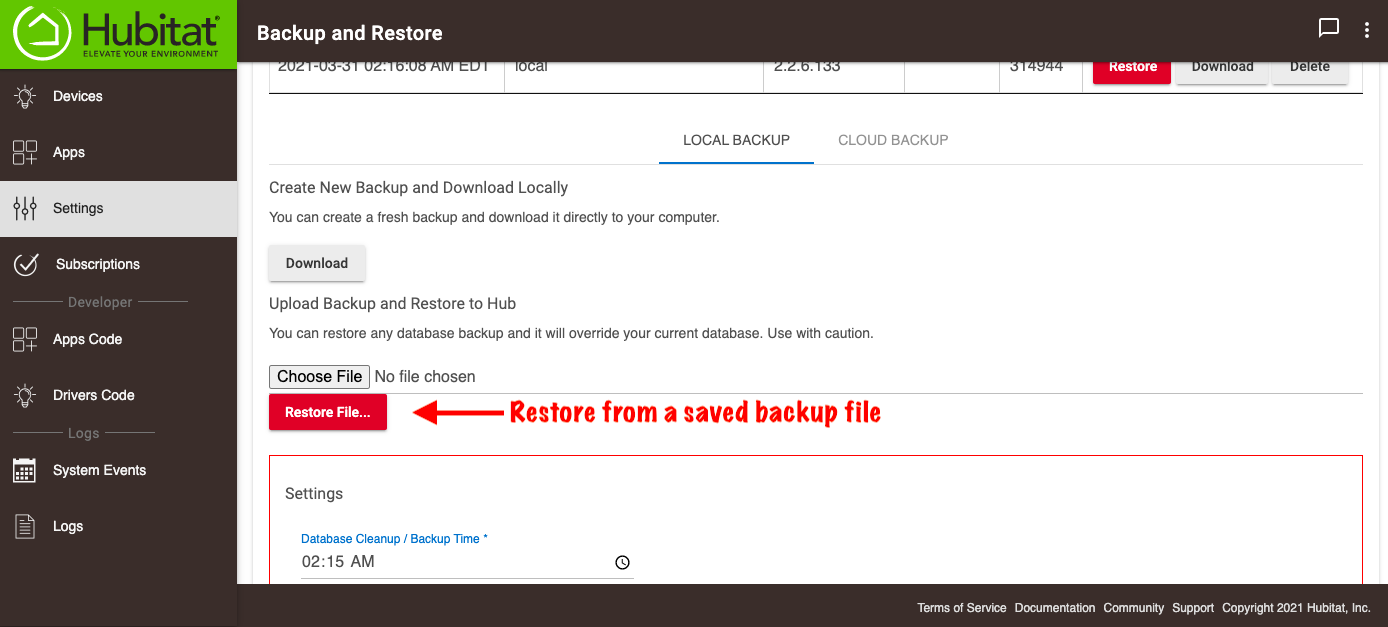
#<big>If you want to restore the hub database from a backup file saved on your computer, select the '''Restore File''' button and choose the backup file you want to use.</big>[[File:Restore from locally saved backup 3.0.png|none|thumb|600x600px|link=https://docs.hubitat.com/images/9/98/Restore_from_locally_saved_backup_3.0.png |alt=If you have a database backup file stored locally on your computer, you can press the "Choose file" button on the left side of the Backup and Restore page to select the file, then press the "Restore file" button to begin restoring your hub database to the state that it was in at the time the backup file you have selected was saved. ]] | #<big>If you want to restore the hub database from a backup file saved on your computer, select the '''Restore File''' button and choose the backup file you want to use.</big>[[File:Restore from locally saved backup 3.0.png|none|thumb|600x600px|link=https://docs.hubitat.com/images/9/98/Restore_from_locally_saved_backup_3.0.png |alt=If you have a database backup file stored locally on your computer, you can press the "Choose file" button on the left side of the Backup and Restore page to select the file, then press the "Restore file" button to begin restoring your hub database to the state that it was in at the time the backup file you have selected was saved. ]] | ||
| − | #<big>Confirm the restore selection, and your Hubitat Elevation hub will return to the previously saved state.</big>__FORCETOC__ | + | #<big>Confirm the restore selection, and your Hubitat Elevation hub will return to the previously saved state.</big> __FORCETOC__<big>This may take a few minutes, and your hub will reboot when the process is complete.</big> |
Revision as of 03:13, 25 March 2022

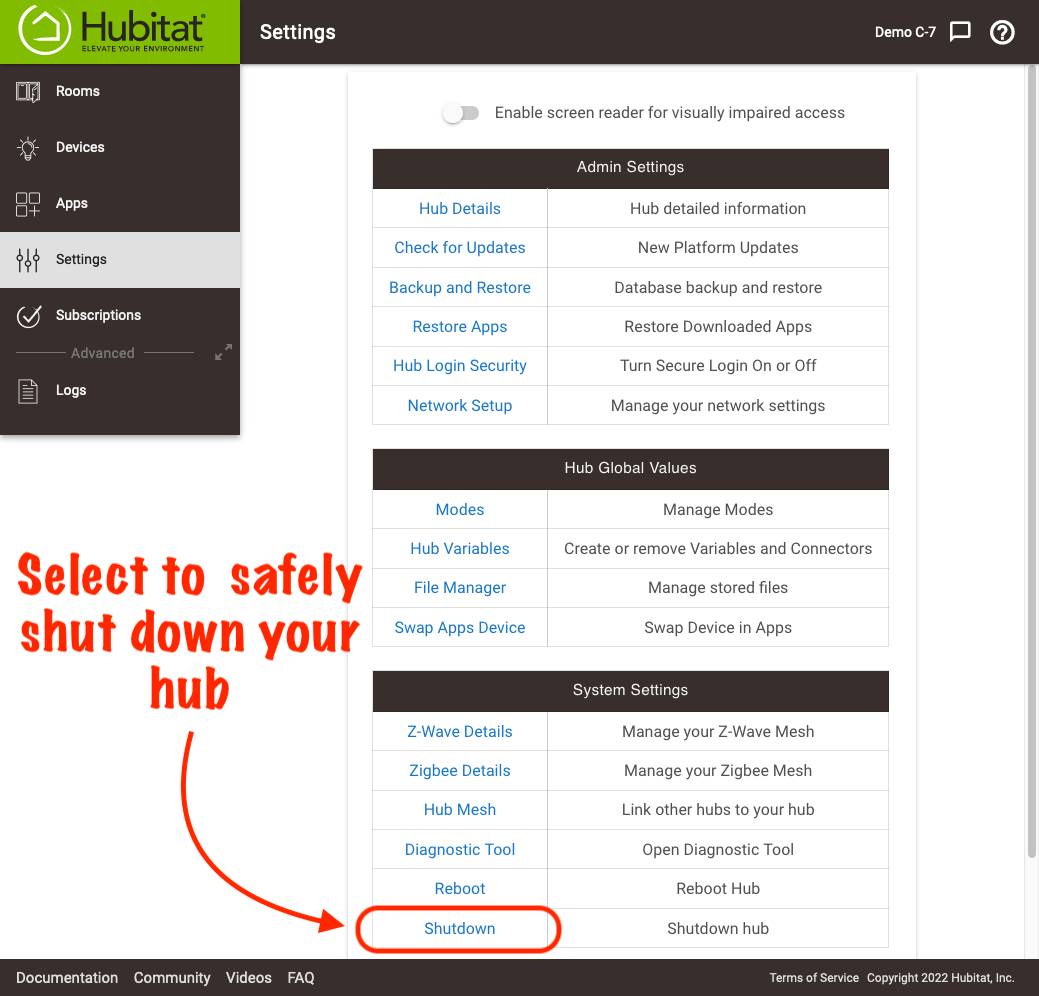
It is important to remember that your Hubitat Elevation hub is a computer and should be treated as such. This means you must shut down your hub down safely using Shutdown Hub from the Settings page, keep it updated with the latest platform updates, and store backups locally on a regular basis.
Because of our belief in local processing and maintaining your personal privacy, Hubitat Elevation does not push updates onto your hub. It is strongly recommended you regularly update your hub with the latest software so you will always have the latest features and security protection.
Contents
How to update your hub
- If a notification is shown in the message center, check to see if a platform update is available for your hub.
- Select Settings in the sidebar of your hub and press the Check for Updates item.
- It's recommended that you first download a backup of your current database before updating the hub.
- NOTE: It is not mandatory that you update your hub. The choice is yours alone. If you choose to update, you can view the release notes in the update window or at a later time by visiting the Platform Release Notes.
- NOTE: It is not mandatory that you update your hub. The choice is yours alone. If you choose to update, you can view the release notes in the update window or at a later time by visiting the Platform Release Notes.
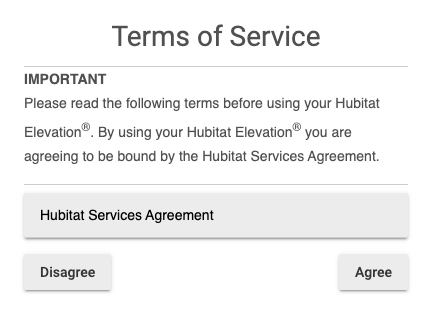
- Accept the Terms of Service.
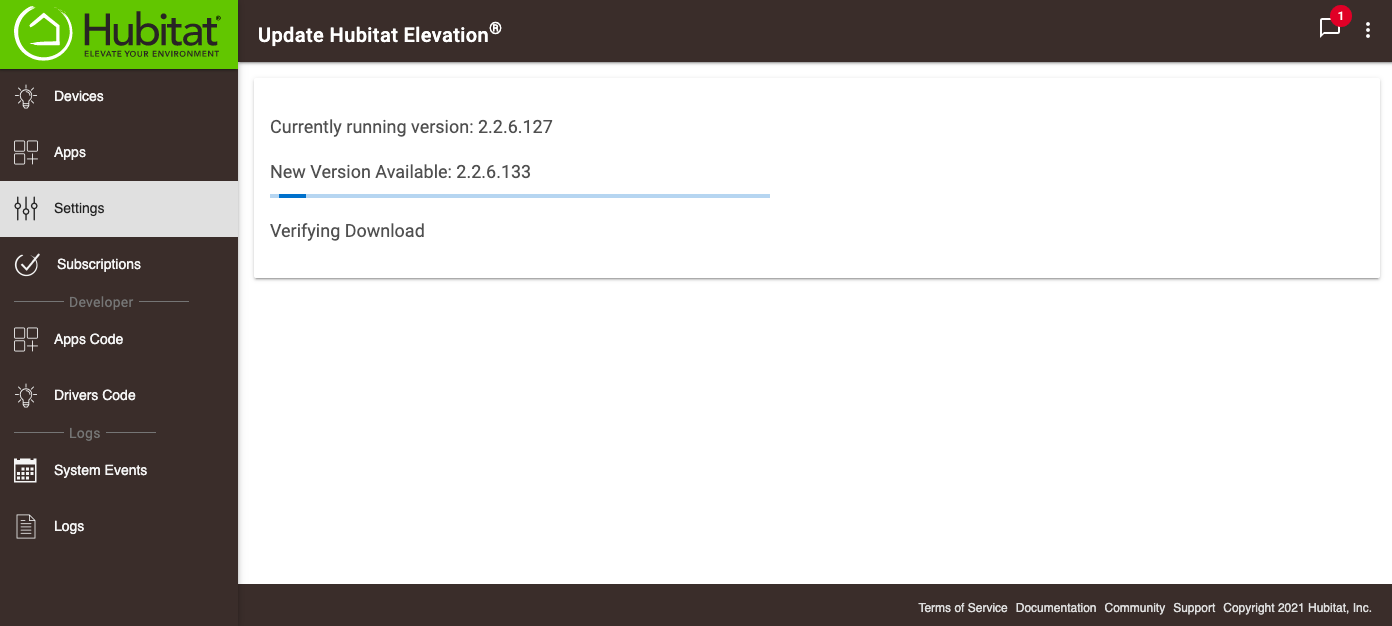
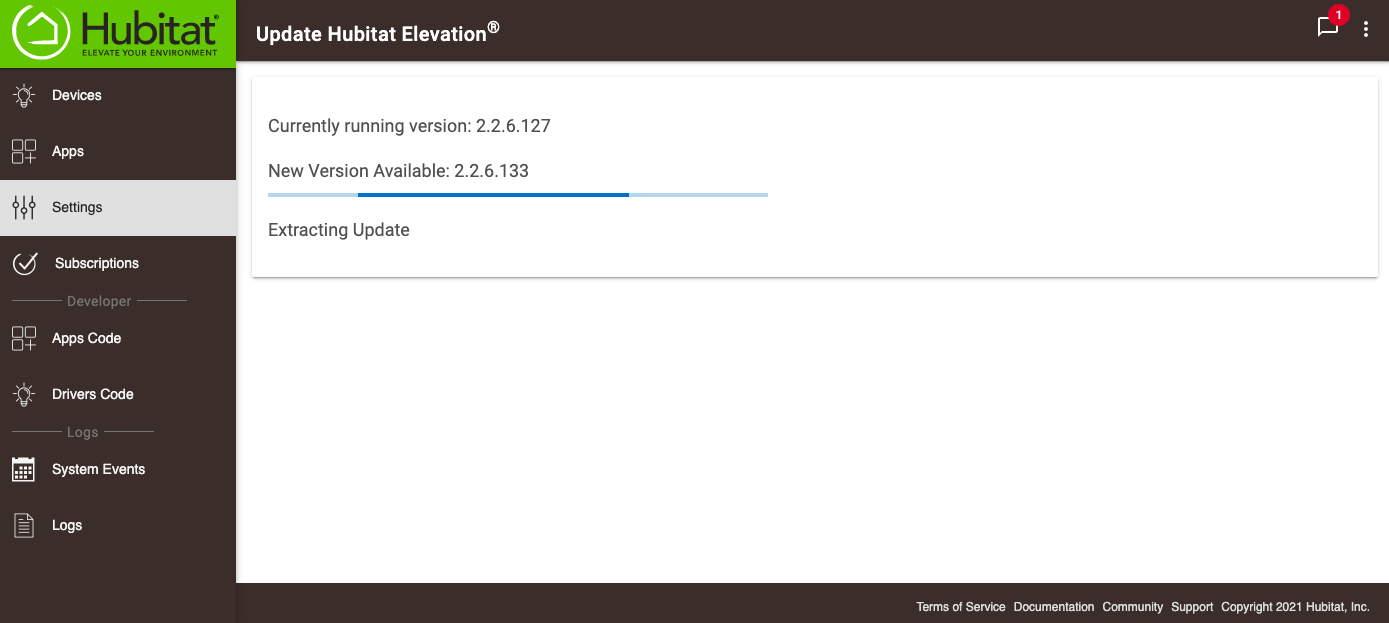
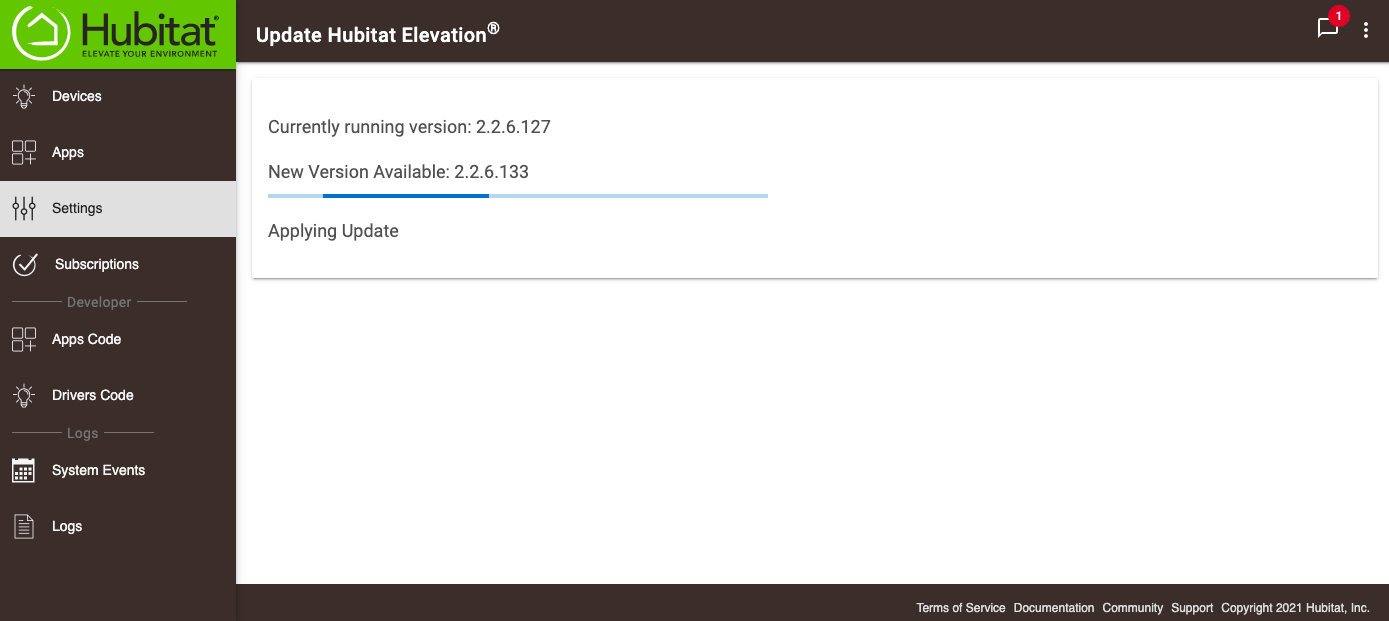
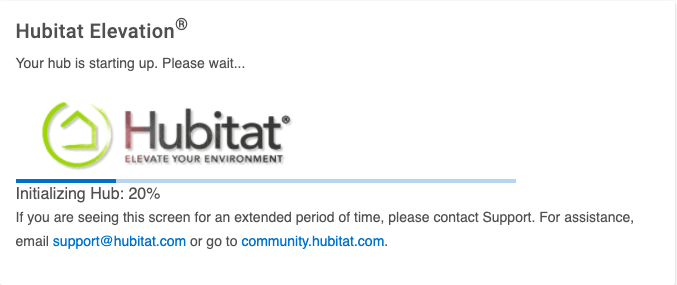
- Your hub will go through the installation process automatically. This process may take several minutes. When the install is complete, your hub will restart.


How to Shut Down Your Hub
Occasionally you may want to move your hub or power it down. It is important to shut it down properly to keep it running smoothly when you power it back up. Here’s how:
- Go to the Settings page of your hub.
- Select Shutdown Hub.
- Wait until the LED on your hub turns Red. It is now safe to unplug your hub. To restart your hub, simply plug it back in and wait for the LED to turn Green.
How to Reboot Your Hub
If your hub is not performing as expected, there's a good chance that a reboot may be required. To reboot properly:
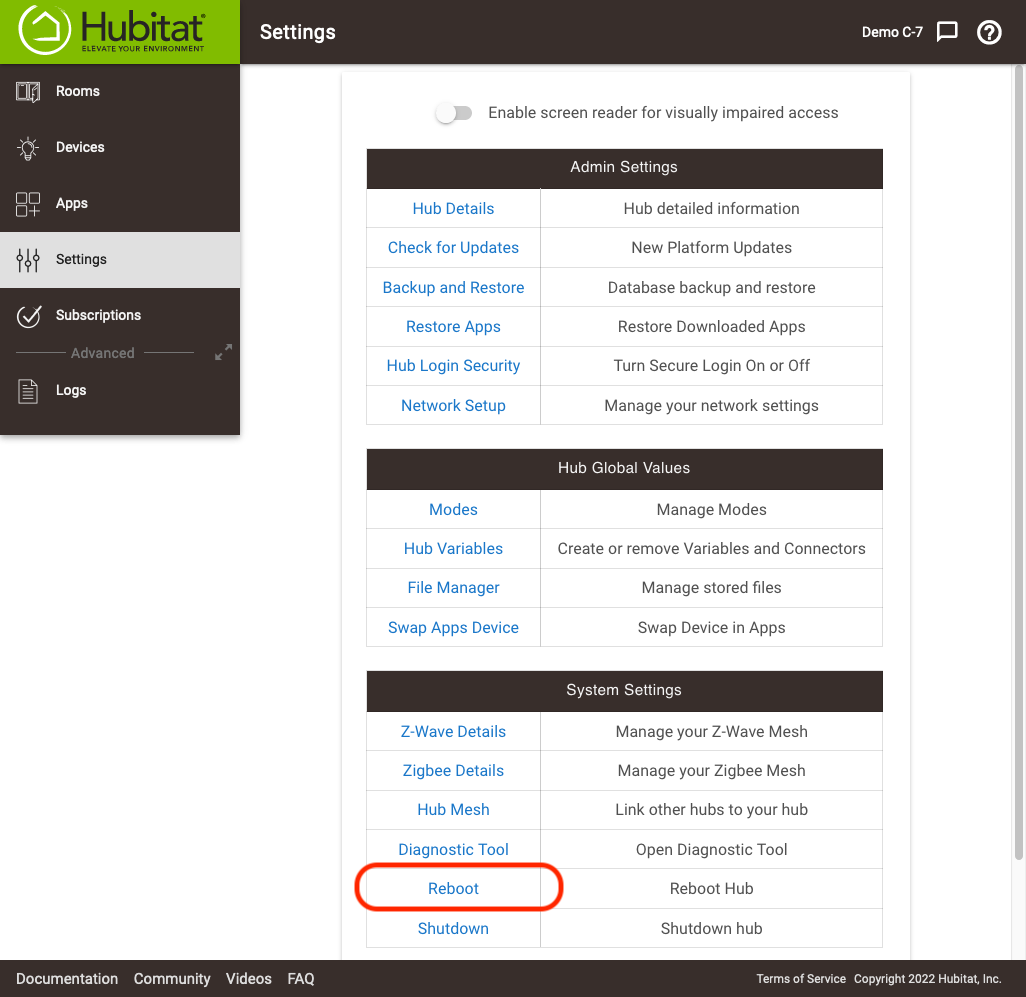
- Go to the Settings page of your hub.
- Choose Reboot Hub.
- You will be asked to confirm the reboot. The hub will then automatically cycle through its rebooting process. After a few minutes, hit refresh on your browser and you'll be back in business.
Backup your hub
Local Backup
Your Hubitat Elevation hub automatically generates a backup every day at 2:15am by default, in your local time zone. These backups are stored on the hub for 5 days. After making changes to your hub (adding devices, automations, etc.), it is a good idea to save a manual backup to your computer or the cloud.
- NOTE: You may backup and restore files from a local disk anytime, but manual and automatic backup to the Hubitat cloud, including restore from cloud backup and Z-Wave radio migration requires a Hub Protect subscription.
- Backup includes the hub database only. It does not backup files you have uploaded to your hub with File Manager. Please be sure you backup these files manually.
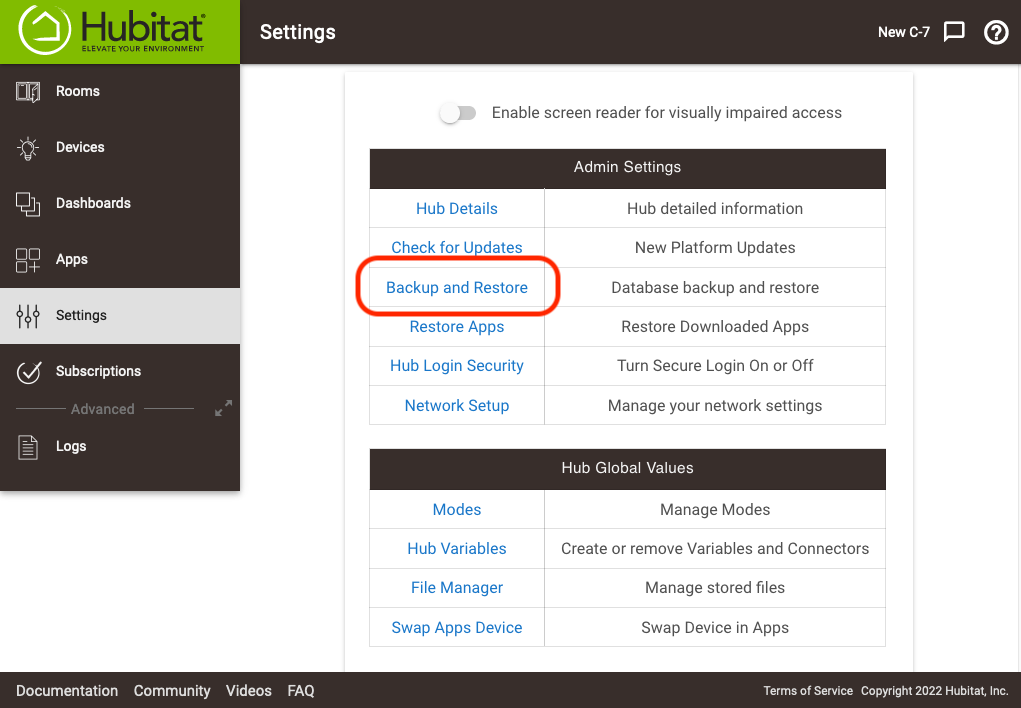
- Select Settings in the sidebar of your hub.
- Select the Backup and Restore item.
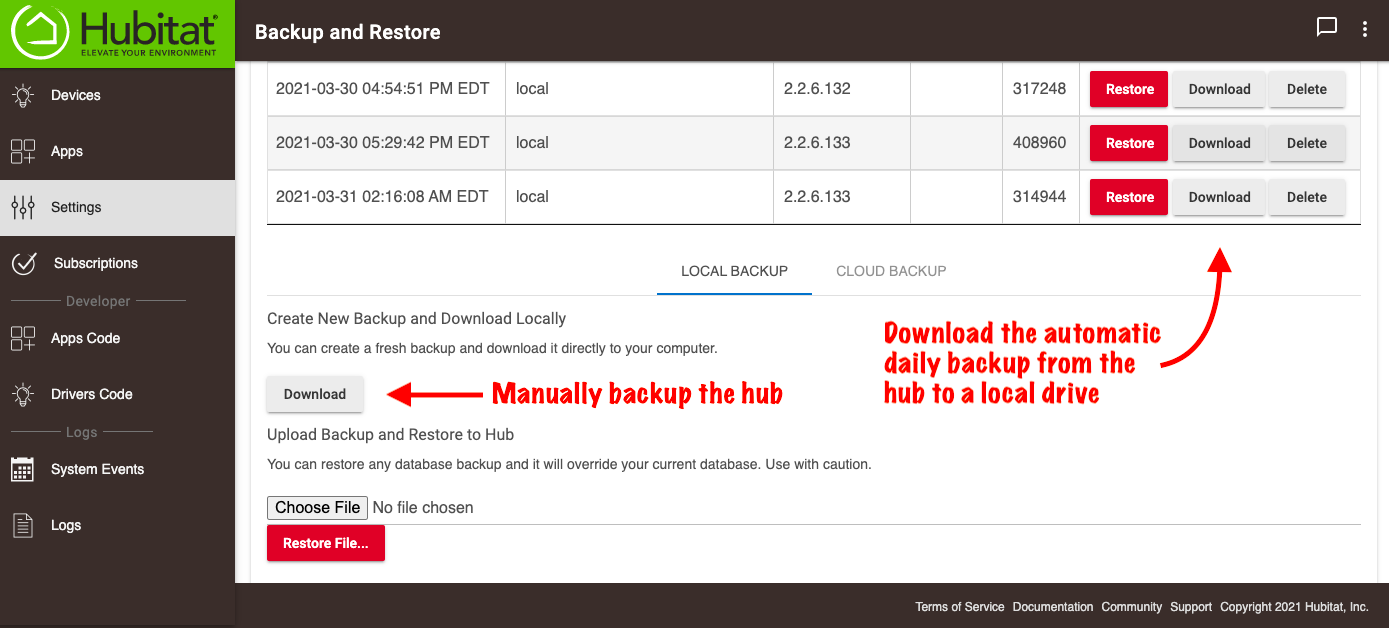
- Select the Download button under the Create New Backup and Download Locally section (you can also download any of the automatic backups that have been stored). The backup will be saved on your computer, which can be uploaded later to restore your hub to a previous state if you desire.
- You may set the time for when database maintenance and backup to take place.
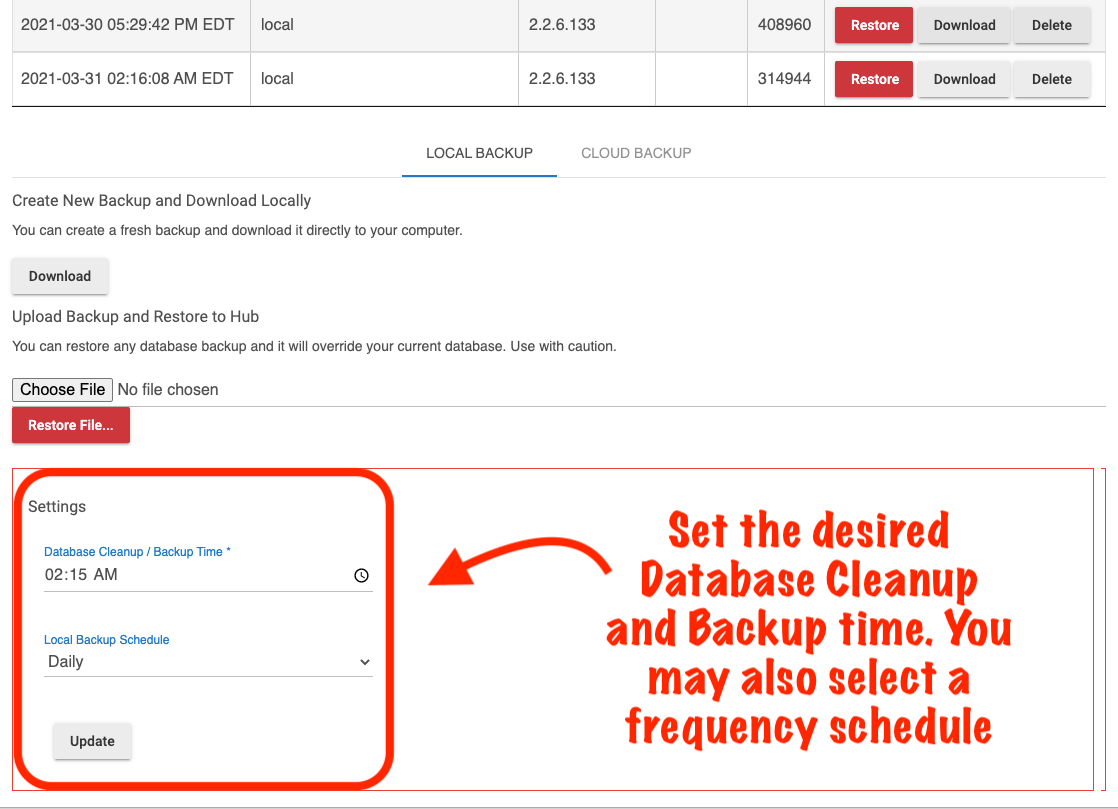
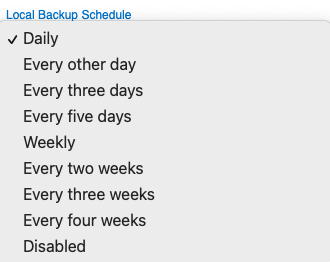
- You may also set the frequency for automatic backups.
Cloud Backup
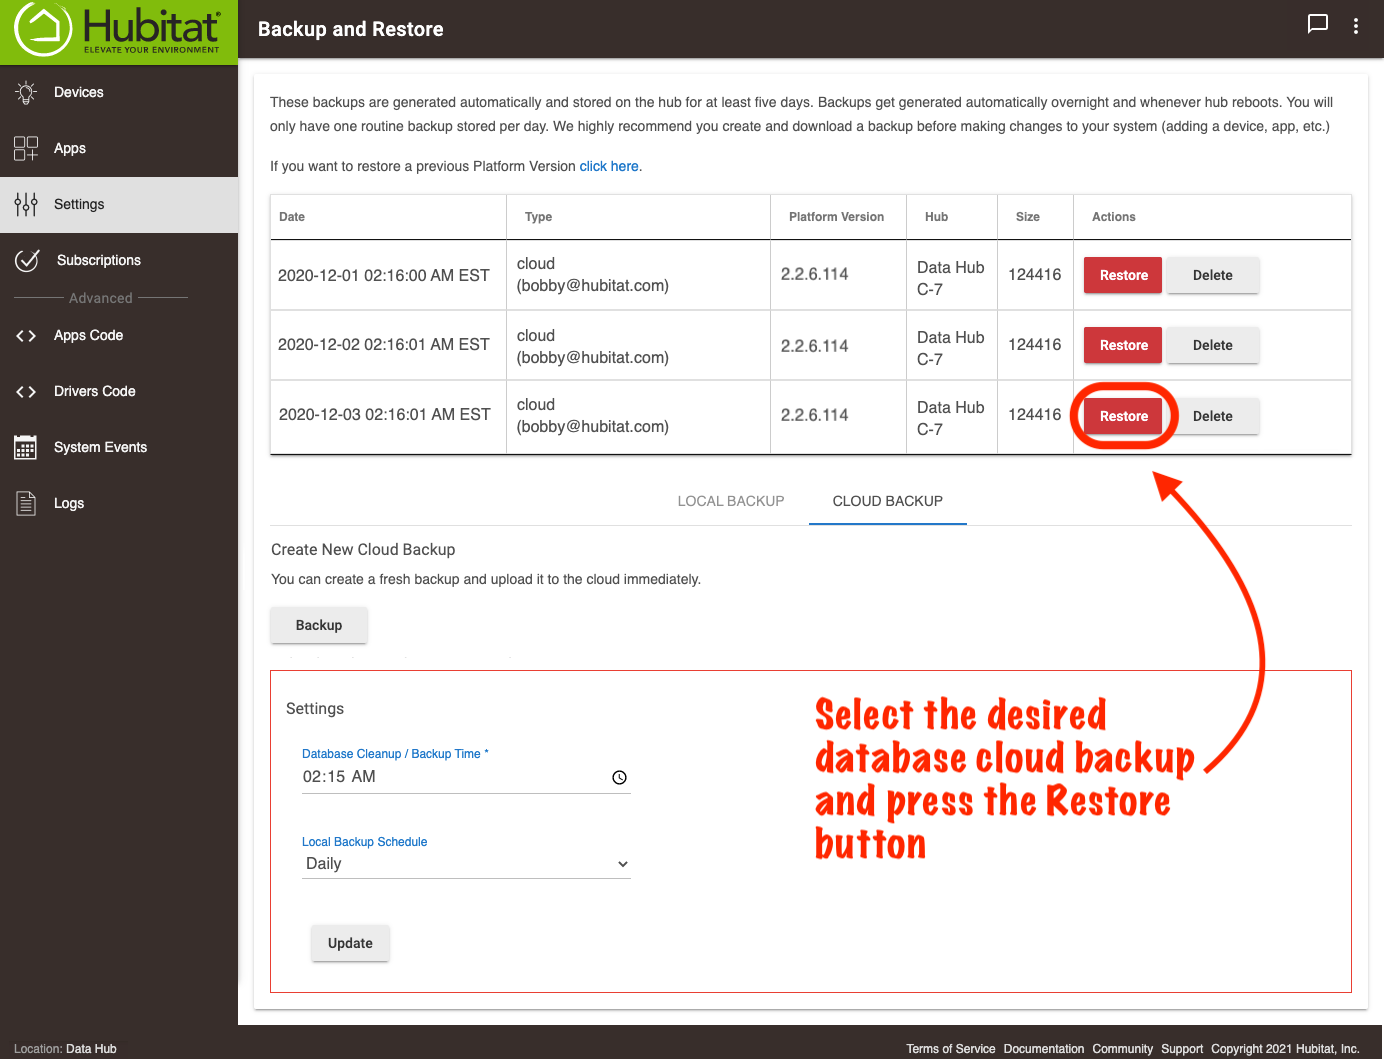
With a Hub Protect subscription, you may set the time for when database maintenance and backup to the cloud will occur.
NOTE: Backup includes the hub database only. It does not backup files you have uploaded to your hub with File Manager. Please be sure you backup these files manually.
- Set the desired time for the database maintenance and backup.
- You may also set the frequency of your cloud backups.
- To restore your Hub Protect database backups, simply press the Restore button.
- If you would like to manually backup the current database with Hub Protect, just press the Backup button.


How to restore from Local Backup
If you have made changes to your hub and want to go back to a previous saved backup, Hubitat Elevation makes it easy.
- Select Settings in the sidebar of your hub.
- Select the Backup and Restore item.
- If you want to restore from one of the automatic backup files, select the Restore button for the database backup you want to restore to your hub.
- If you want to restore the hub database from a backup file saved on your computer, select the Restore File button and choose the backup file you want to use.
- Confirm the restore selection, and your Hubitat Elevation hub will return to the previously saved state. This may take a few minutes, and your hub will reboot when the process is complete.