Difference between revisions of "Registration and setup"
m (™ change) |
(Images and text changed for 2.0 update) (Tag: Visual edit) |
||
| Line 1: | Line 1: | ||
Before you can begin automating your hub, you must complete the setup and registration process. | Before you can begin automating your hub, you must complete the setup and registration process. | ||
| − | + | ==='''Connect Your Hub'''=== | |
| − | =='''Connect Your Hub'''== | ||
| − | |||
#Insert the USB stick (grey side up) into either USB slot. | #Insert the USB stick (grey side up) into either USB slot. | ||
| Line 12: | Line 10: | ||
[[File:Hub_Setup.jpg|400px]] | [[File:Hub_Setup.jpg|400px]] | ||
| + | ==='''Register Your Hub'''=== | ||
| − | + | #Visit <nowiki>portal.hubitat.com*</nowiki> and login. | |
| − | |||
| − | |||
| − | |||
| − | #Visit <nowiki>portal.hubitat.com*</nowiki> and | ||
#Your new Hub should appear in the Hubitat Elevation™ list. | #Your new Hub should appear in the Hubitat Elevation™ list. | ||
#Click the ''Register Hub'' button to link your Hub to your account. | #Click the ''Register Hub'' button to link your Hub to your account. | ||
| − | #Wait for registration to complete | + | #Wait for registration to complete, you will be taken to the ''Get Started'' page. |
| − | #:[[File: | + | #:[[File:Hubitat Elevation get started 2.0.png|600x600px]] |
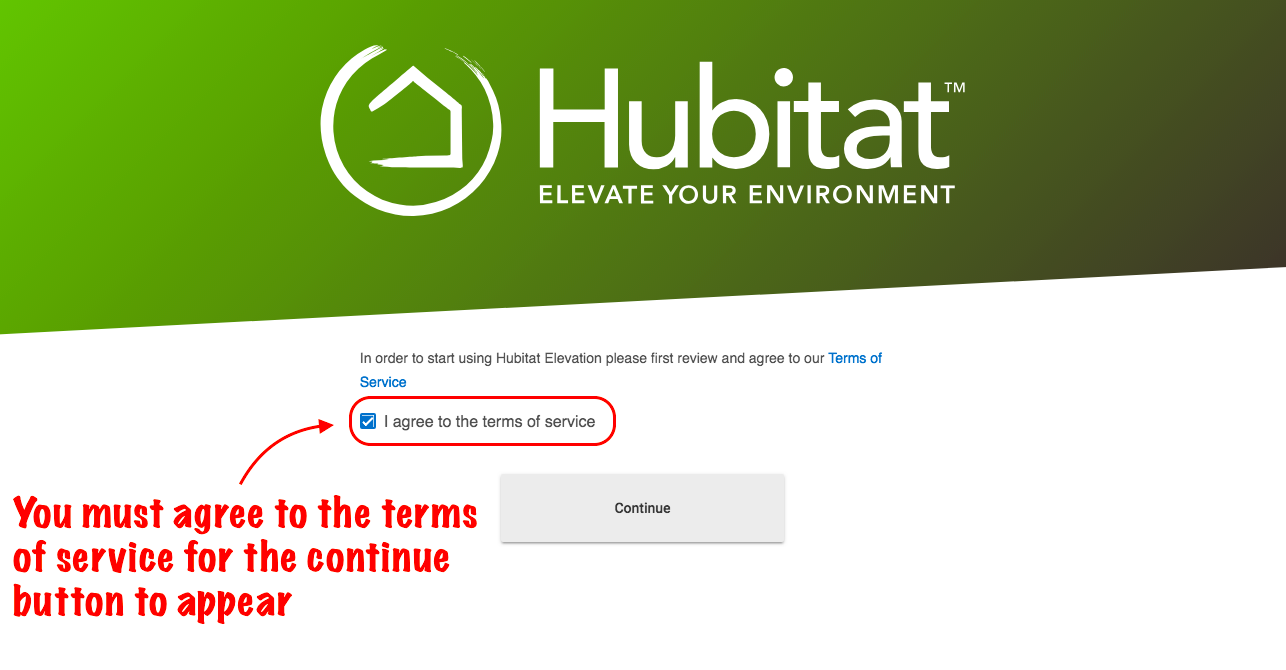
| − | #Next you will be taken to the | + | #Next you will be taken to the Terms of Service Page. You must check the box for the ''Continue'' button to appear.[[File:Agree to TOS screen 2.0.png|600x600px]] |
| − | + | #The following screens introduce your new Hubitat Elevation™. These are optional and may be skipped, but if this is your first time using Hubitat Elevation™, you are encouraged to review the introduction to learn about the hub platform features.[[File:Welcome to HE preview screen 2.0.png|left|thumb|400x400px]][[File:Devices discovery preview 2.0.png|none|thumb|375x375px]][[File:Apps registration preview 2.0.png|left|thumb|426x426px]][[File:Registration Settings preview 2.0.png|none|thumb|395x395px]][[File:Docs and support 2.0.png|none|thumb|400x400px]] | |
| − | # | + | #Lastly, enter a name for your hub or location, along with your postal code, then select ''Save and Exit to Main Menu'' |
| − | # | + | #You will now be taken to the Hubitat Elevation™ Main Menu of your Web Interface. Now that your hub is registered, you can begin adding devices and apps, setup modes and build rules in our various included apps. |
<nowiki>* Your computer must be on the same Local Area Network as your hub in order to register and access the Web Interface.</nowiki> | <nowiki>* Your computer must be on the same Local Area Network as your hub in order to register and access the Web Interface.</nowiki> | ||
Revision as of 23:59, 15 November 2018
Before you can begin automating your hub, you must complete the setup and registration process.
Connect Your Hub
- Insert the USB stick (grey side up) into either USB slot.
- Connect your Hub to your network using the included Ethernet cable.
- Plug in your Hub using the included 5V power supply. There is no power switch; once you plug in your up it is powered up and you are ready to register your hub.
Note: you can improve the performance of your hub by placing it in a central location, free from metal obstructions.

Register Your Hub
- Visit portal.hubitat.com* and login.
- Your new Hub should appear in the Hubitat Elevation™ list.
- Click the Register Hub button to link your Hub to your account.
- Wait for registration to complete, you will be taken to the Get Started page.
- Next you will be taken to the Terms of Service Page. You must check the box for the Continue button to appear.
- The following screens introduce your new Hubitat Elevation™. These are optional and may be skipped, but if this is your first time using Hubitat Elevation™, you are encouraged to review the introduction to learn about the hub platform features.
- Lastly, enter a name for your hub or location, along with your postal code, then select Save and Exit to Main Menu
- You will now be taken to the Hubitat Elevation™ Main Menu of your Web Interface. Now that your hub is registered, you can begin adding devices and apps, setup modes and build rules in our various included apps.


* Your computer must be on the same Local Area Network as your hub in order to register and access the Web Interface.